
Access
Connect cross-platform accounts & identity management
Get a 360 view on game health by combining crash reporting, performance analytics, build quality and binary distributtion into one toolbox
Matchmaking allows parties to be paired to compete against each other in your game. With AccelByte matchmaking services, you can create your own matchmaking rules (MMR) for how parties are matched. MMR are used to determine how parties are matched up under ideal conditions. You can also create flex rules, which dictate how to match parties when ideal matches aren’t possible. These flex rules usually include time limits for the matchmaking process, to ensure that players don’t have to wait too long to play your game.
Like our Party services, Matchmaking uses WebSocket to ensure real-time updates for players. Here’s the basic flow of our matchmaking service:
Players need to be in a party to use matchmaking. The Matchmaking service supports parties with single users or multiple users, and also supports matching parties with an asymmetrical number of users, e.g. a party with 1 user vs. a party with 3 users. You can configure all of the matchmaking rules in our Admin Portal.
Before implementing the Matchmaking service, you need to define the Statistics that will be used by the Matchmaking service to match players together.
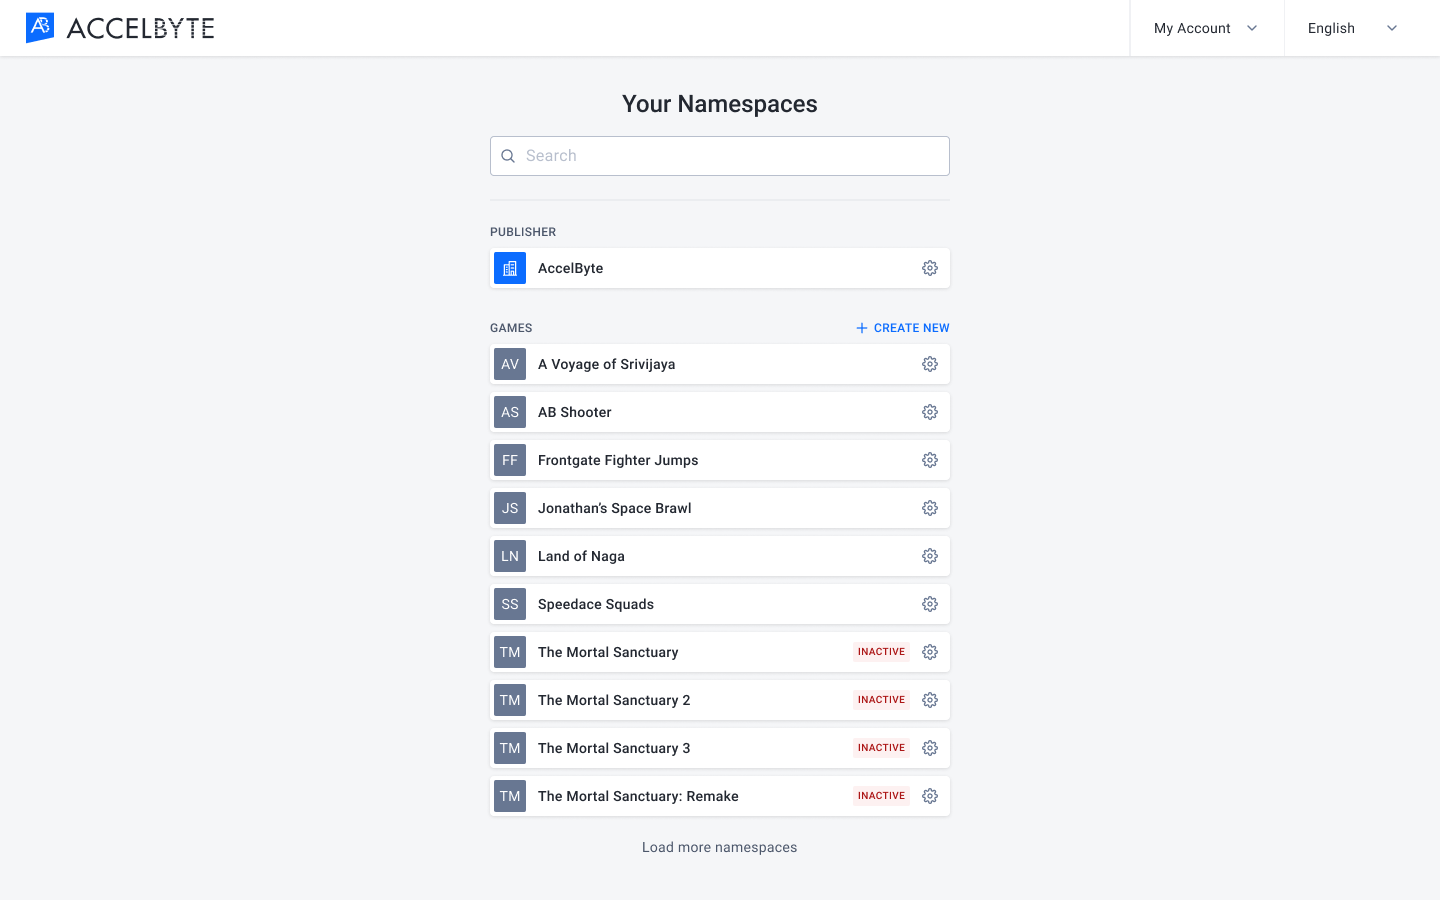
In the Admin Portal, choose the target game namespace.
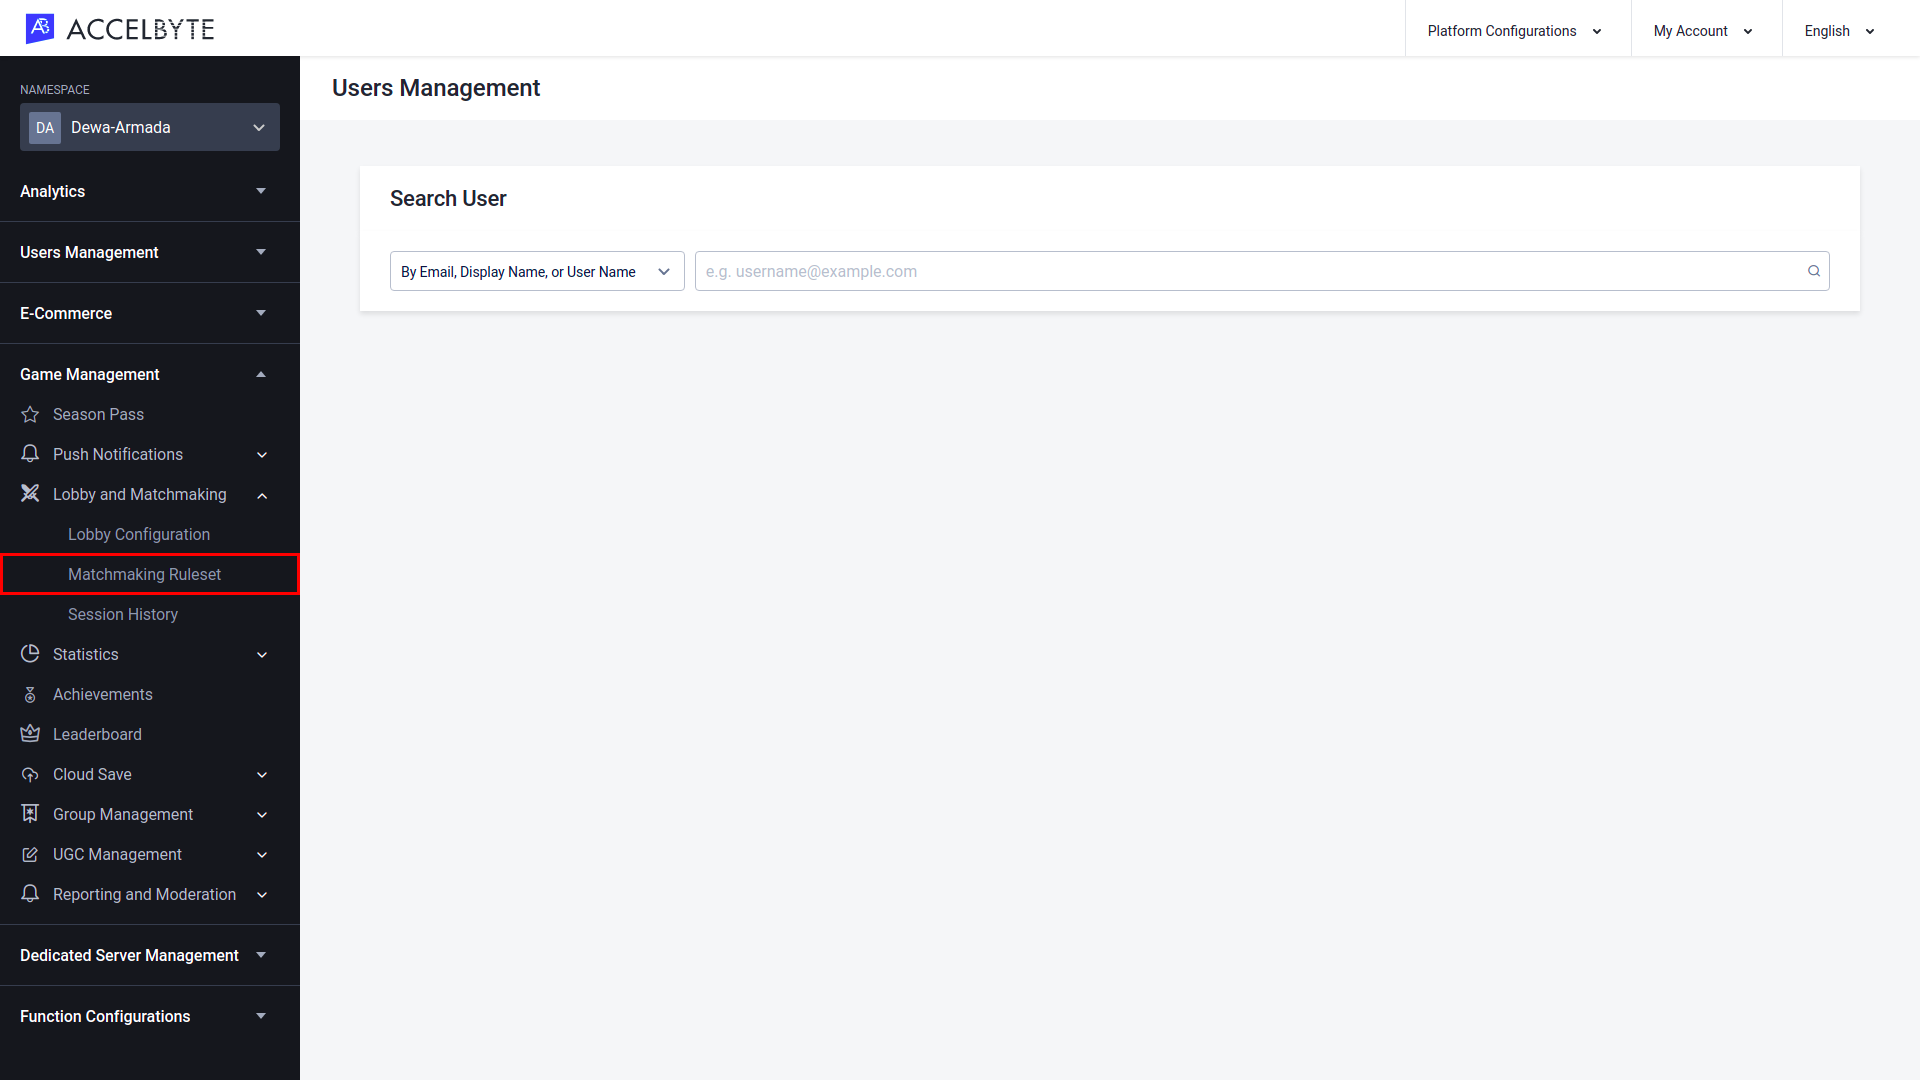
In the Game Management section, open the Lobby and Matchmaking section and click Matchmaking Ruleset.
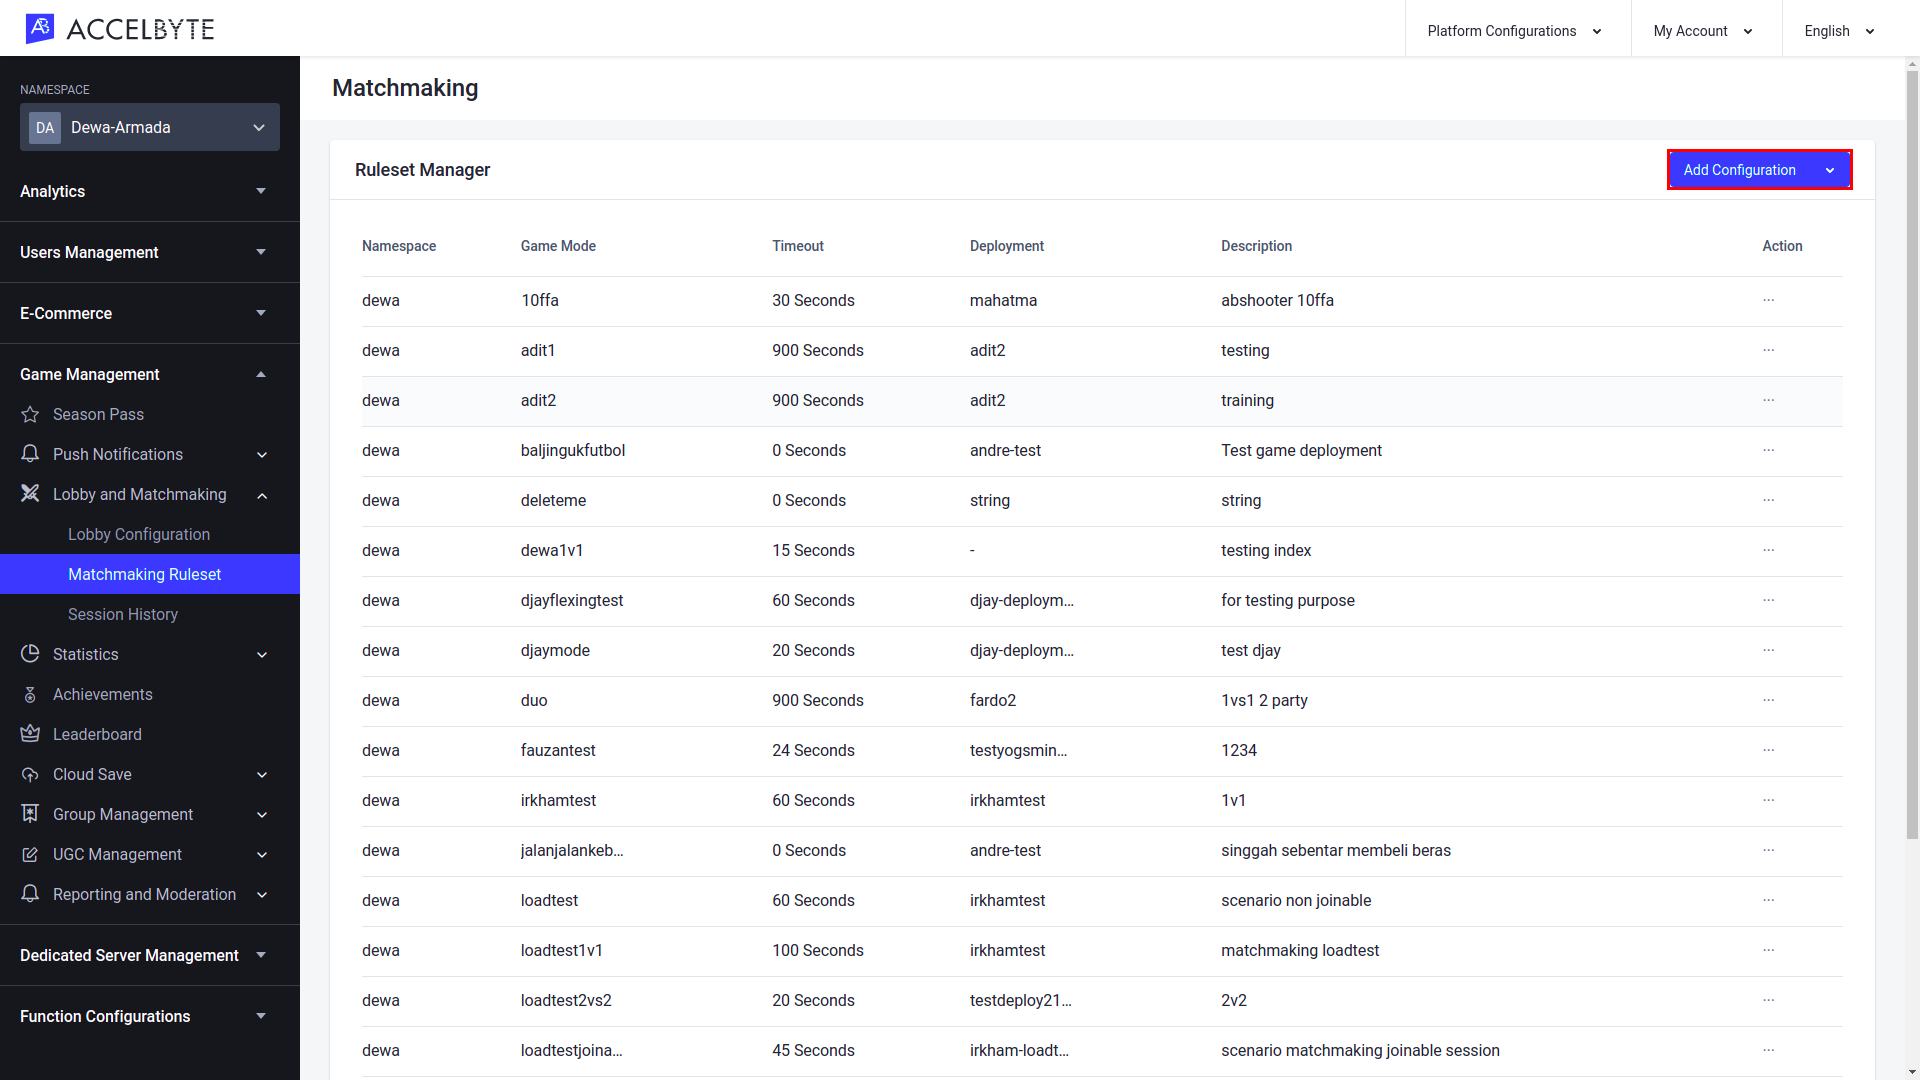
On the Matchmaking page, click Add Configuration to create a new matchmaking channel.
The Create Ruleset wizard will appear. Fill in the required information on each page.
Configuration
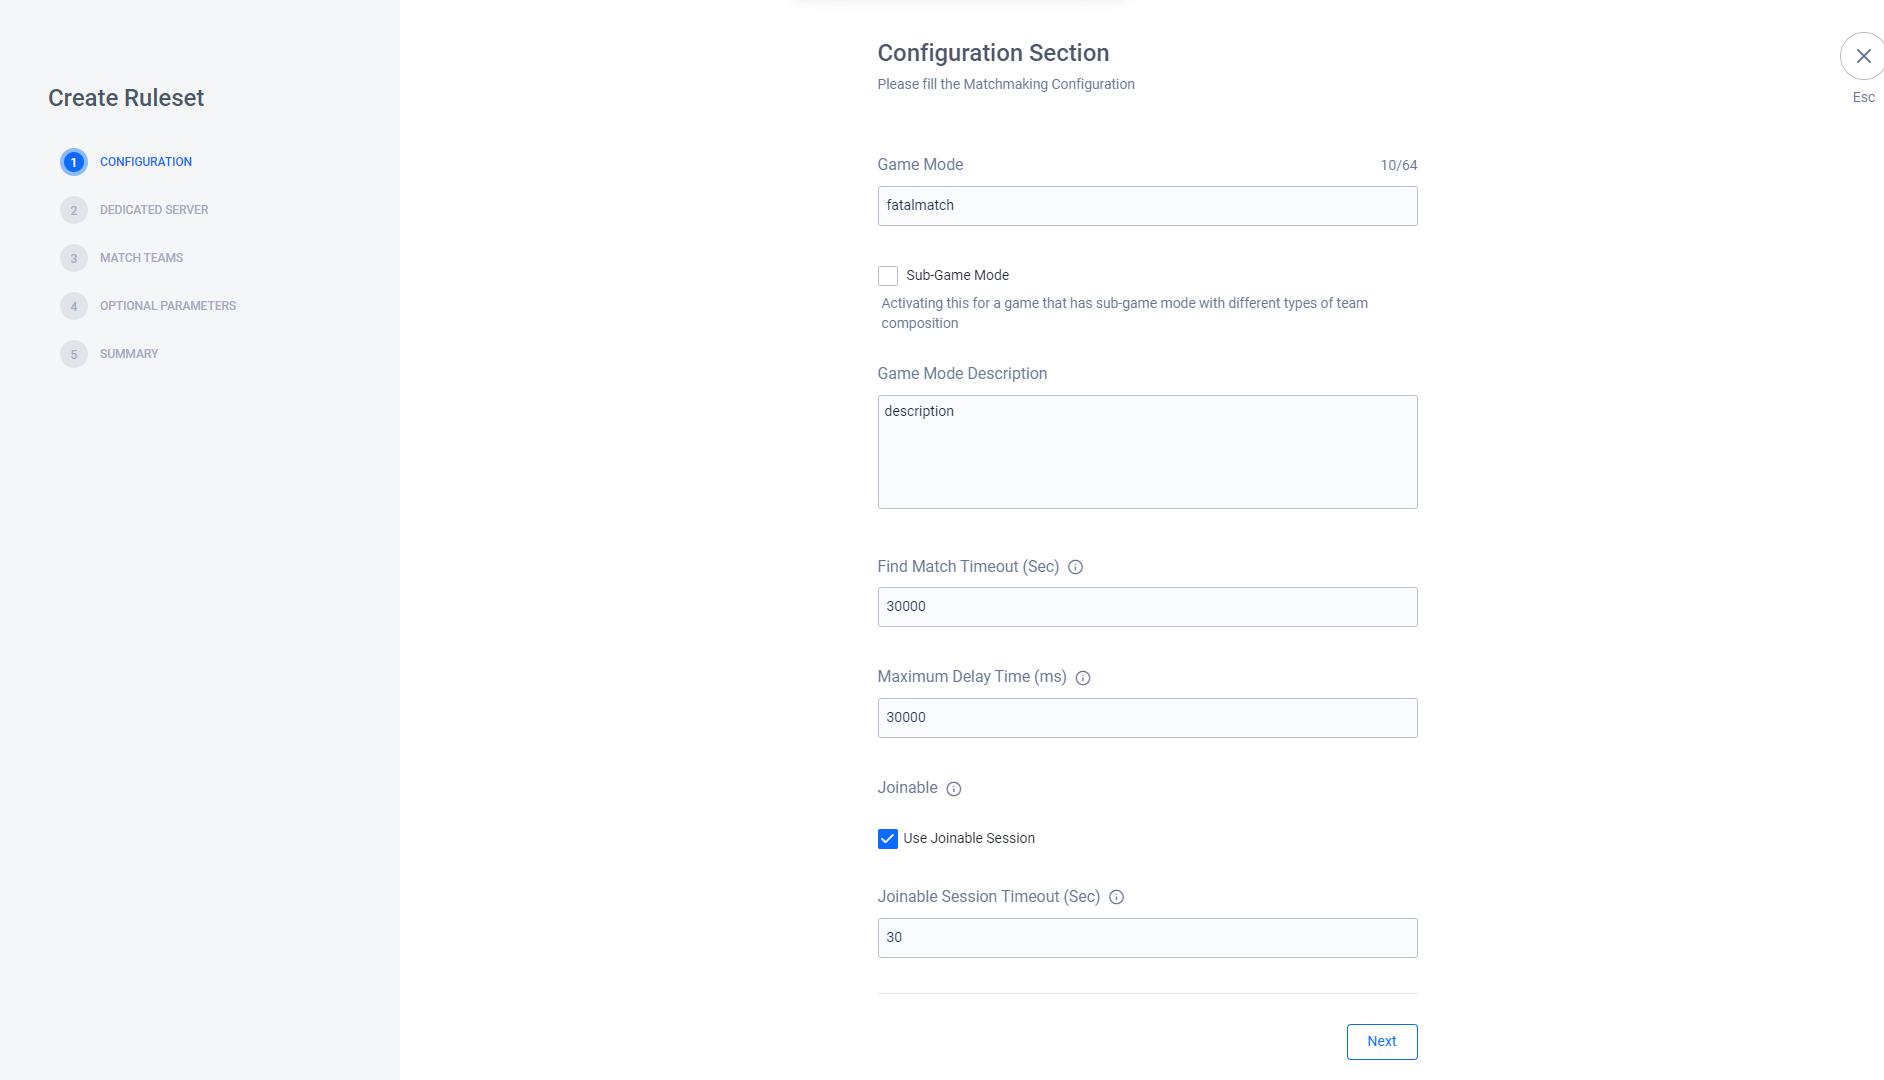
TIP
The Maximum Delay Time can be used to help players be matched together in any situation where player count is low, such as during testing.
IMPORTANT
IMPORTANT Before you can implement joinable sessions, you must grant the following permission to your game server’s IAM Client
| Usage | Resource | Action |
|---|---|---|
| Joinable Session | NAMESPACE:{namespace}:SESSION | Create, Read, Update, Delete |
After filling in all of the fields in the Configuration section, click Next.
Dedicated Server
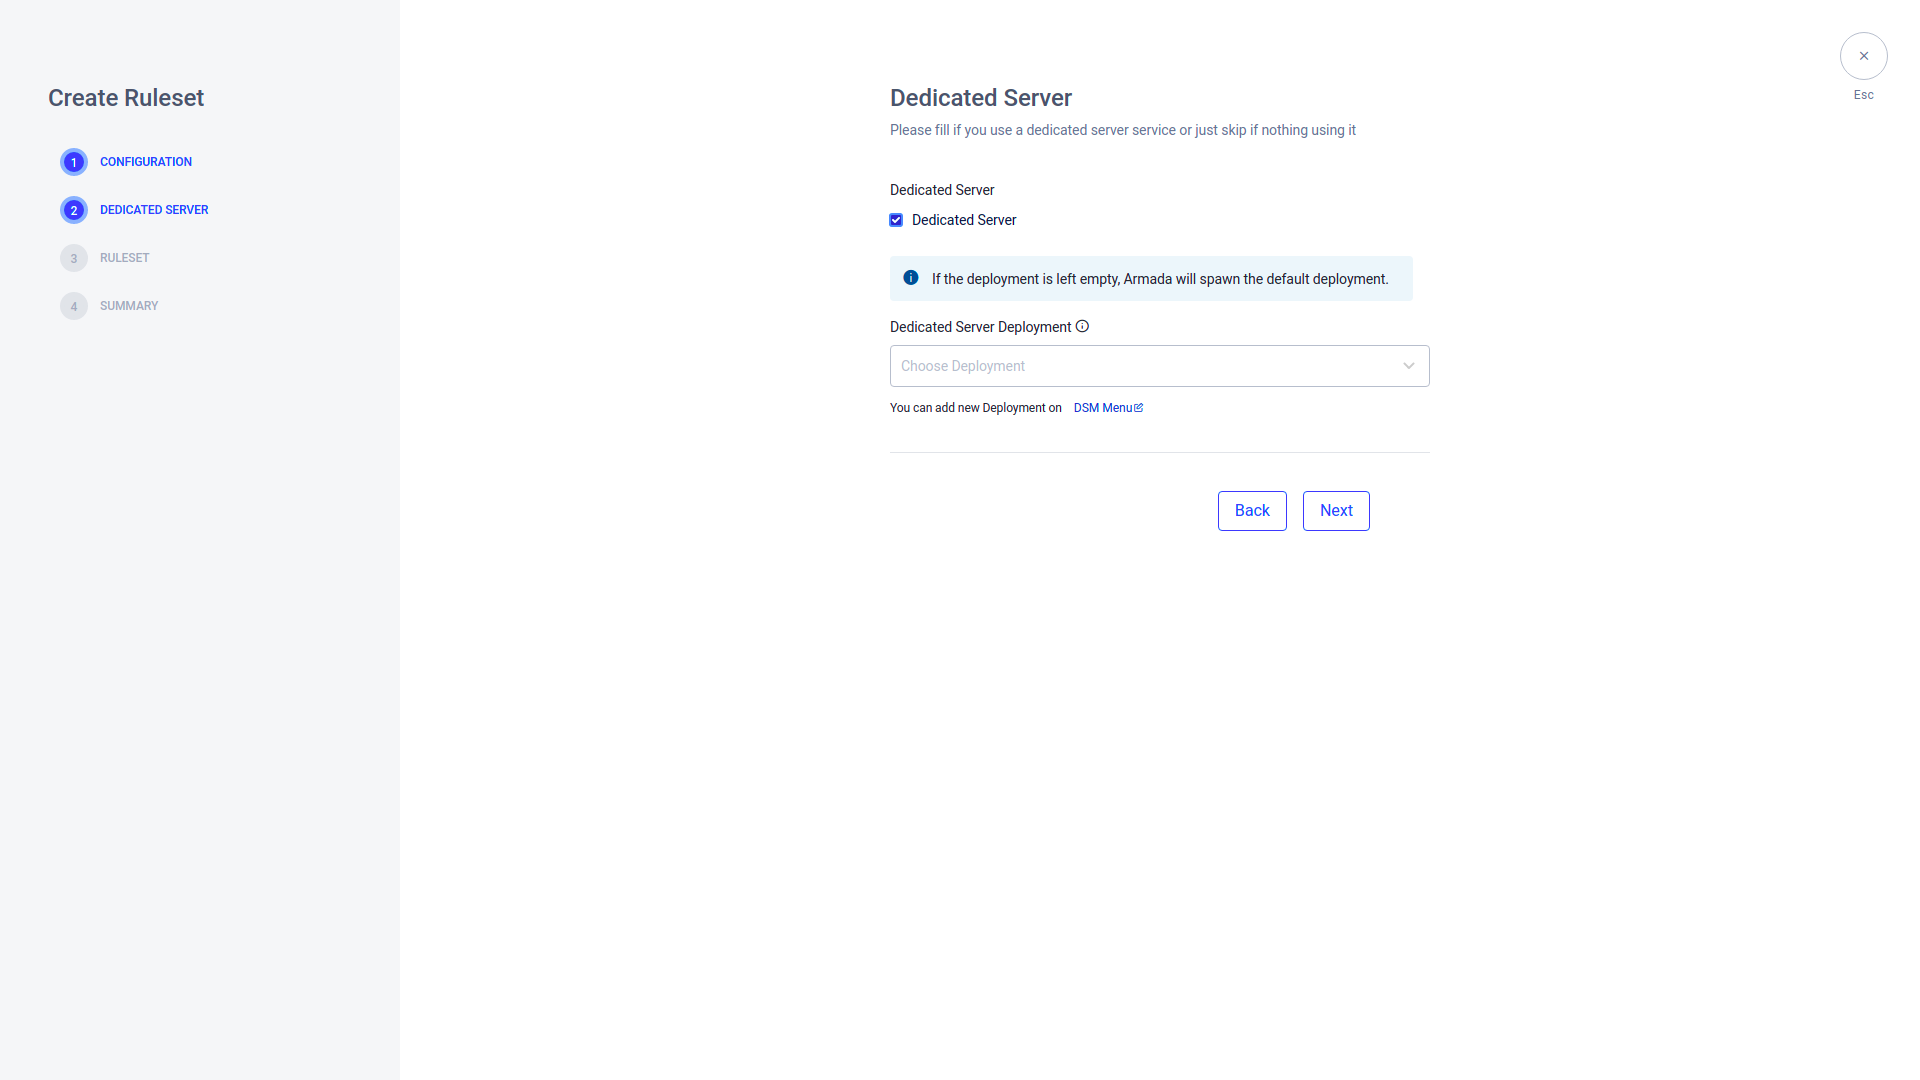
After filling the fields in the Dedicated Server section, click Next.
Ruleset
Choose Game Mode Only if your game only has one game mode.
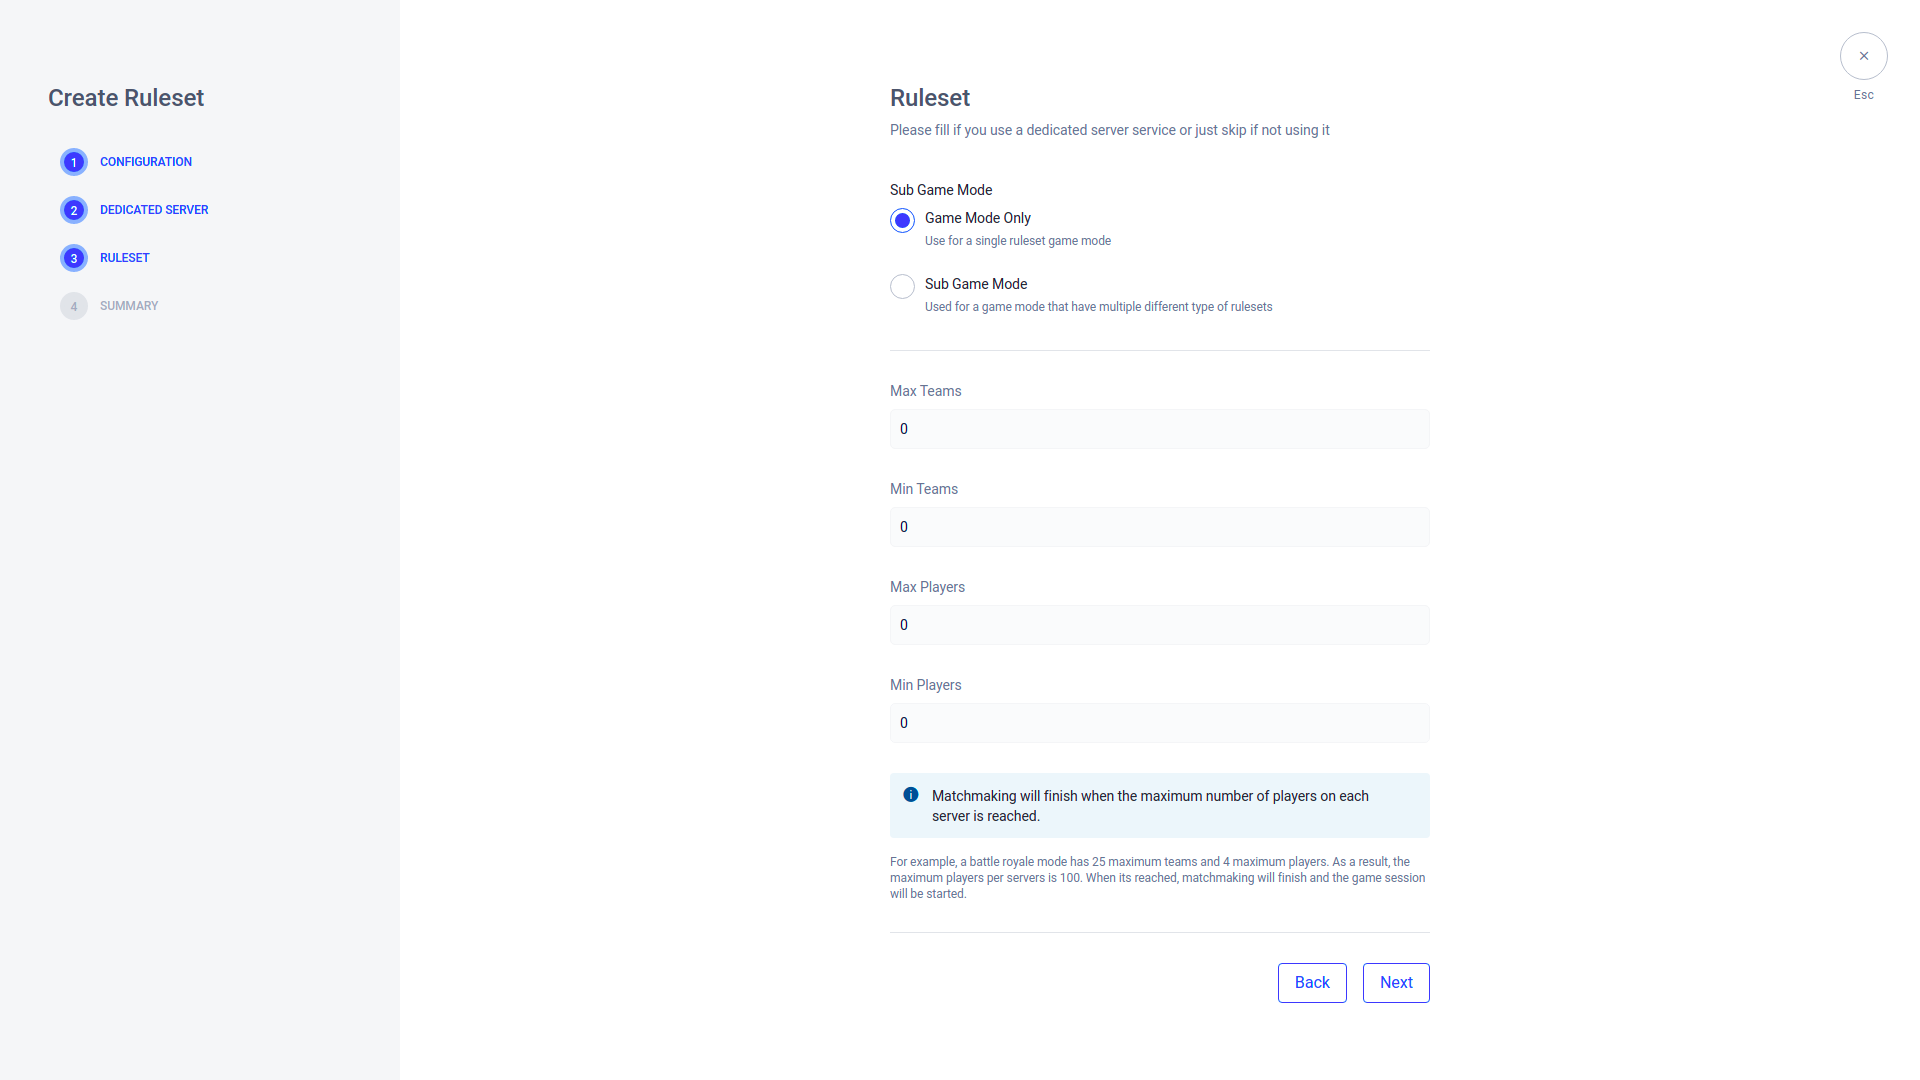
Choose Sub Game Mode if your game hsa more than one game mode.
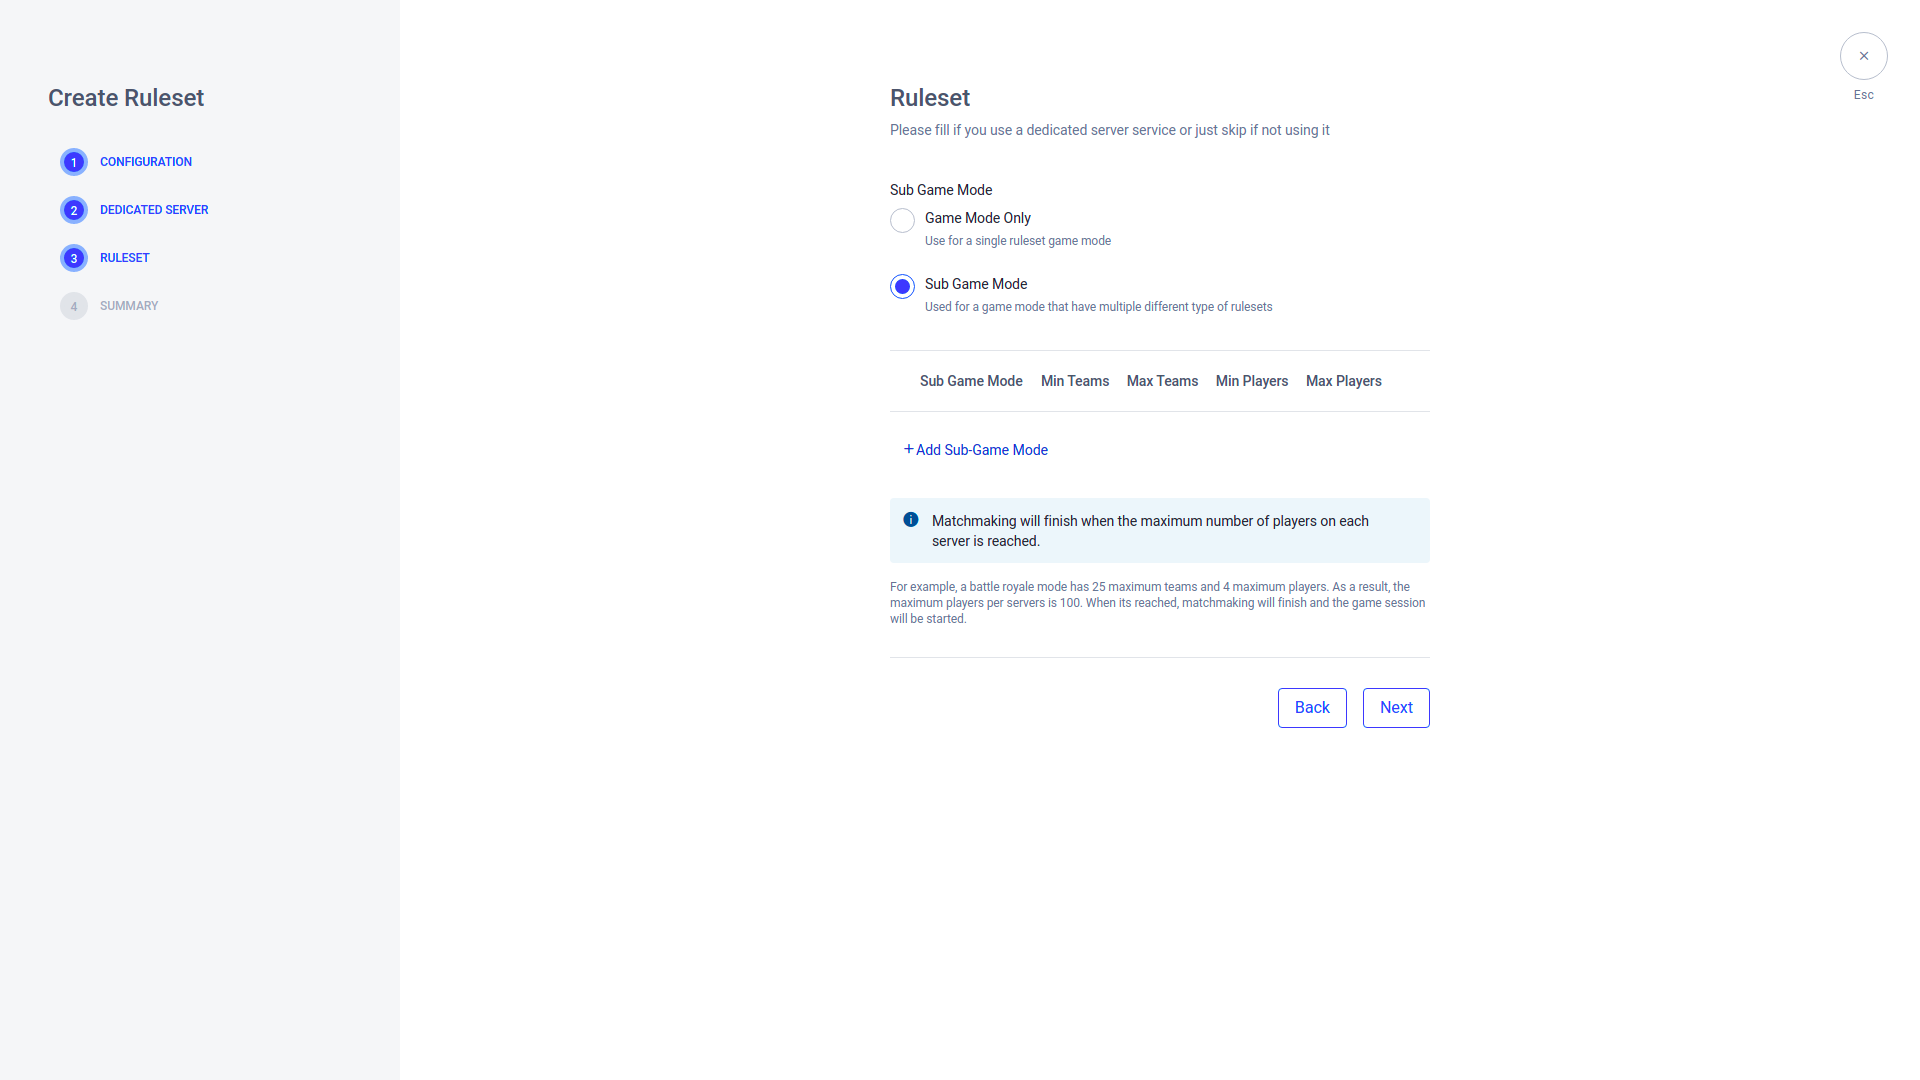
Click Add Sub-Game Mode to add a ruleset for one of your game modes.
The Add Ruleset form appears. Fill in the required fields, as seen below:
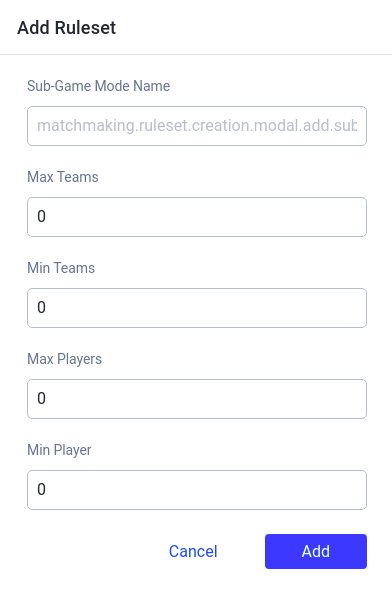
After filling the Add Ruleset form, click the Add button.
Repeat this step, creating a ruleset for each of your different game modes. When you’re done, click Next.
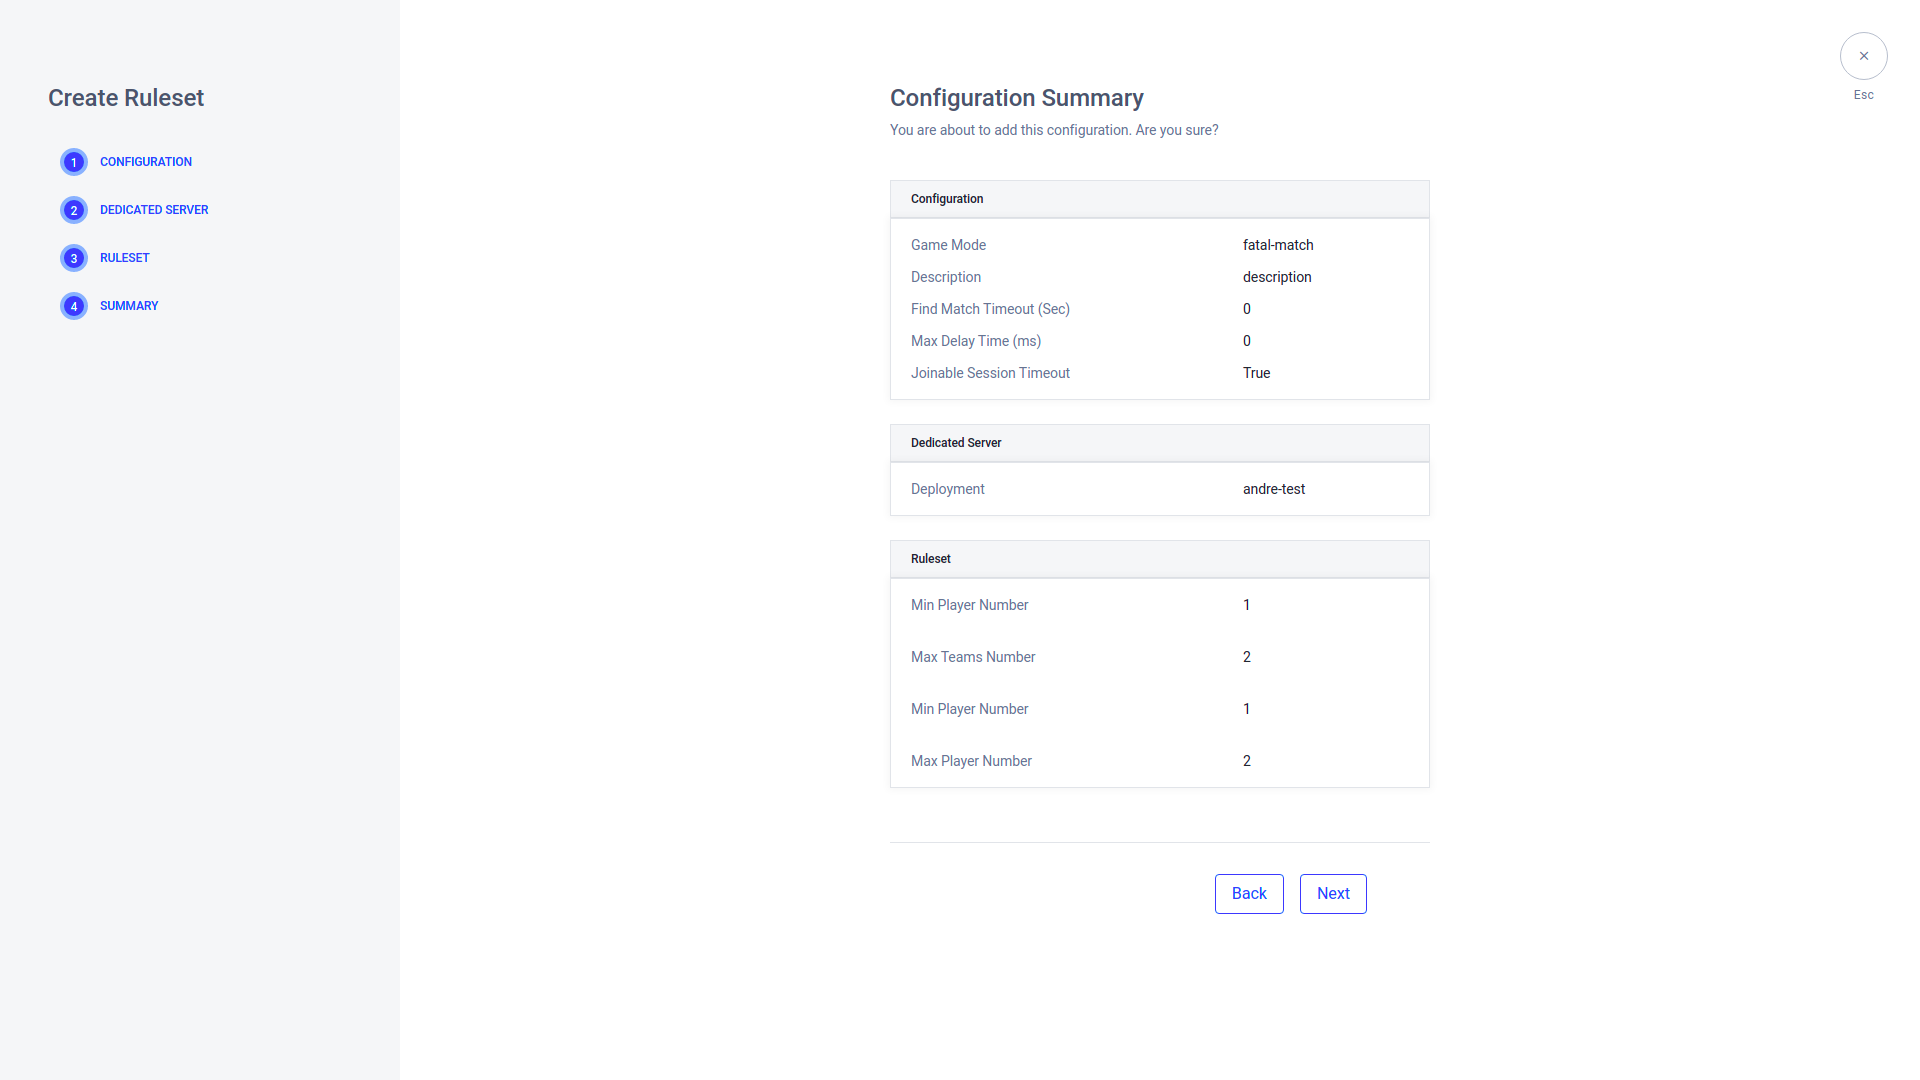
Summary
The summary of your configuration appears. Click Next to create the configuration.
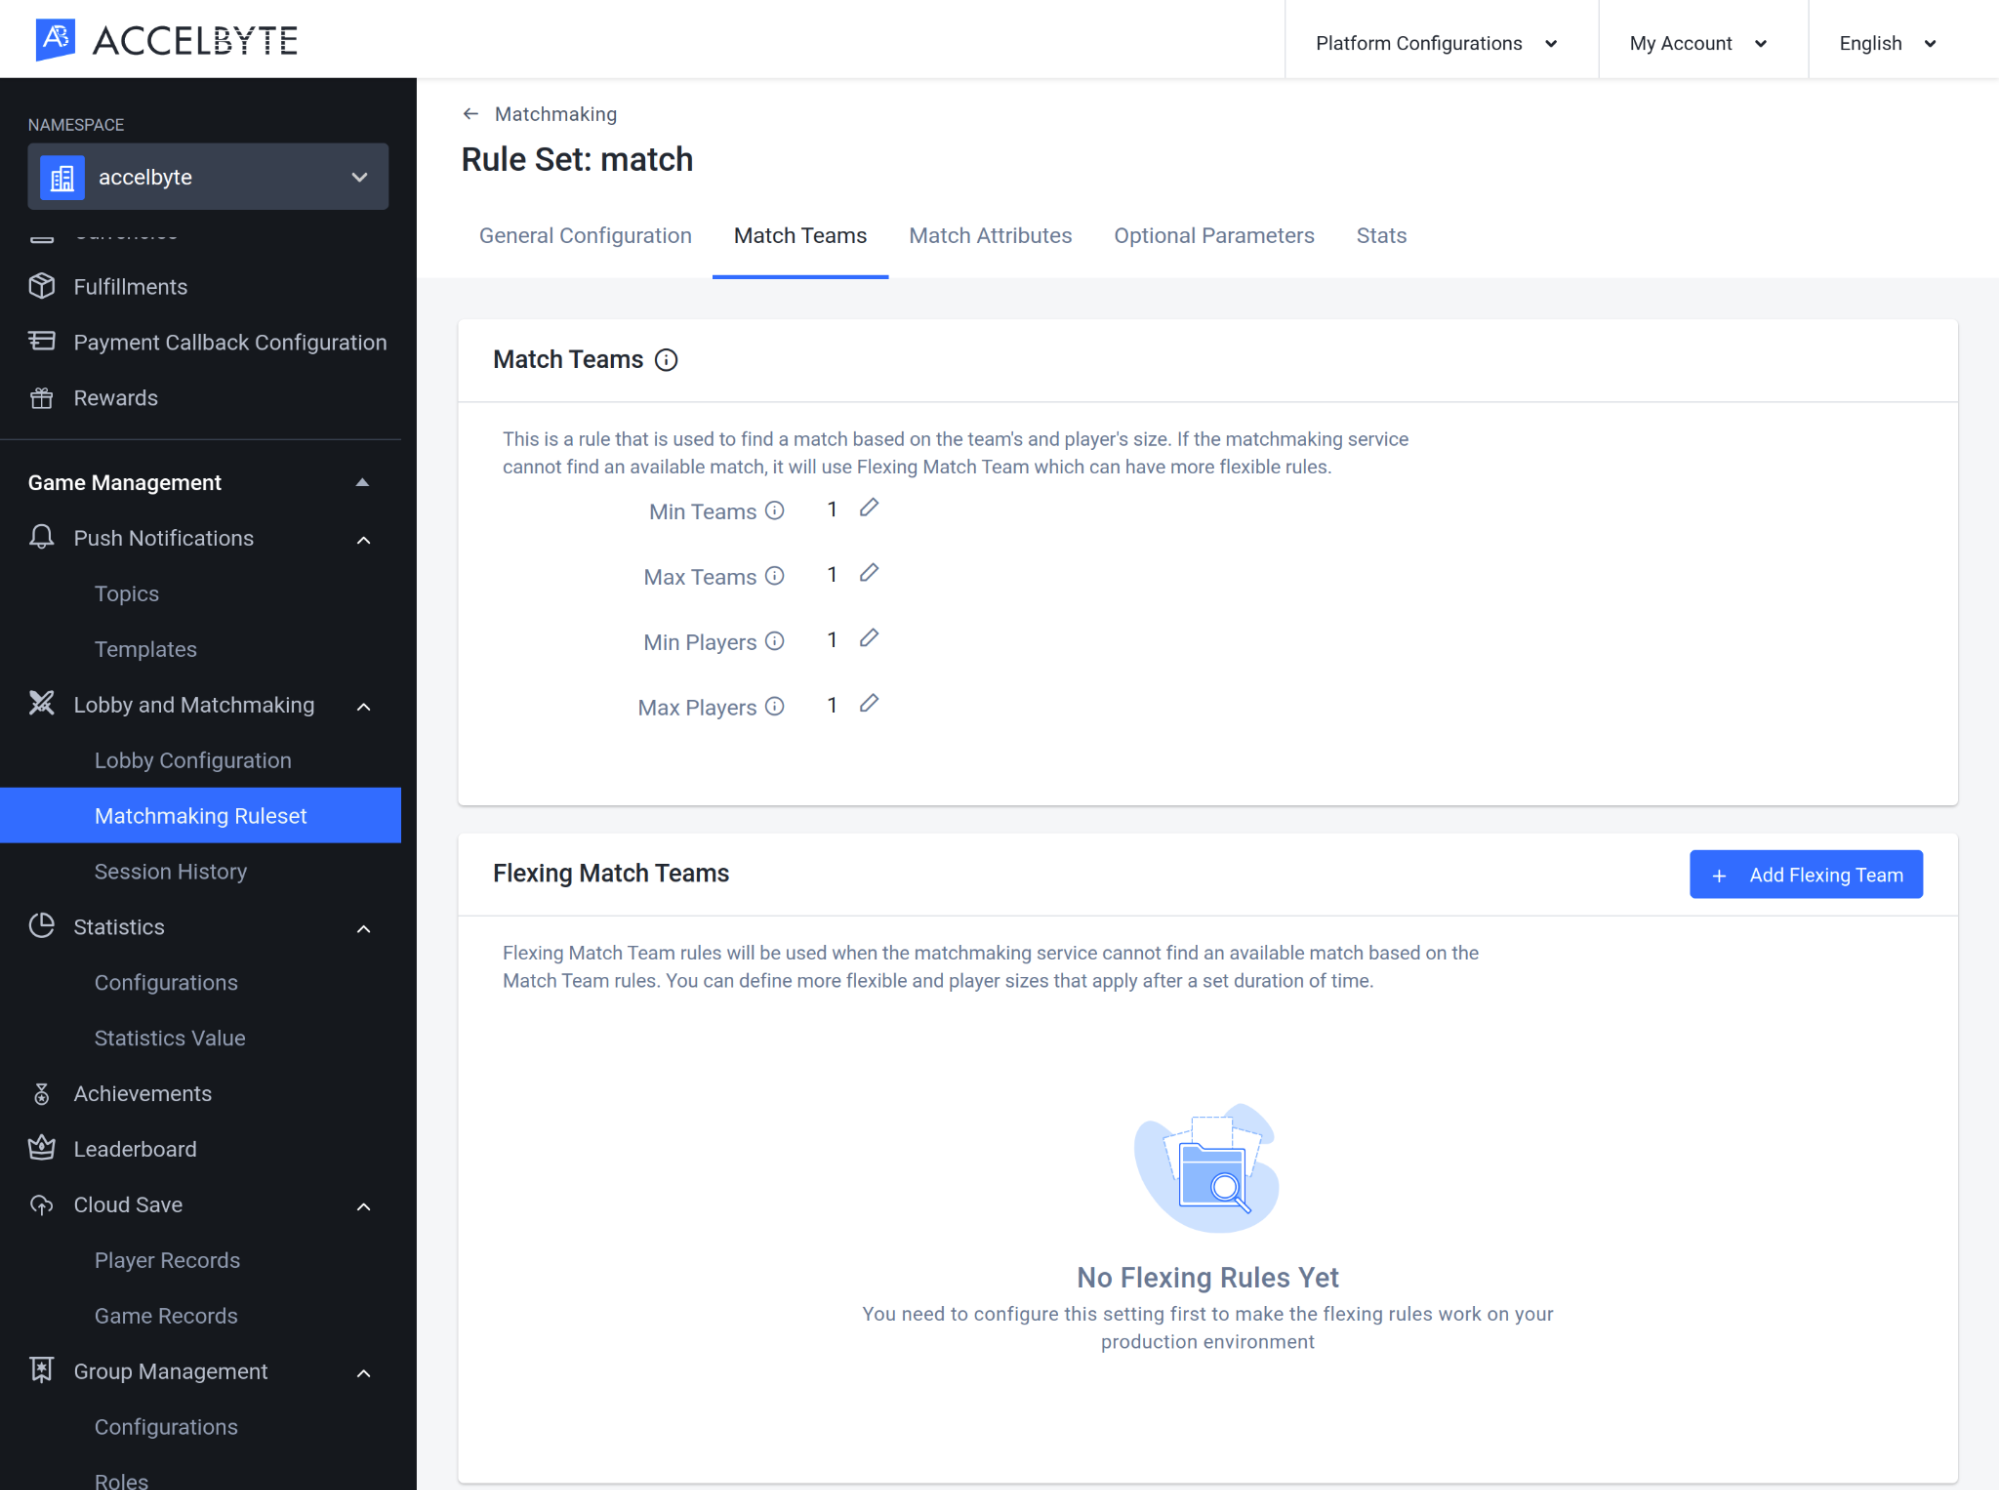
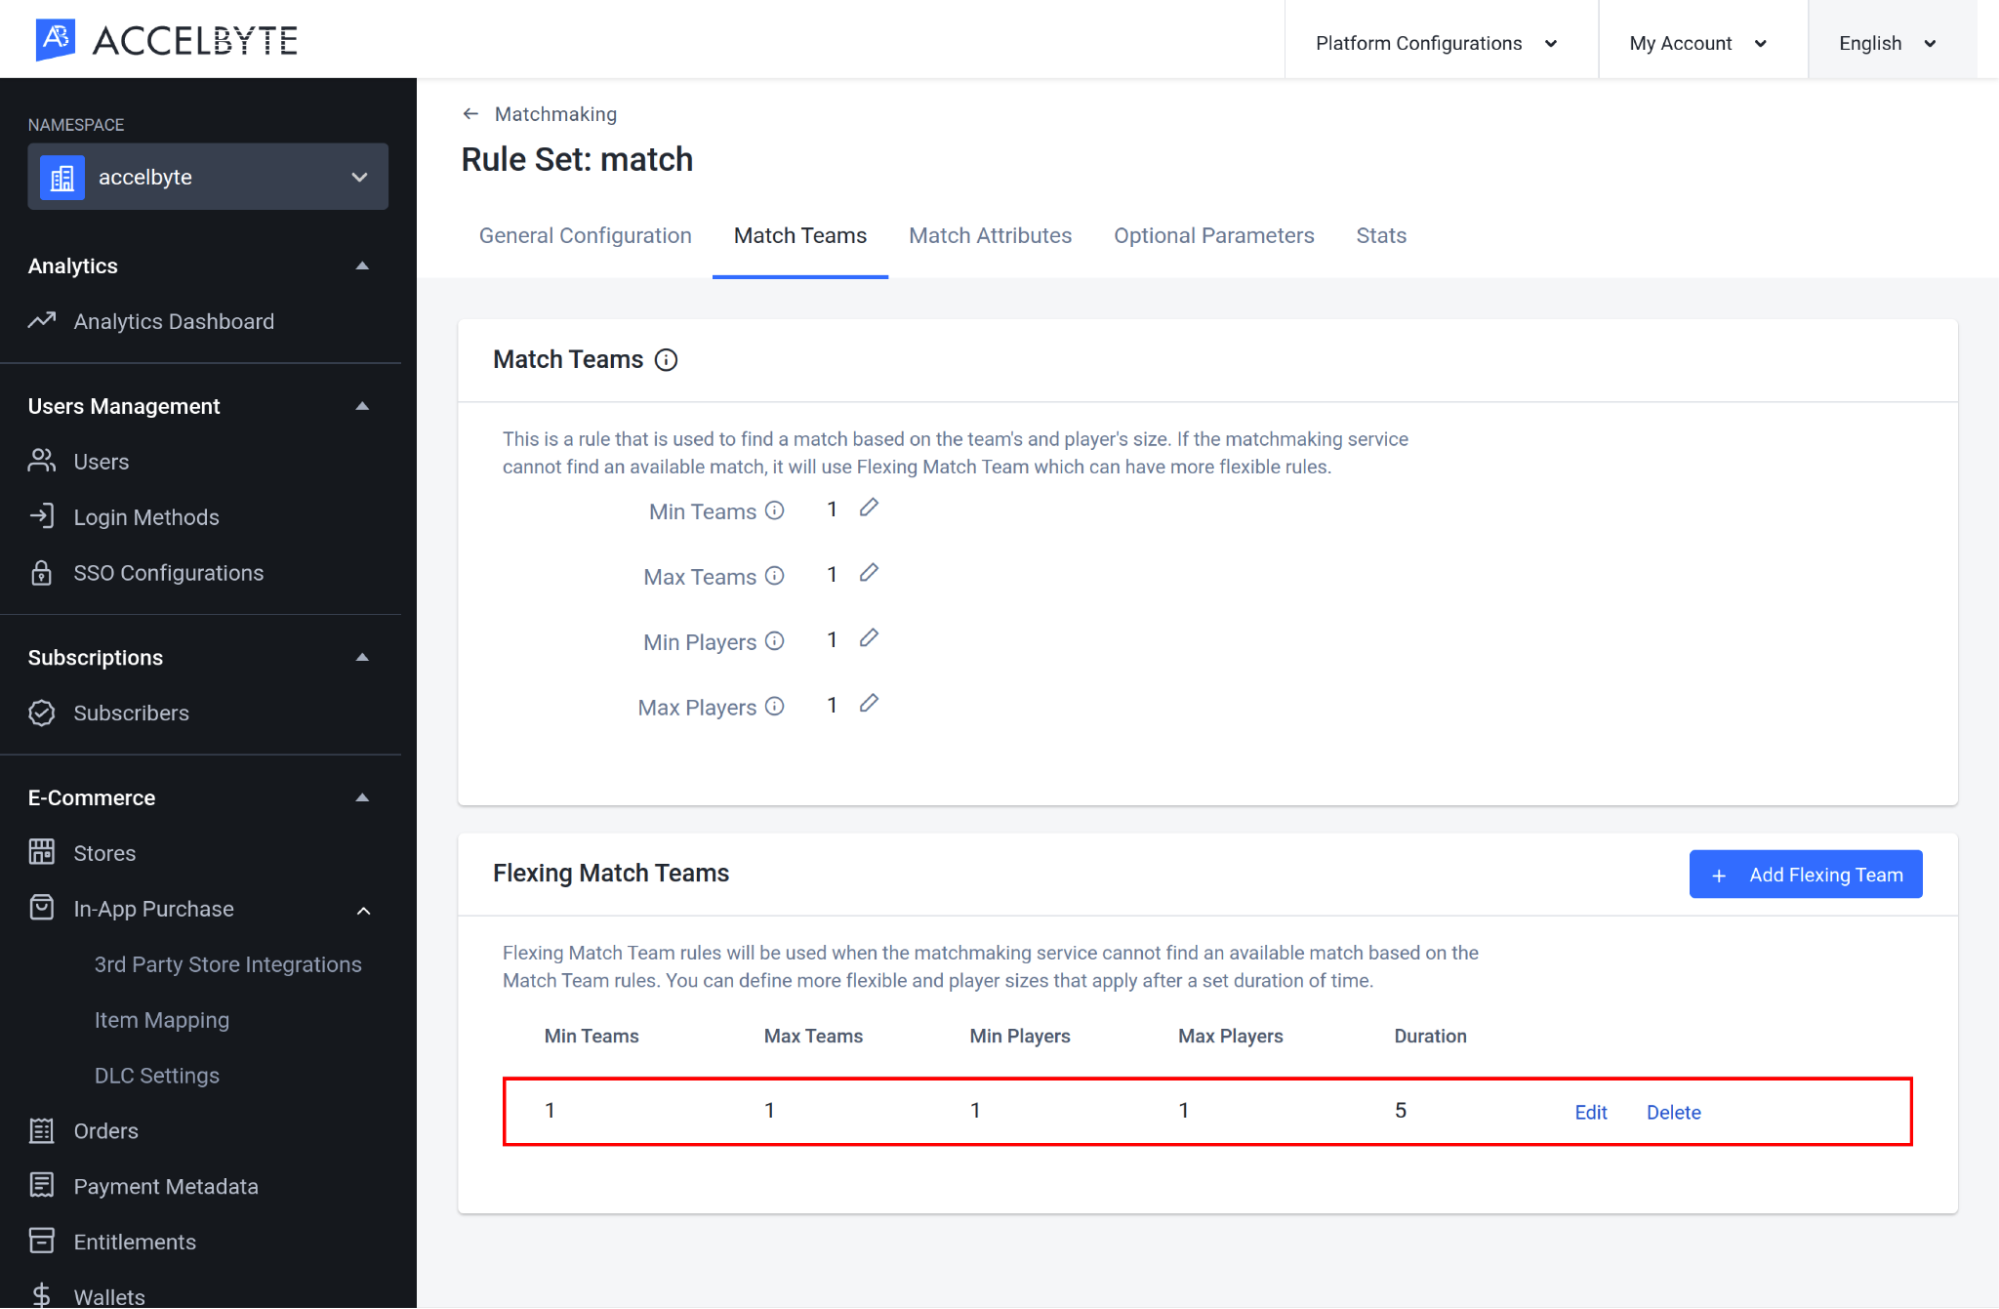
After configuring your Match Team, you can add a Flexing Match Team rule to prevent players from timing out when not enough players are available for a standard Match Team. In the Flexing Match Team, you can define the rules and player numbers that apply after a set duration of time.
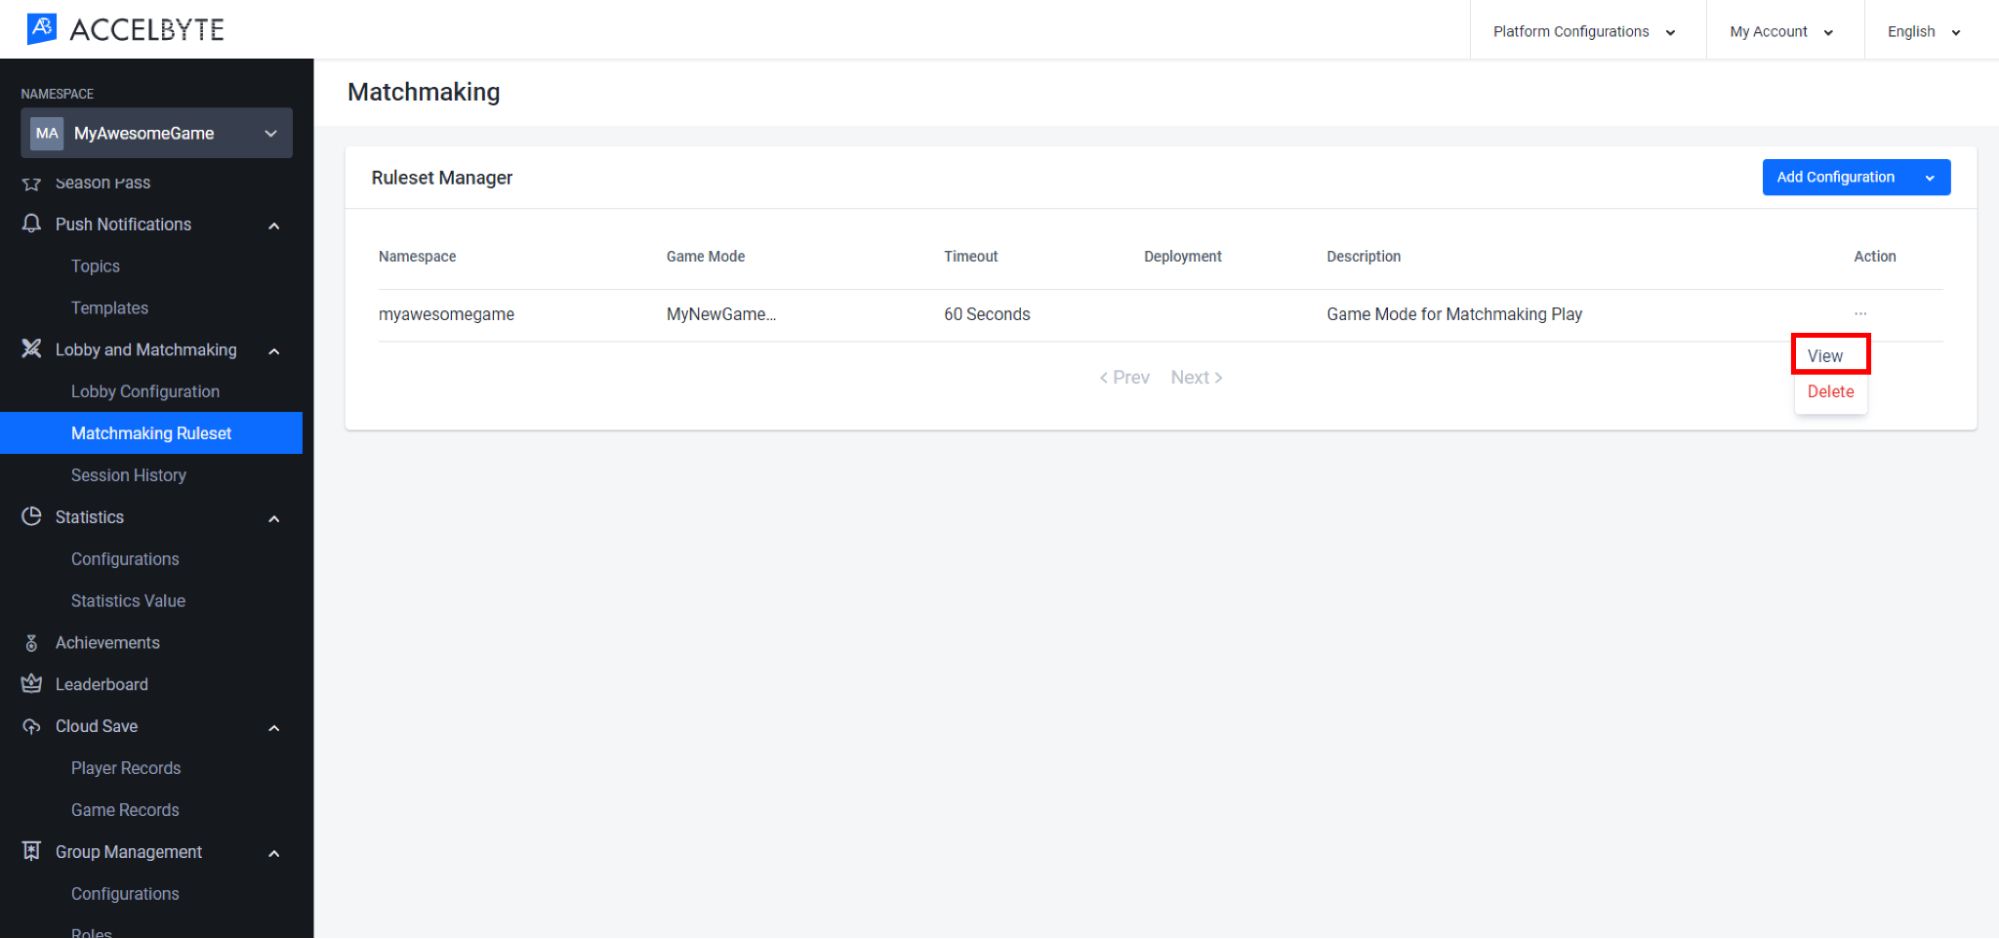
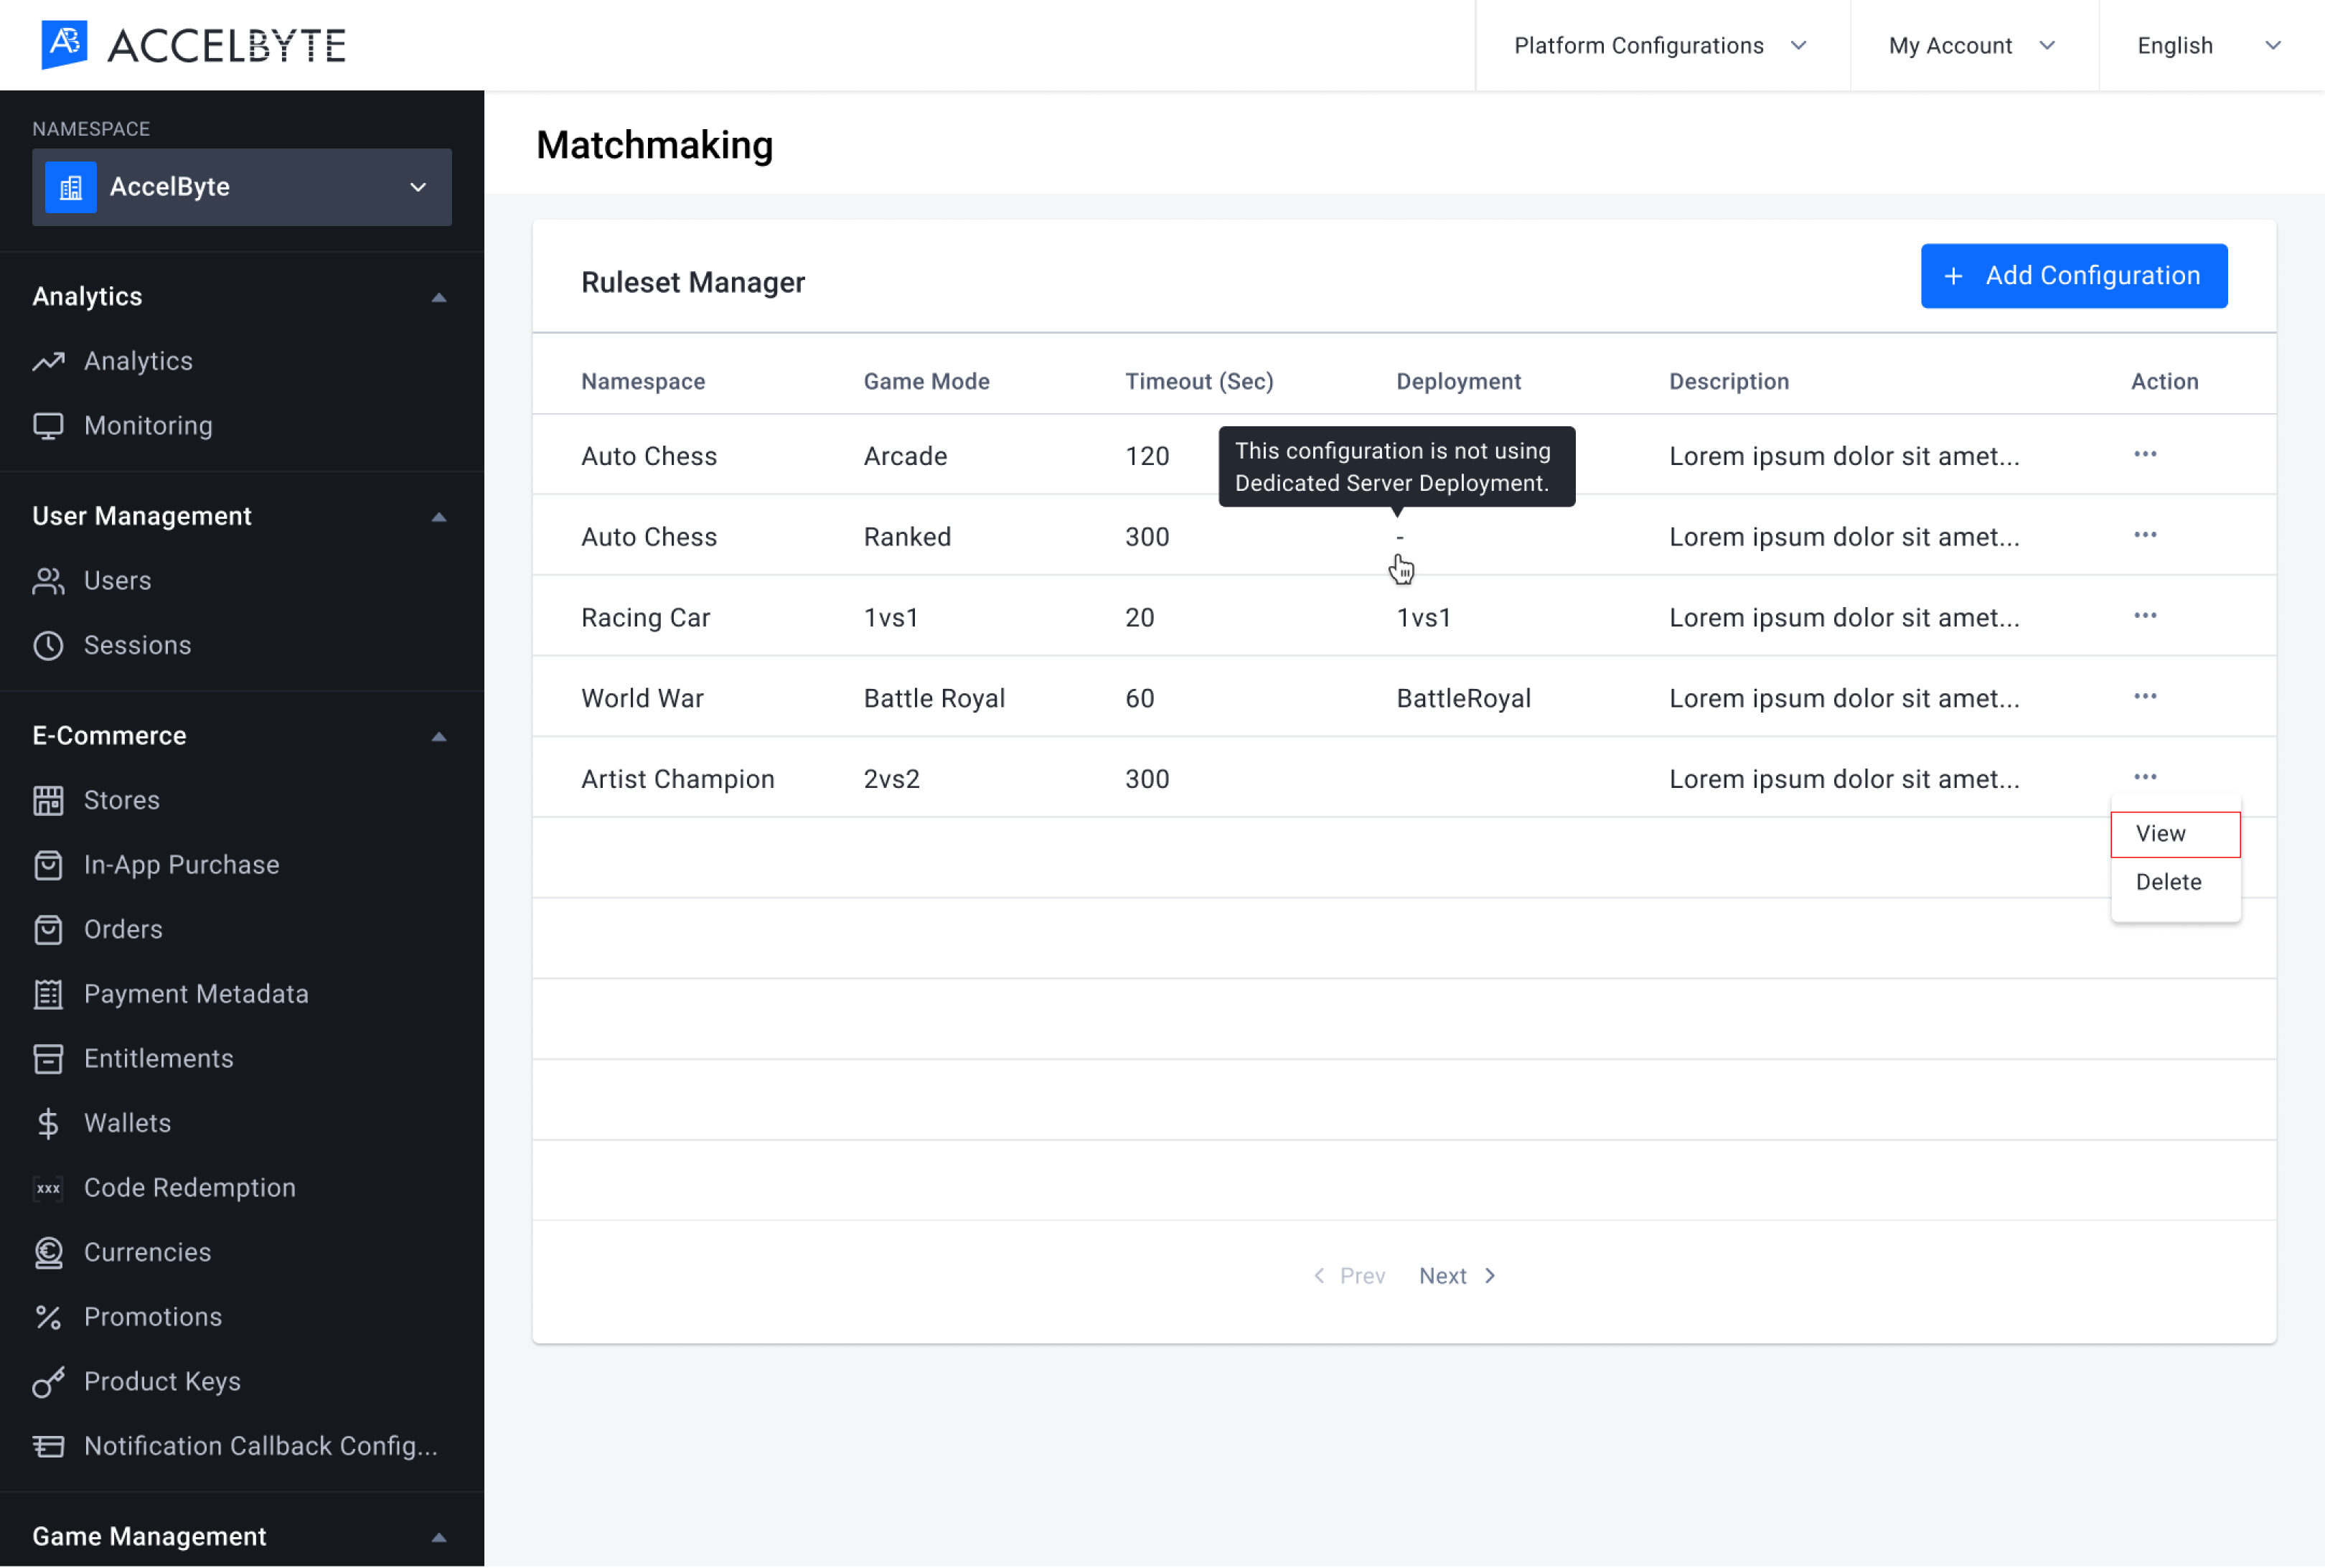
In the Admin Portal, go to the Matchmaking Ruleset page. Choose the Game Mode you wish to manage. In the Action column, click the ellipsis button and select View. You will be directed to the Matchmaking Configuration page.
Open the Match Teams tab, scroll down to the Flexing Match Teams section, and click the Add Flexing Team button.
Fill in the Add Flexing Match Team Rule box with the required fields:
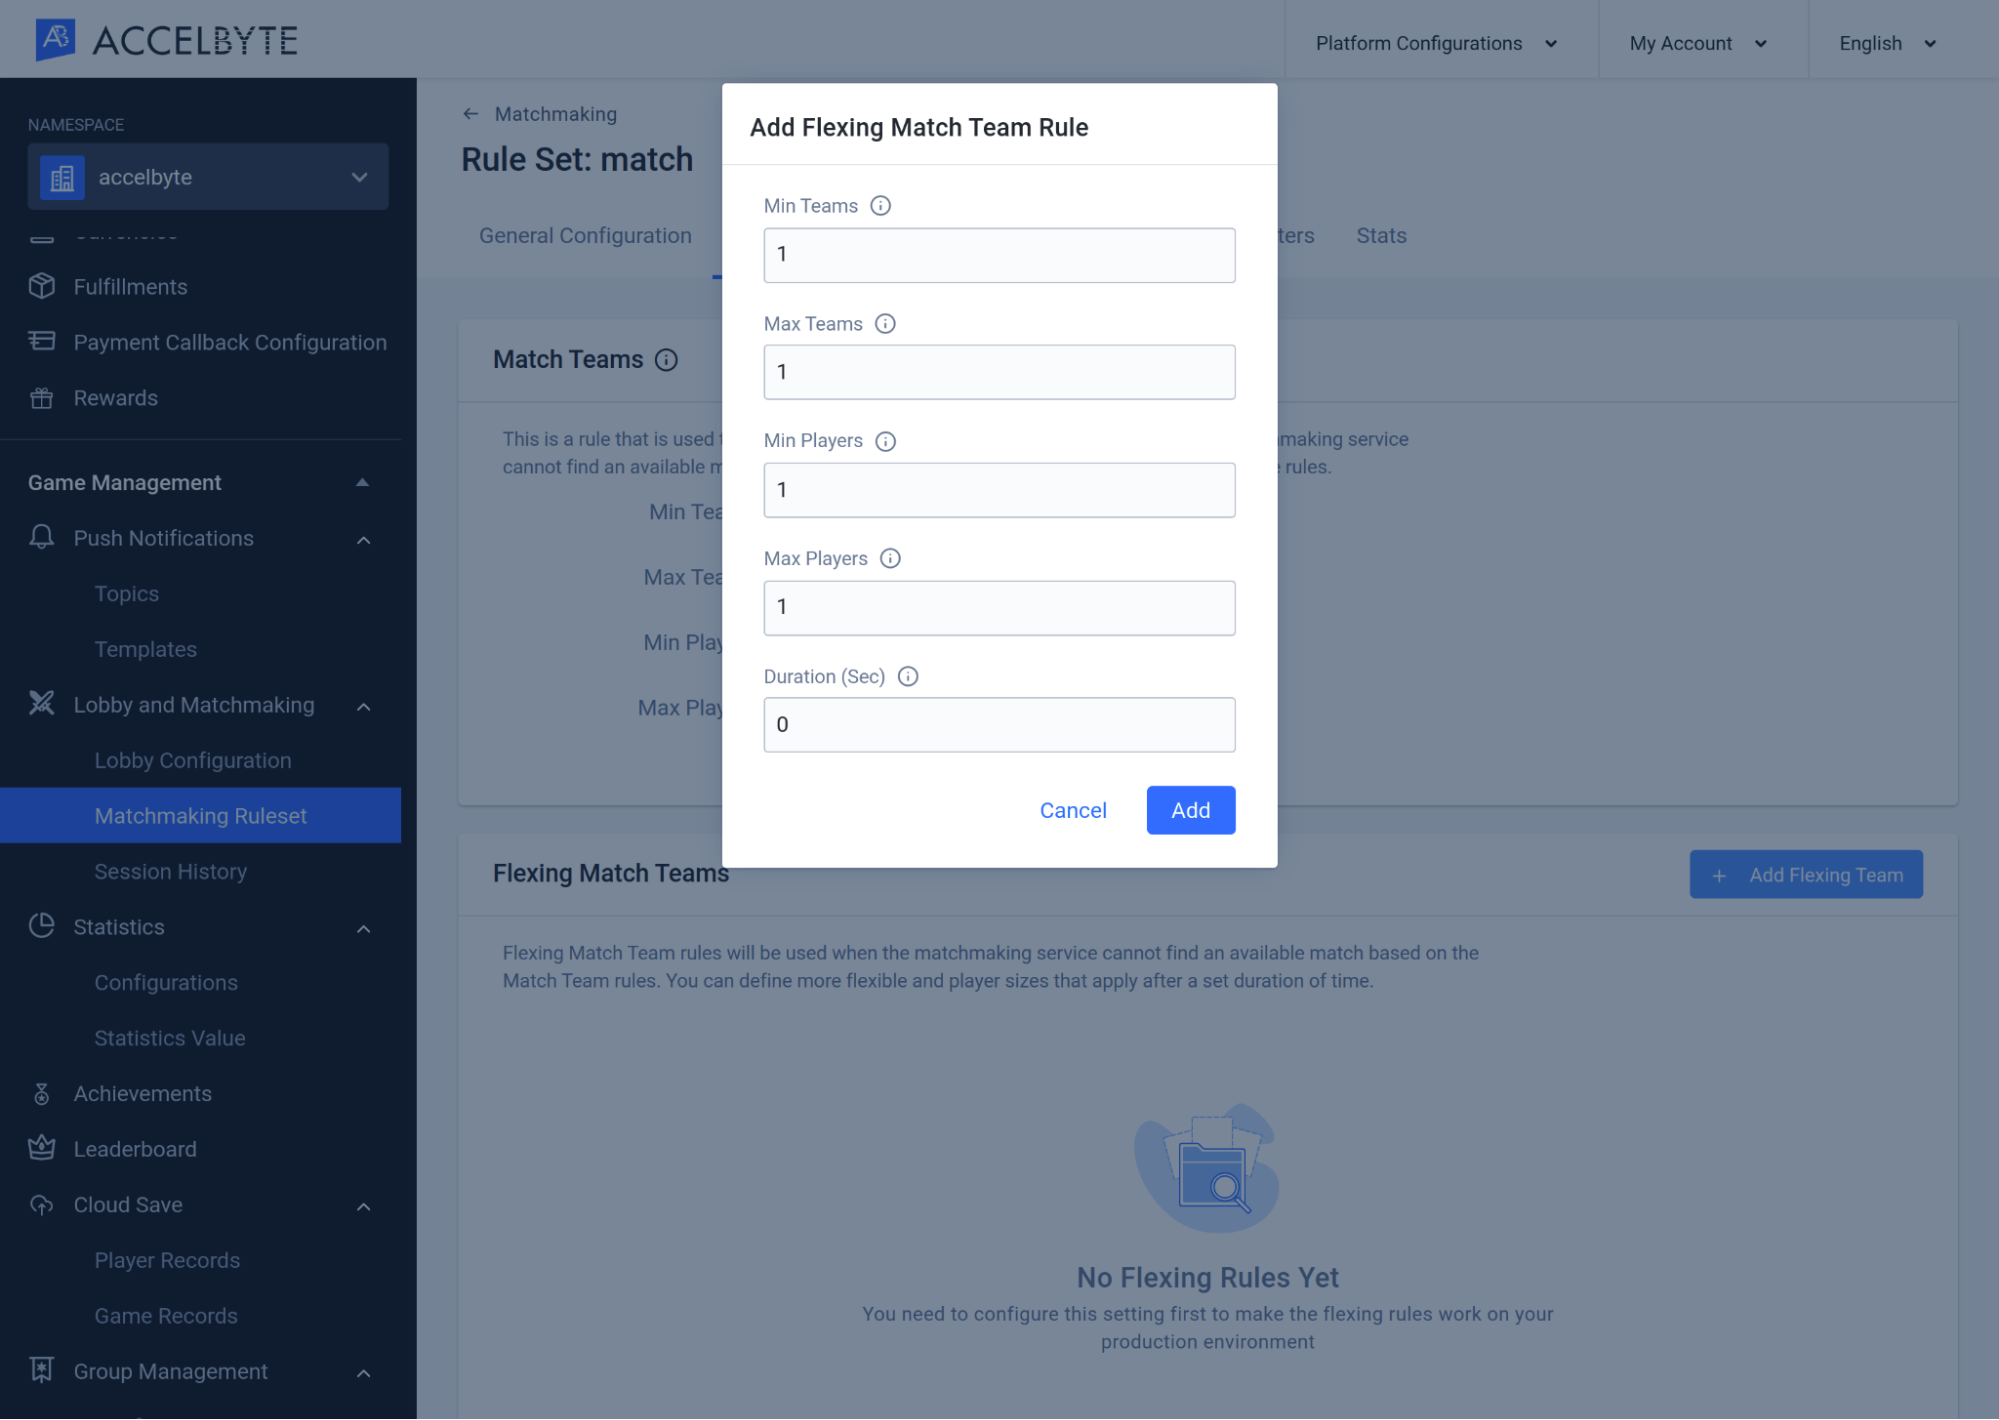
Once completed, click the Add button and the Flexing Match Team will be added to the list.
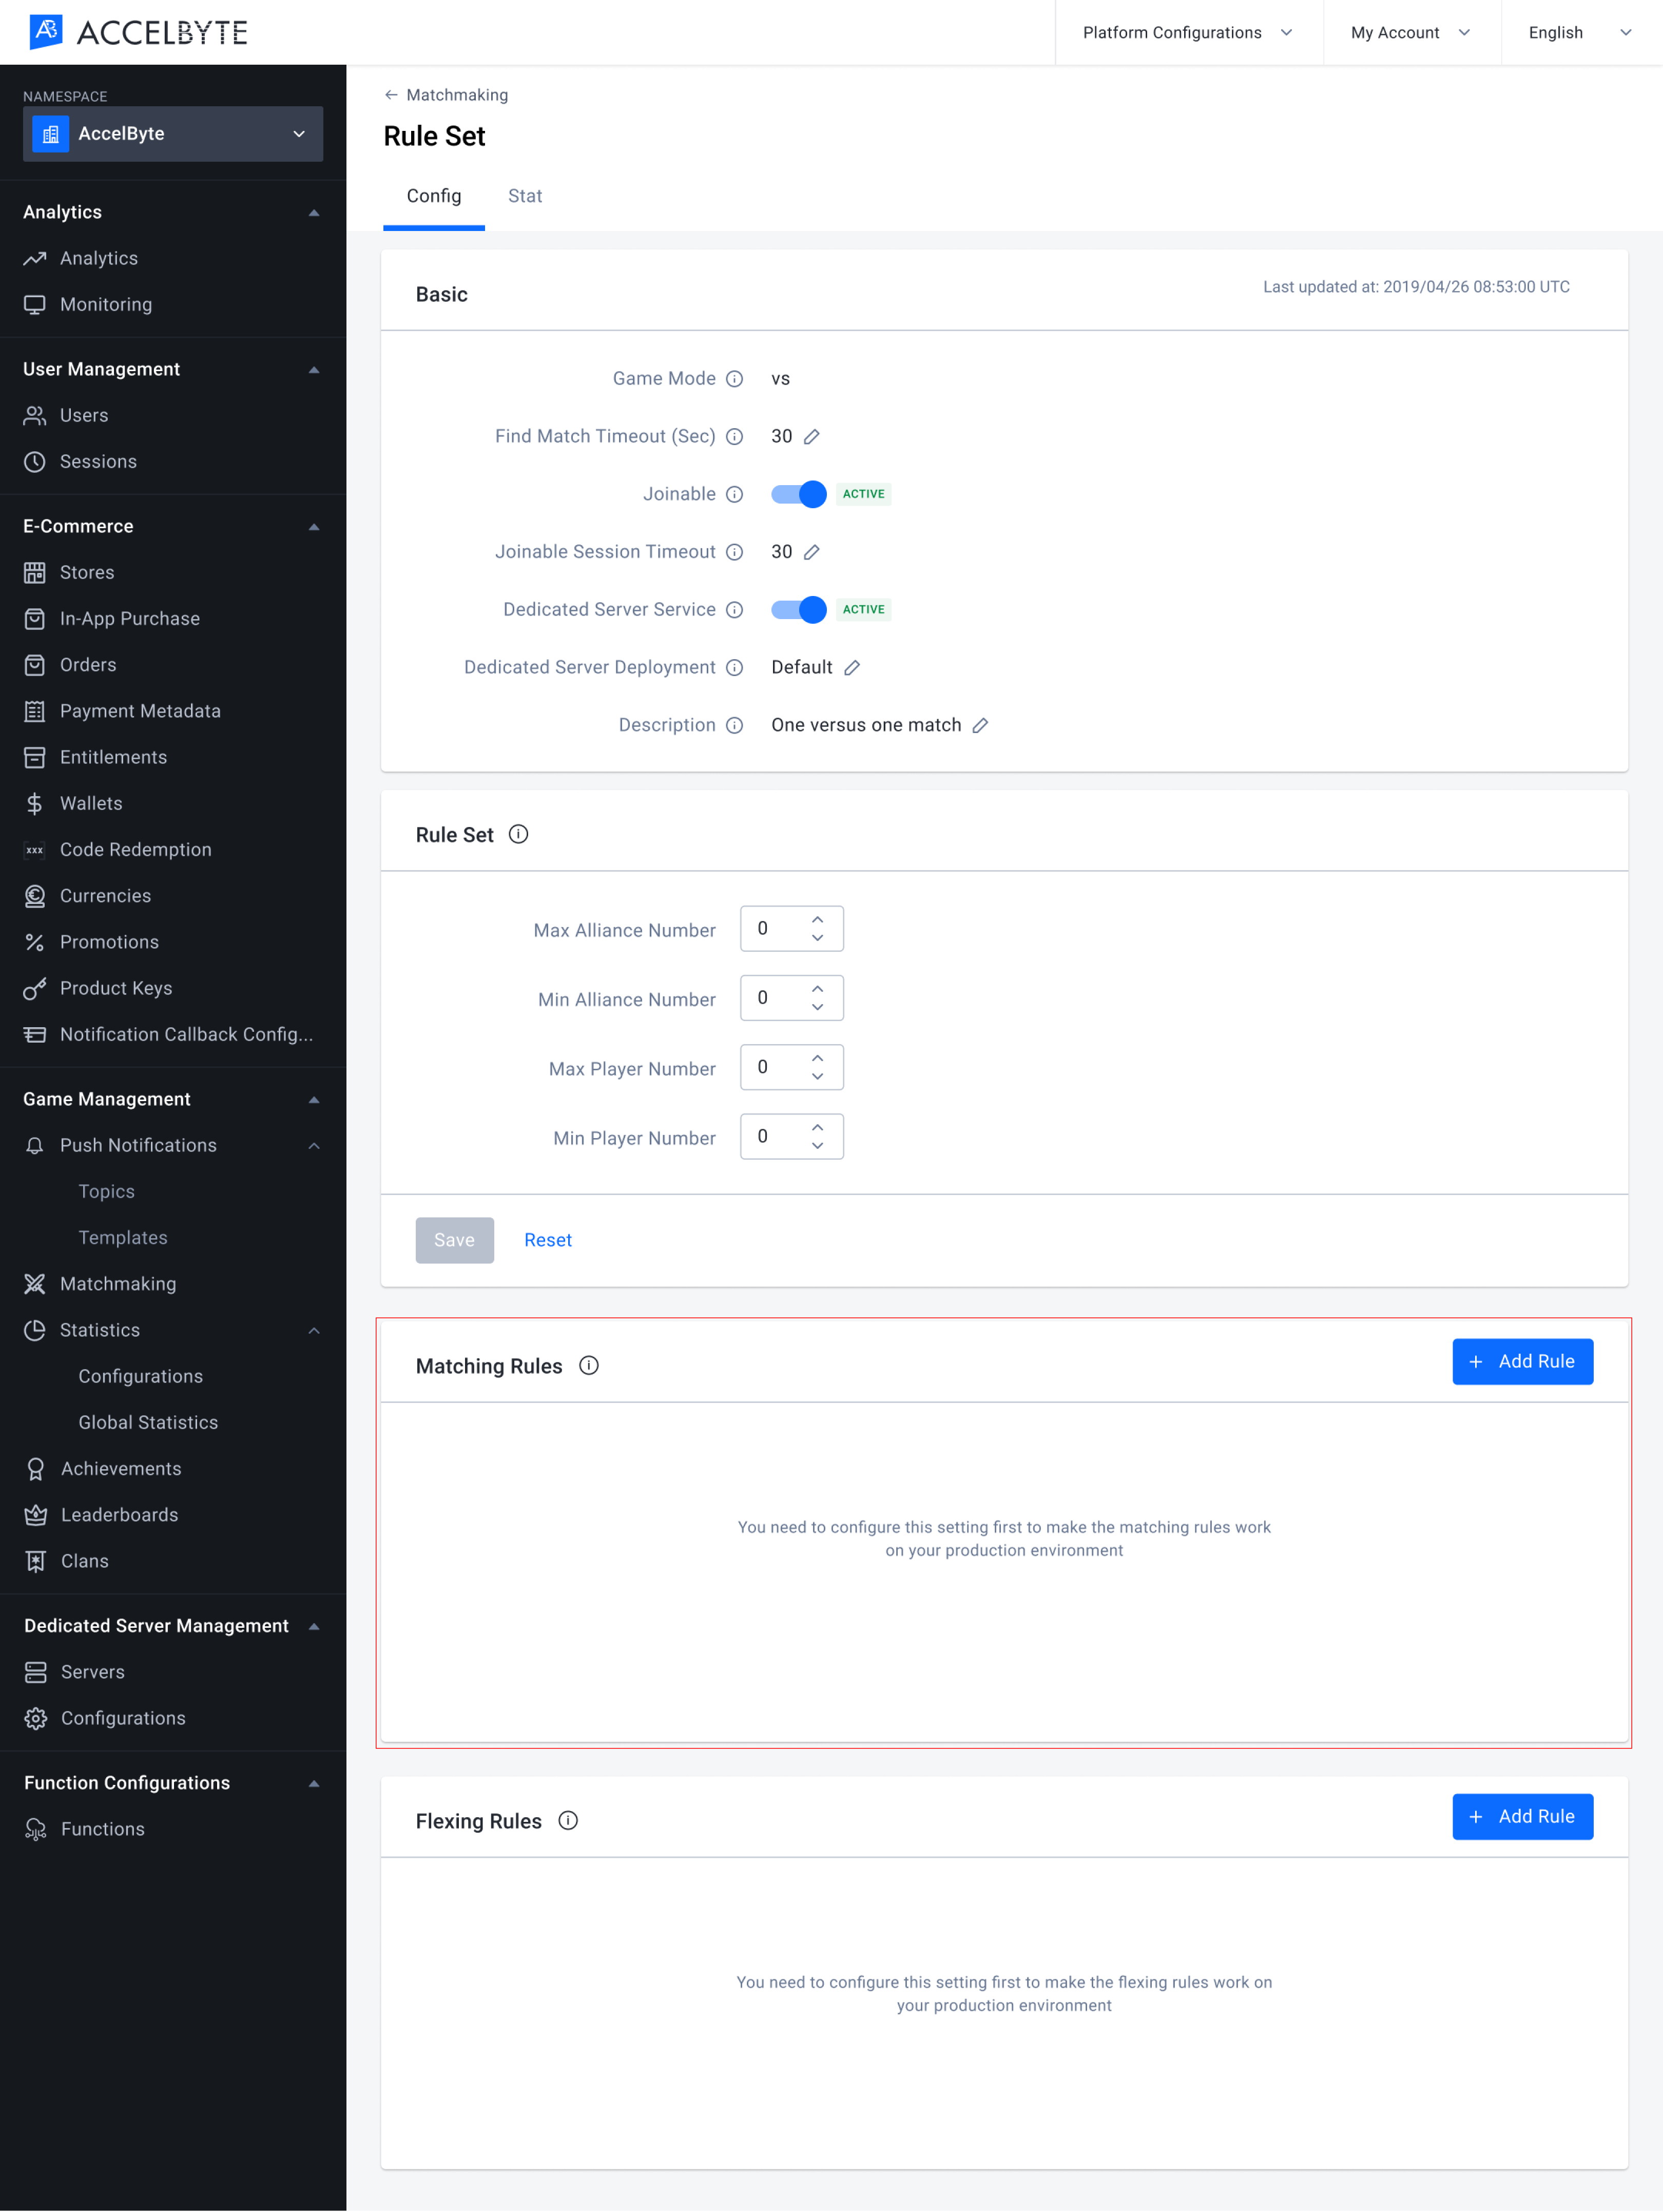
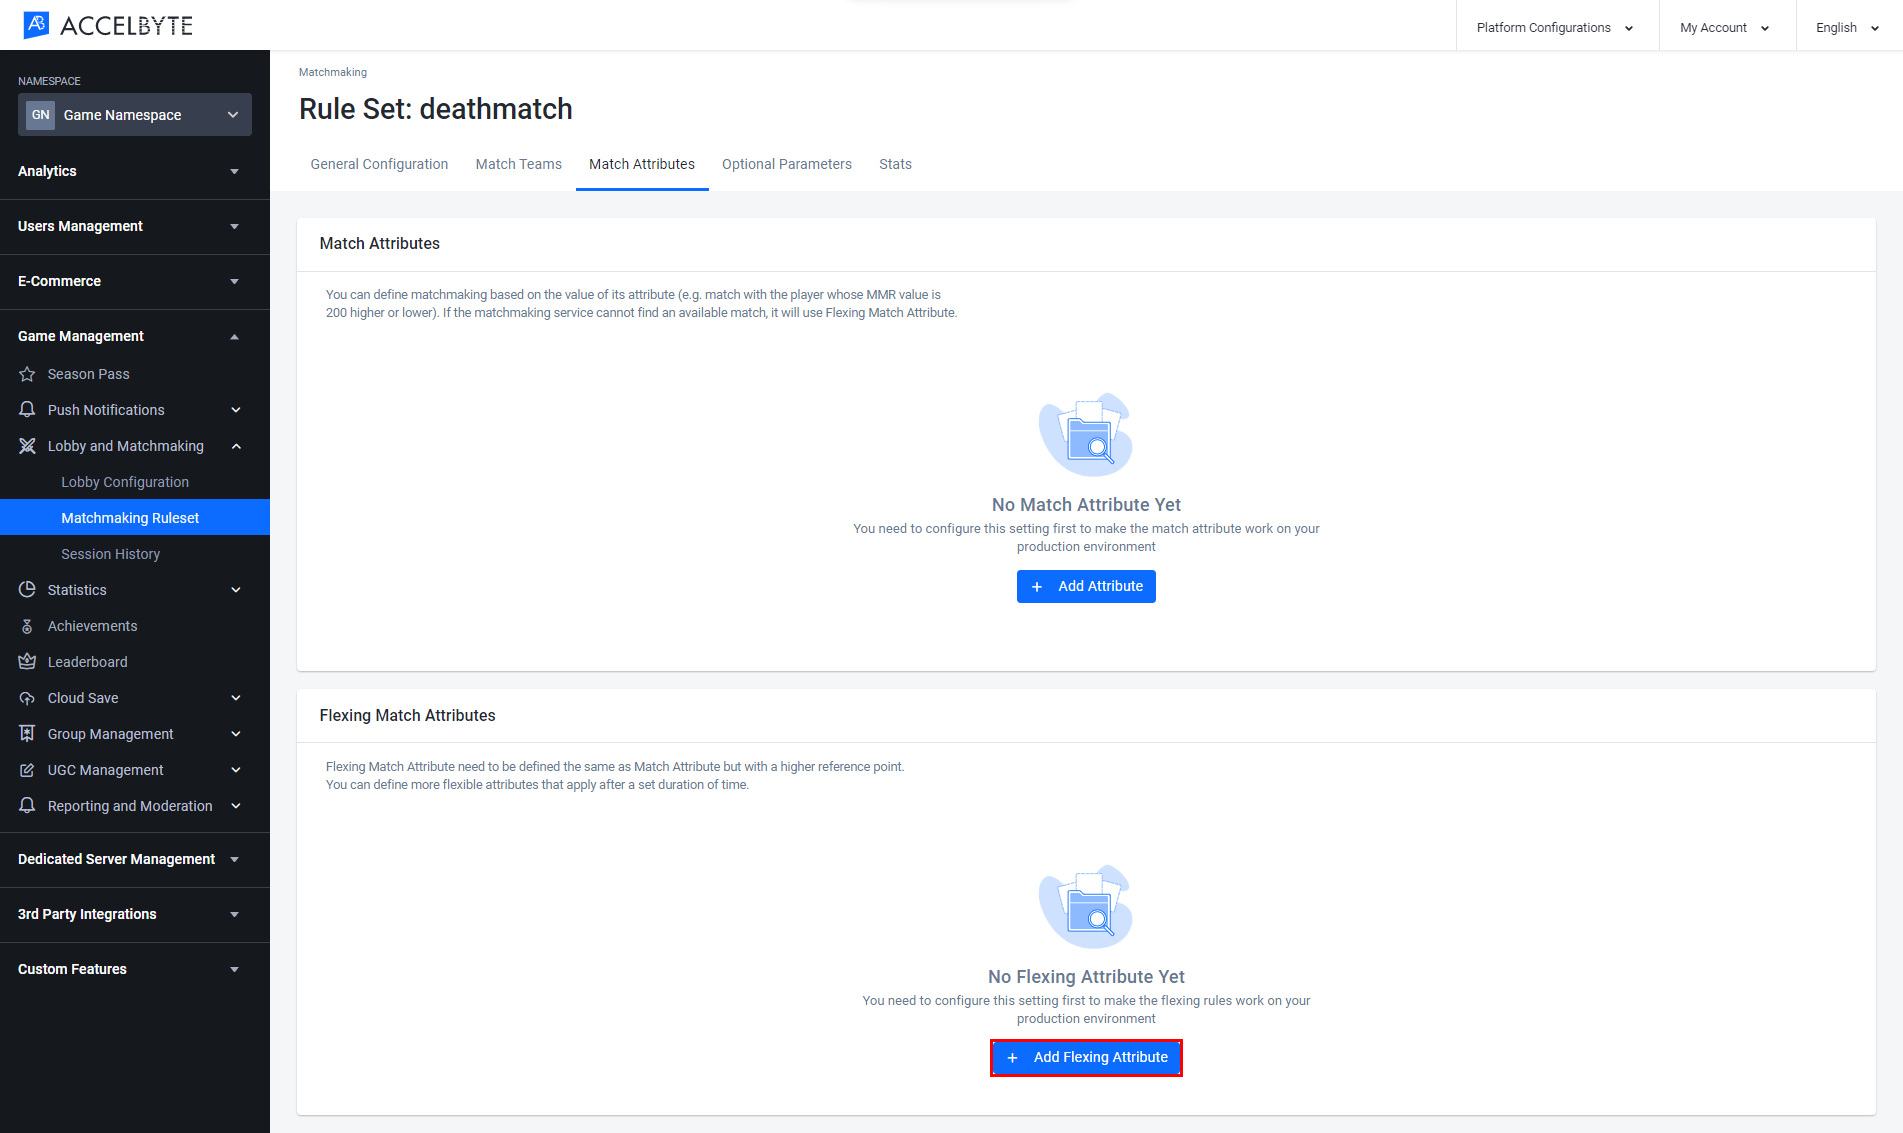
In the Matching Rules, there are two types of attributes/rules. The main match rule will be used to find an available match, and the Flexing Match Rule will be used when the matchmaking service cannot find an available match based on the main match rules.
In the Admin Portal, go to the Matchmaking page. Choose the to which Game Mode you want to add matchmaking rules. In the Action column, click the Ellipsis button and select View. You will be directed to the Matchmaking Detail page.
In the Matching Rule section, click the Add button.
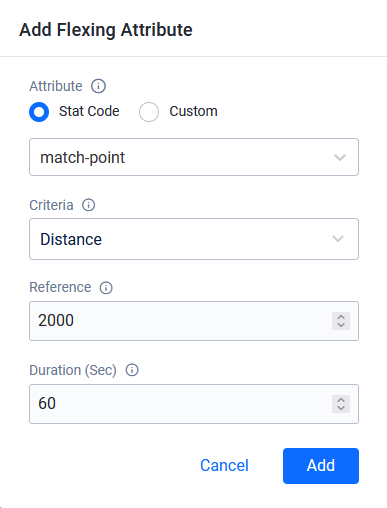
Fill in the required information in the form that appears.
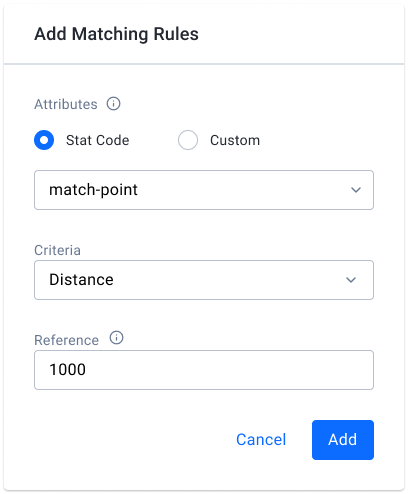
Click Add to continue. The matching rule will be added to the list.
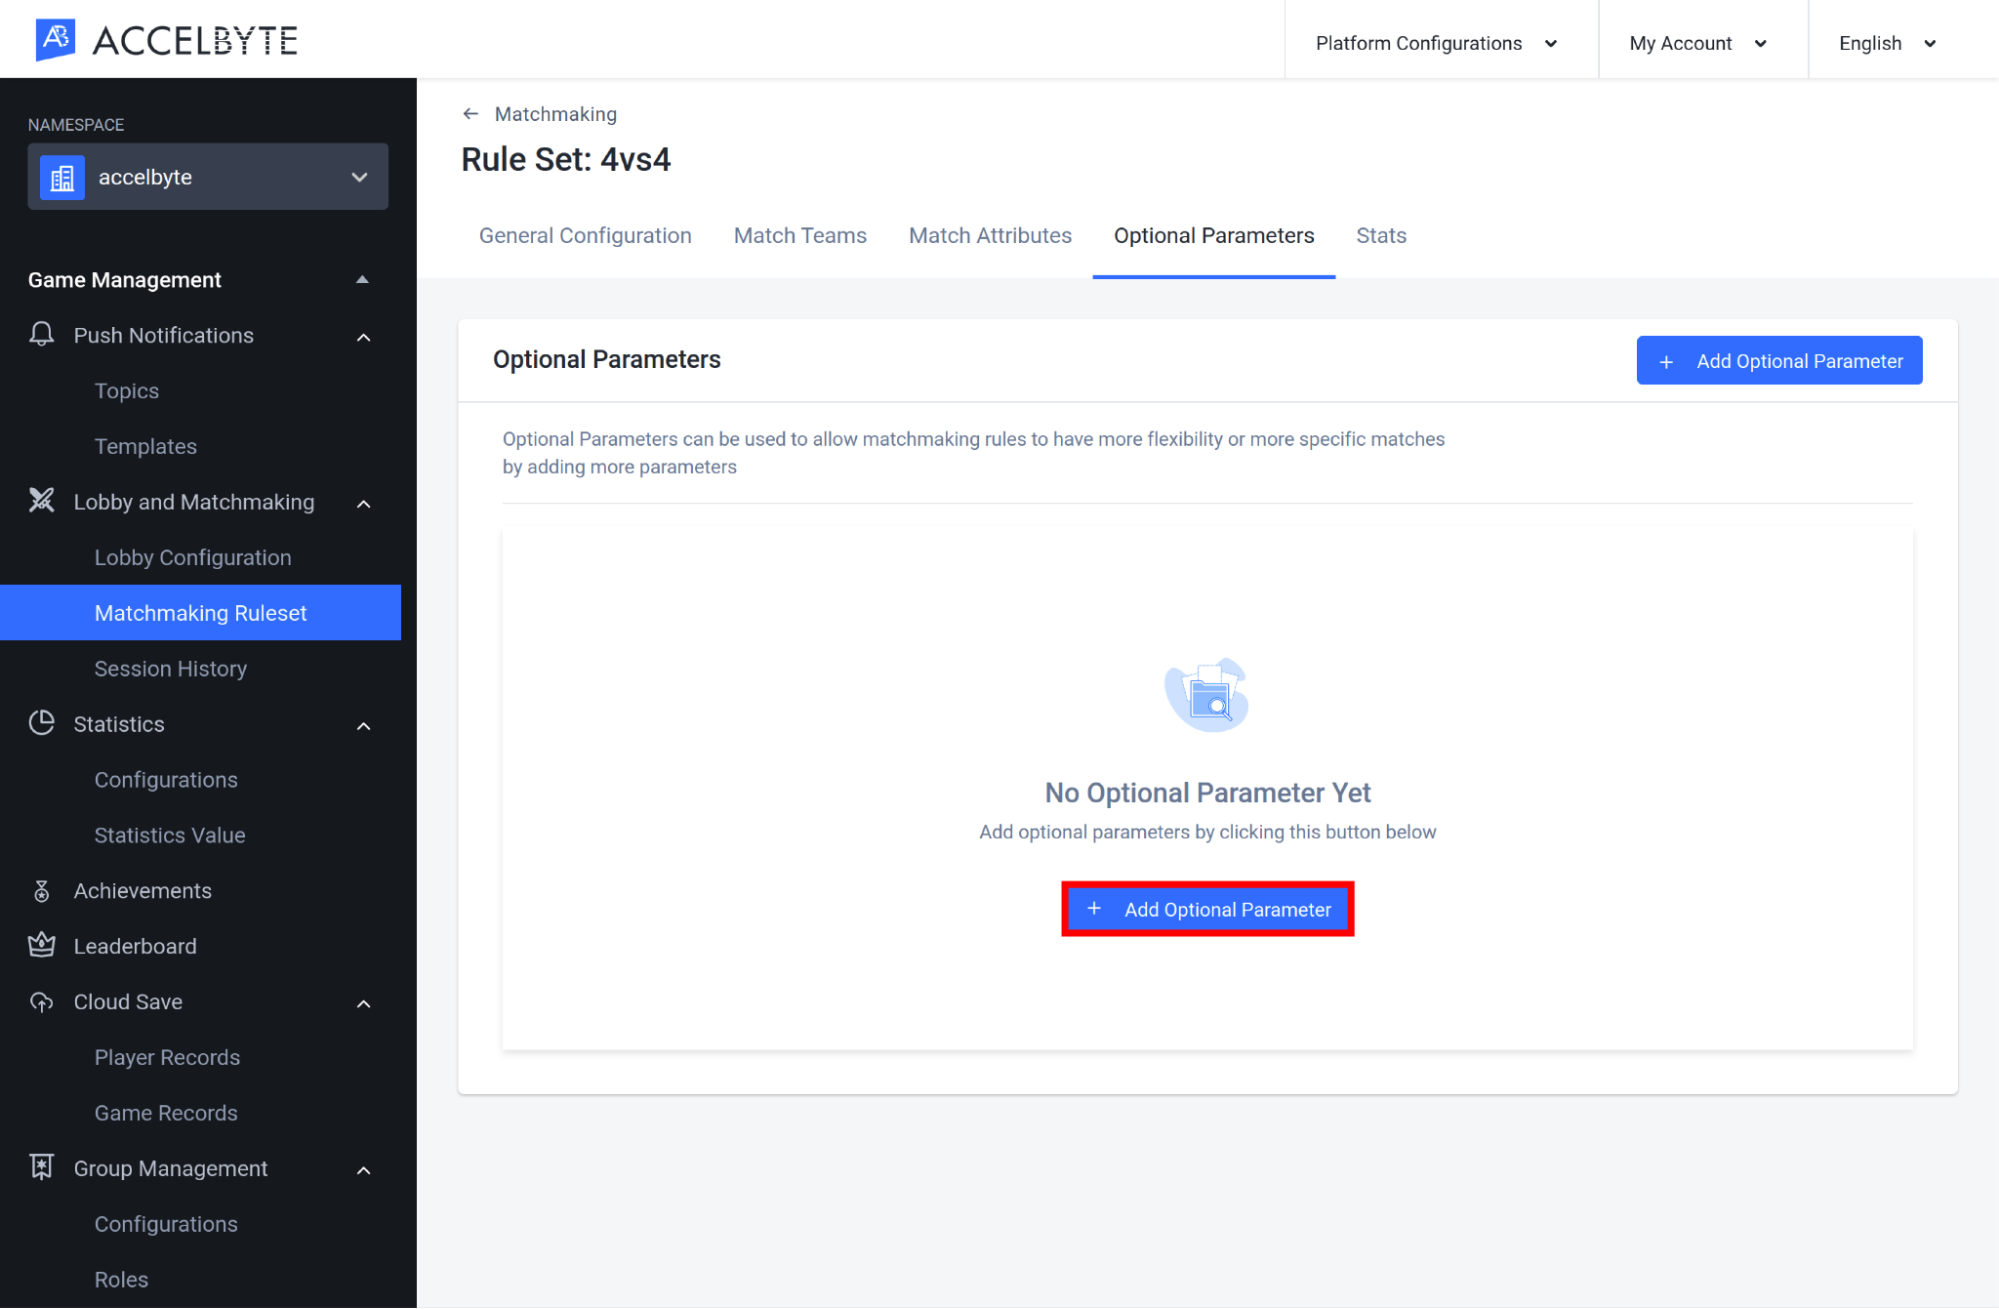
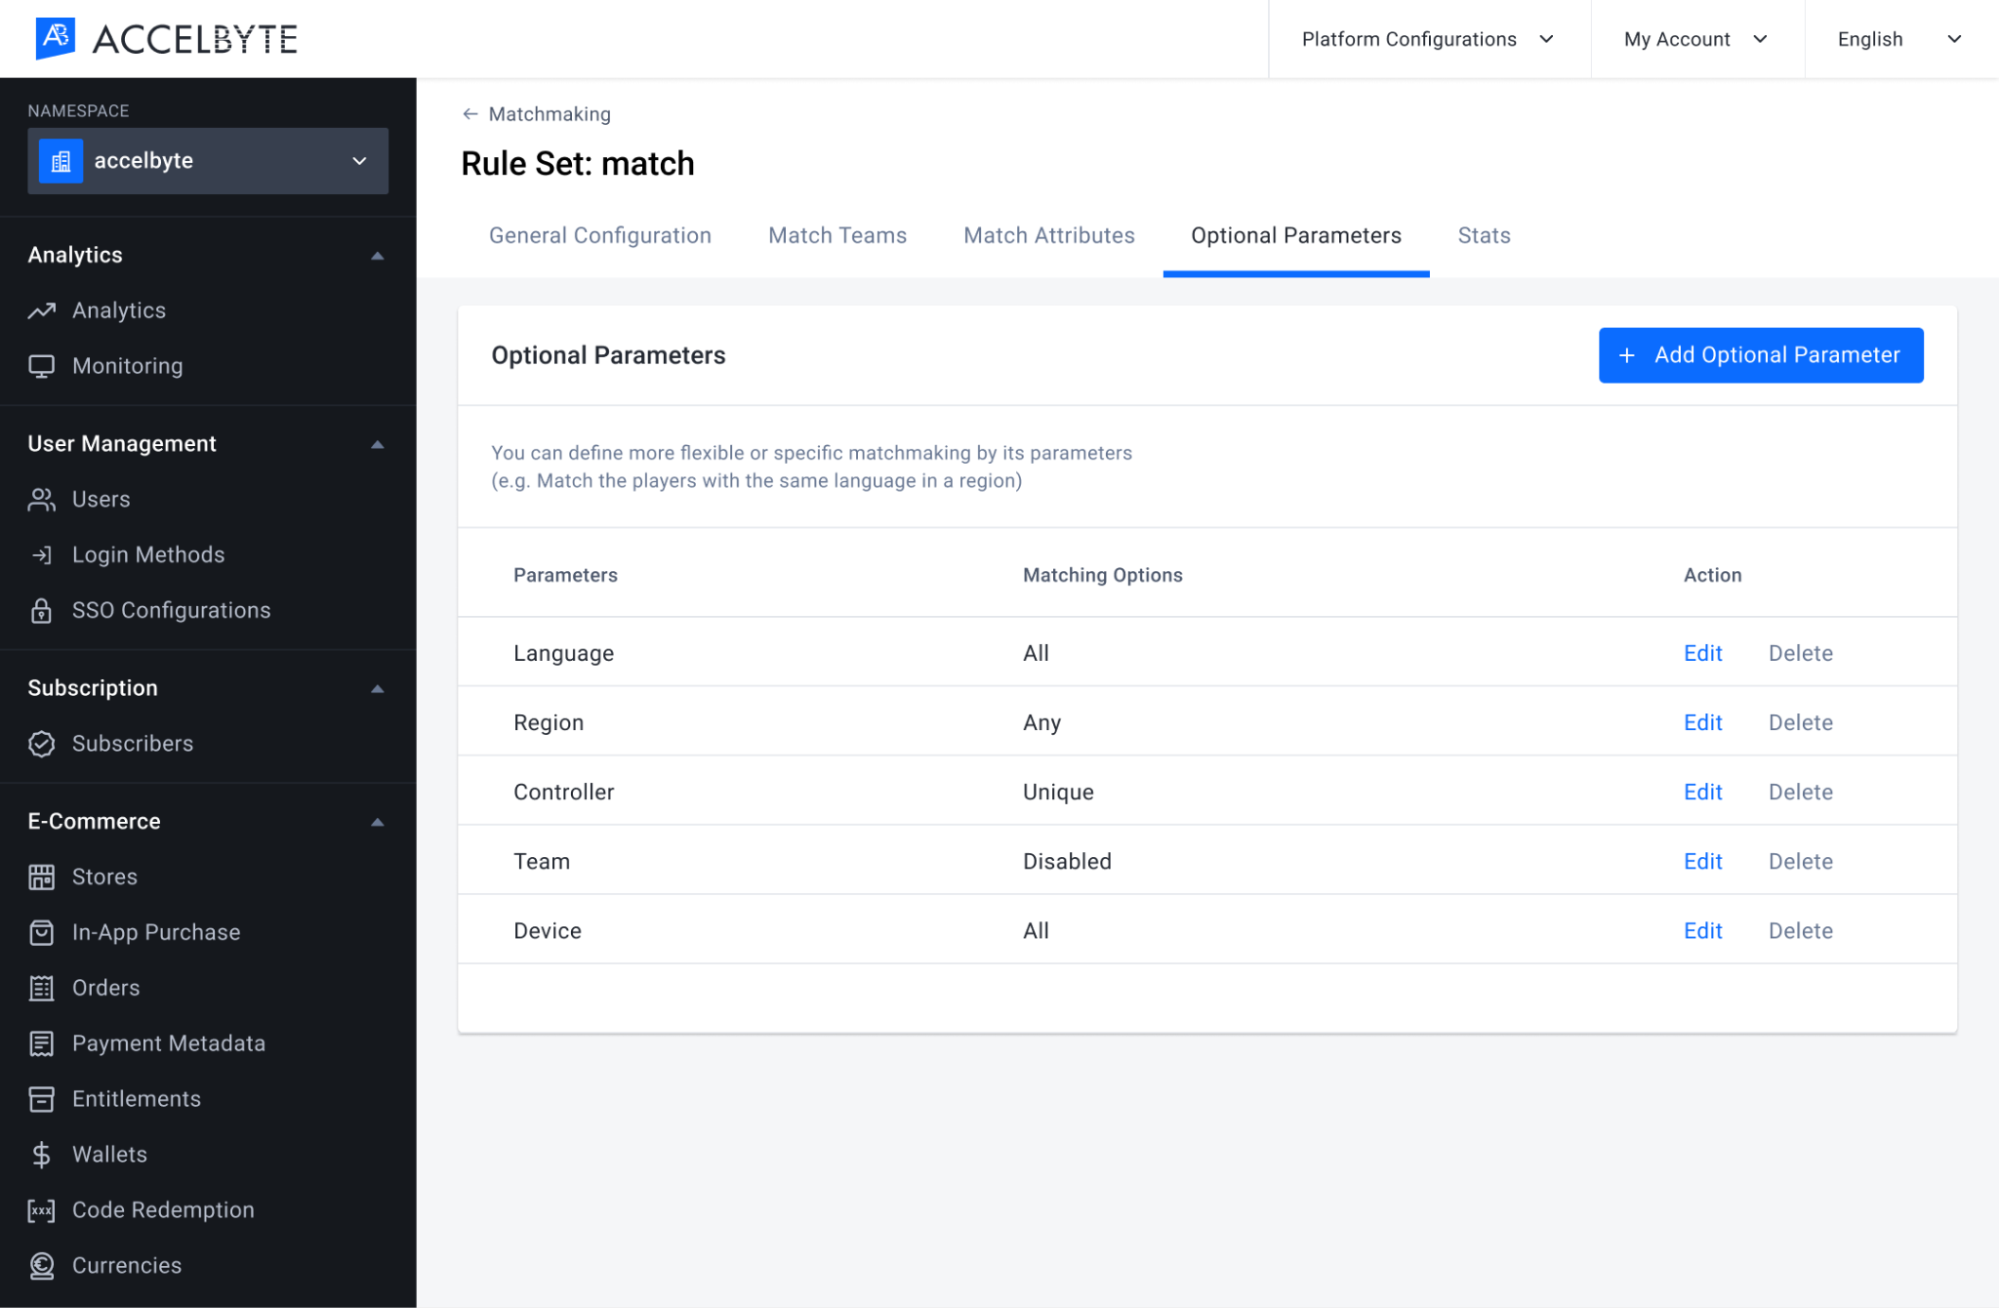
You can add optional parameters to your matchmaking rules by first defining the parameters you want, such as region or player level, and then define whether players should be matched when all of the chosen parameters match, when any of them match, or when none of them match. To add optional parameters to your matchmaking rules, follow the steps below:
On the Matchmaking Ruleset page of the Admin Portal, scroll to the Optional Parameters section at the bottom of the page and click Add Optional Parameter to add a new parameter.
The Add Optional Parameters form appears. Fill it in with the required information.
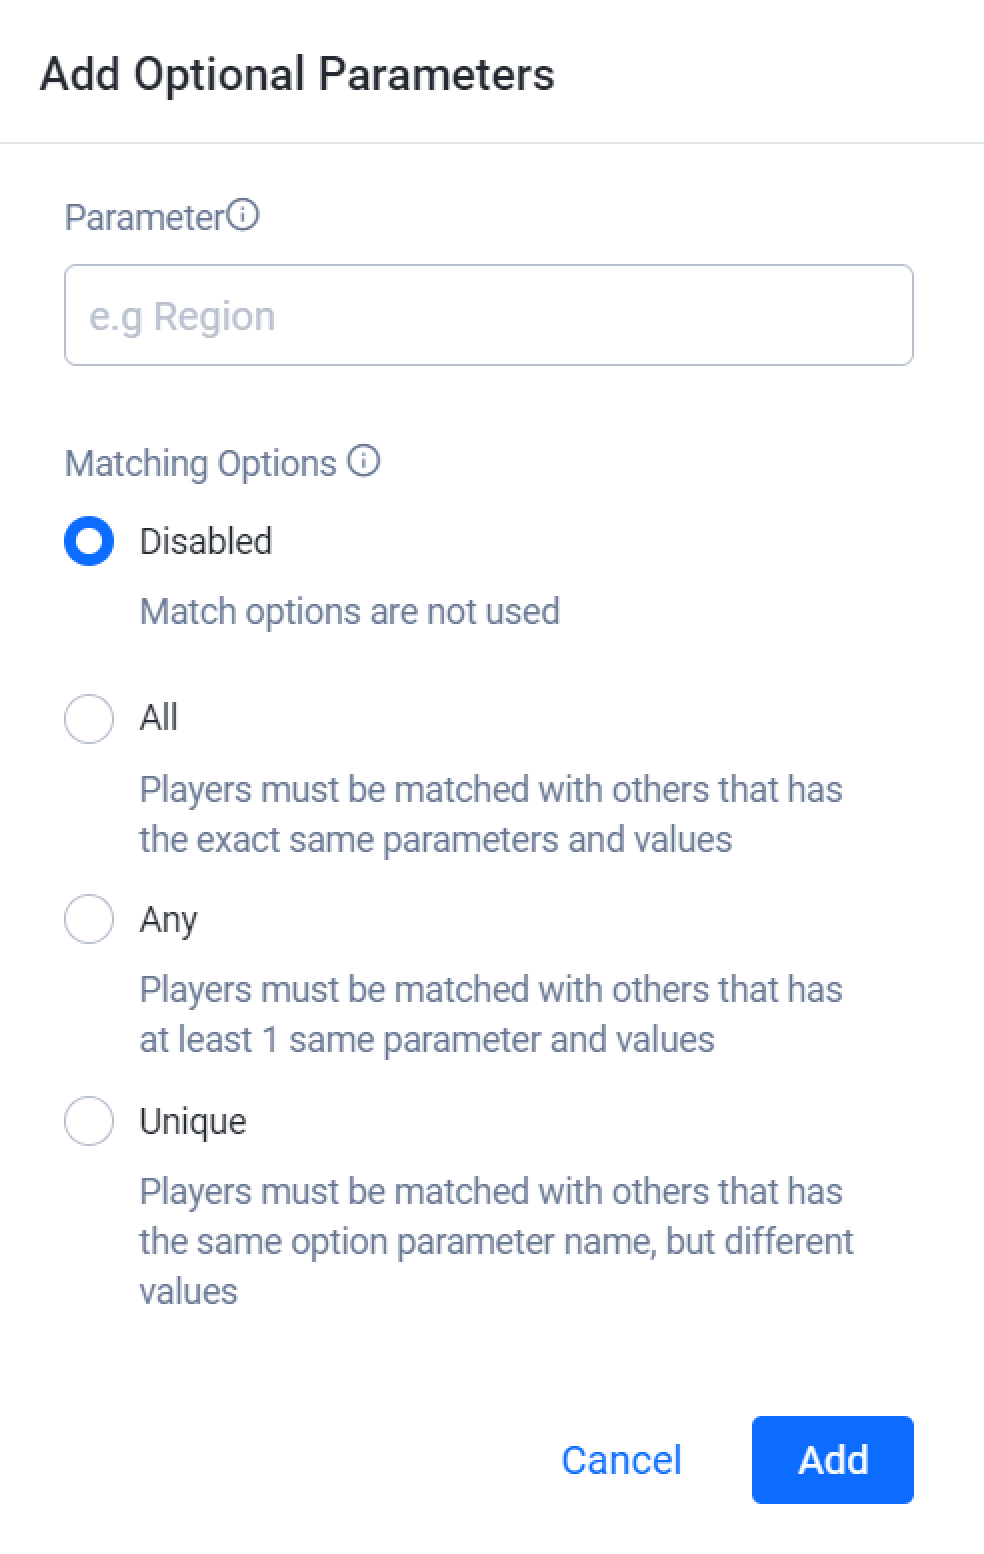
When you’re done, click Add Parameter to add the new parameter.
The parameter you created will appear in the Optional Parameters list in the Matching Rules panel at the bottom of the page. From here you can edit or delete any parameter.
From this panel you can see all the detailed information about matchmaking. This is real-time data, so you need to let the player start matchmaking, and then you can see the details of information on the panel.
In the matchmaking detail page, find the Stats tab section and click the Stats tab button to go to the matchmaking stats. Here you can see by default all the panel of the matchmaking statistics is something like this If no one player has been in a match through your game.
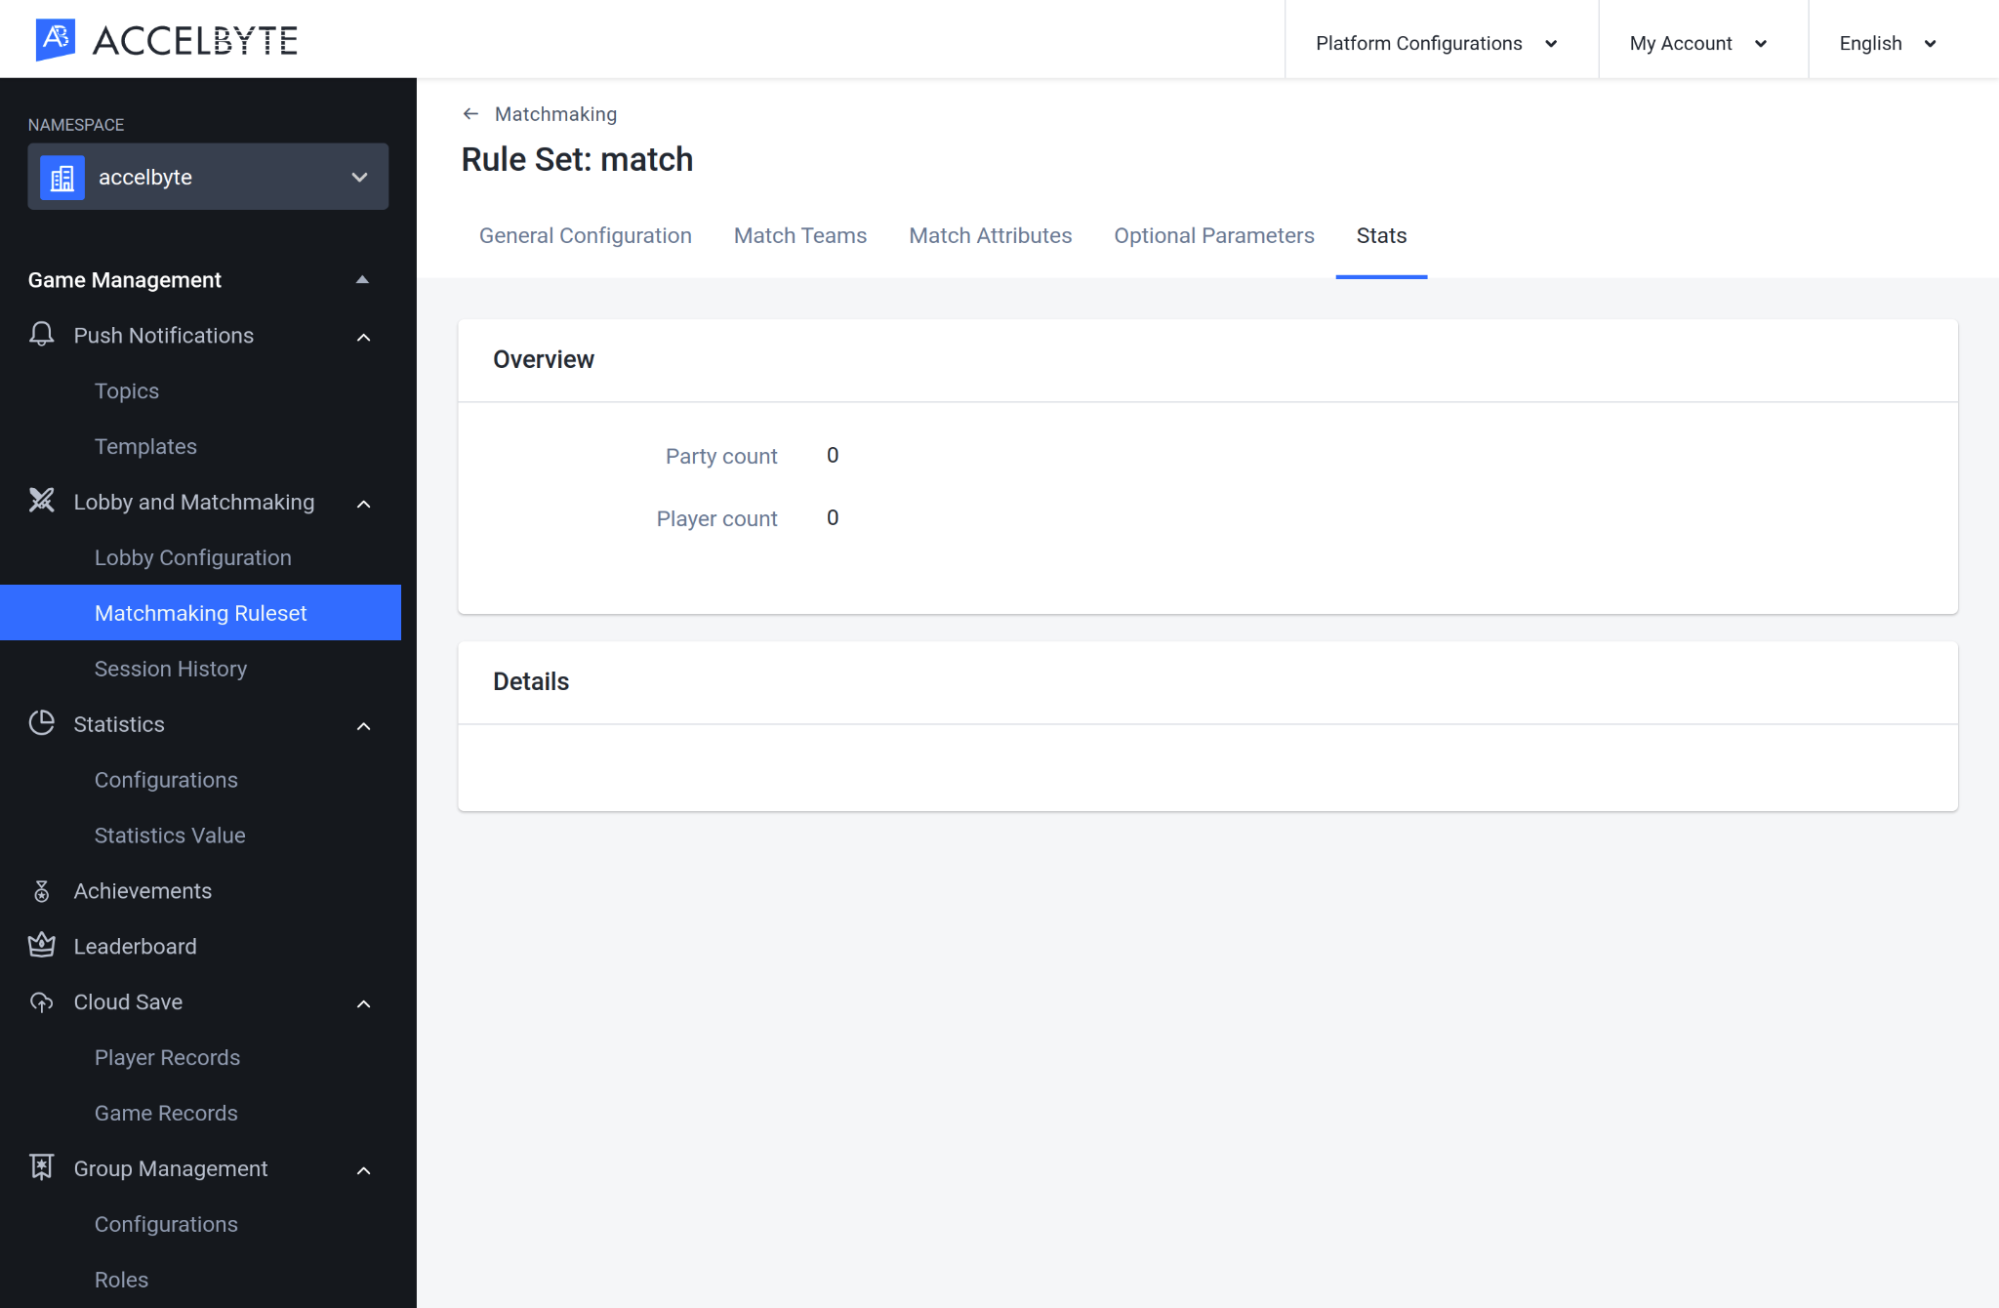
Now if you can see it here. There is some information about the party information, such as party ID, user ID, and some user info. You can click the user id to see the detailed information about the player. This matchmaking statistics only happens when the party starts the matchmaking and the current situation is in a queue of matchmaking. If matchmaking is found, then the matchmaking stats or the counter data here will disappear.
Follow the steps below to export a Matchmaking Configuration from a game namespace.
In the Admin Portal, open the game namespace that contains the configuration you want to export. On the Matchmaking page, open the Add Configuration dropdown menu and select Export Configuration.

Your matchmaking configuration will be exported in a JSON file. Here is an example of the contents:
IMPORTANT
If you use our Dedicated Server Manager Armada, don’t forget to also export your Dedicated Server Configuration. You will need both configurations if you want to use them in a different game namespace.
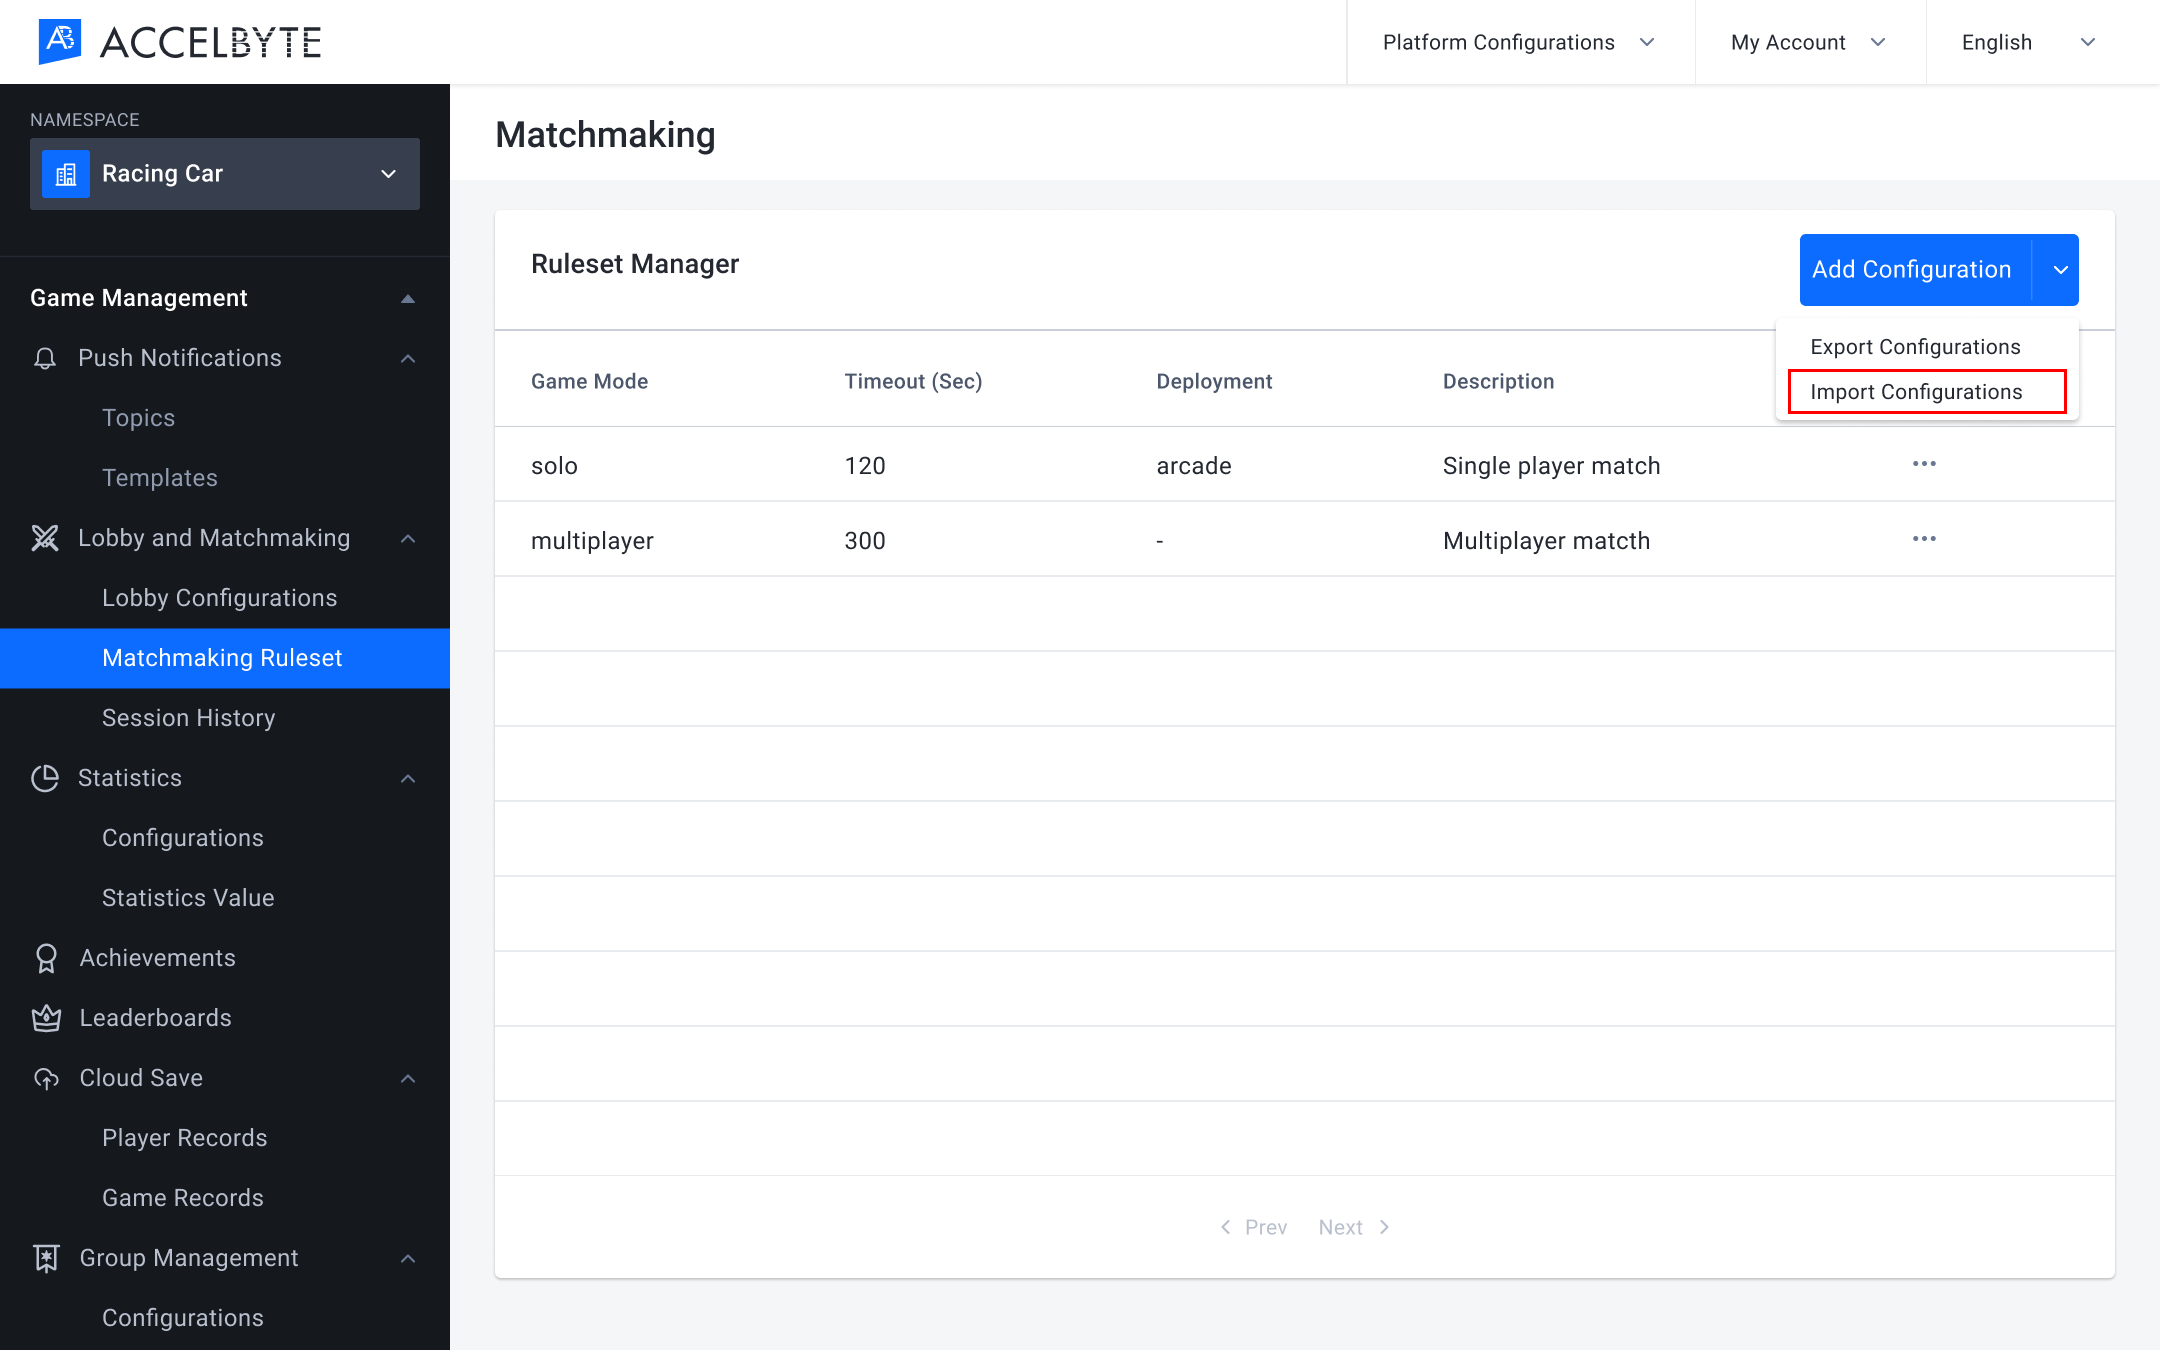
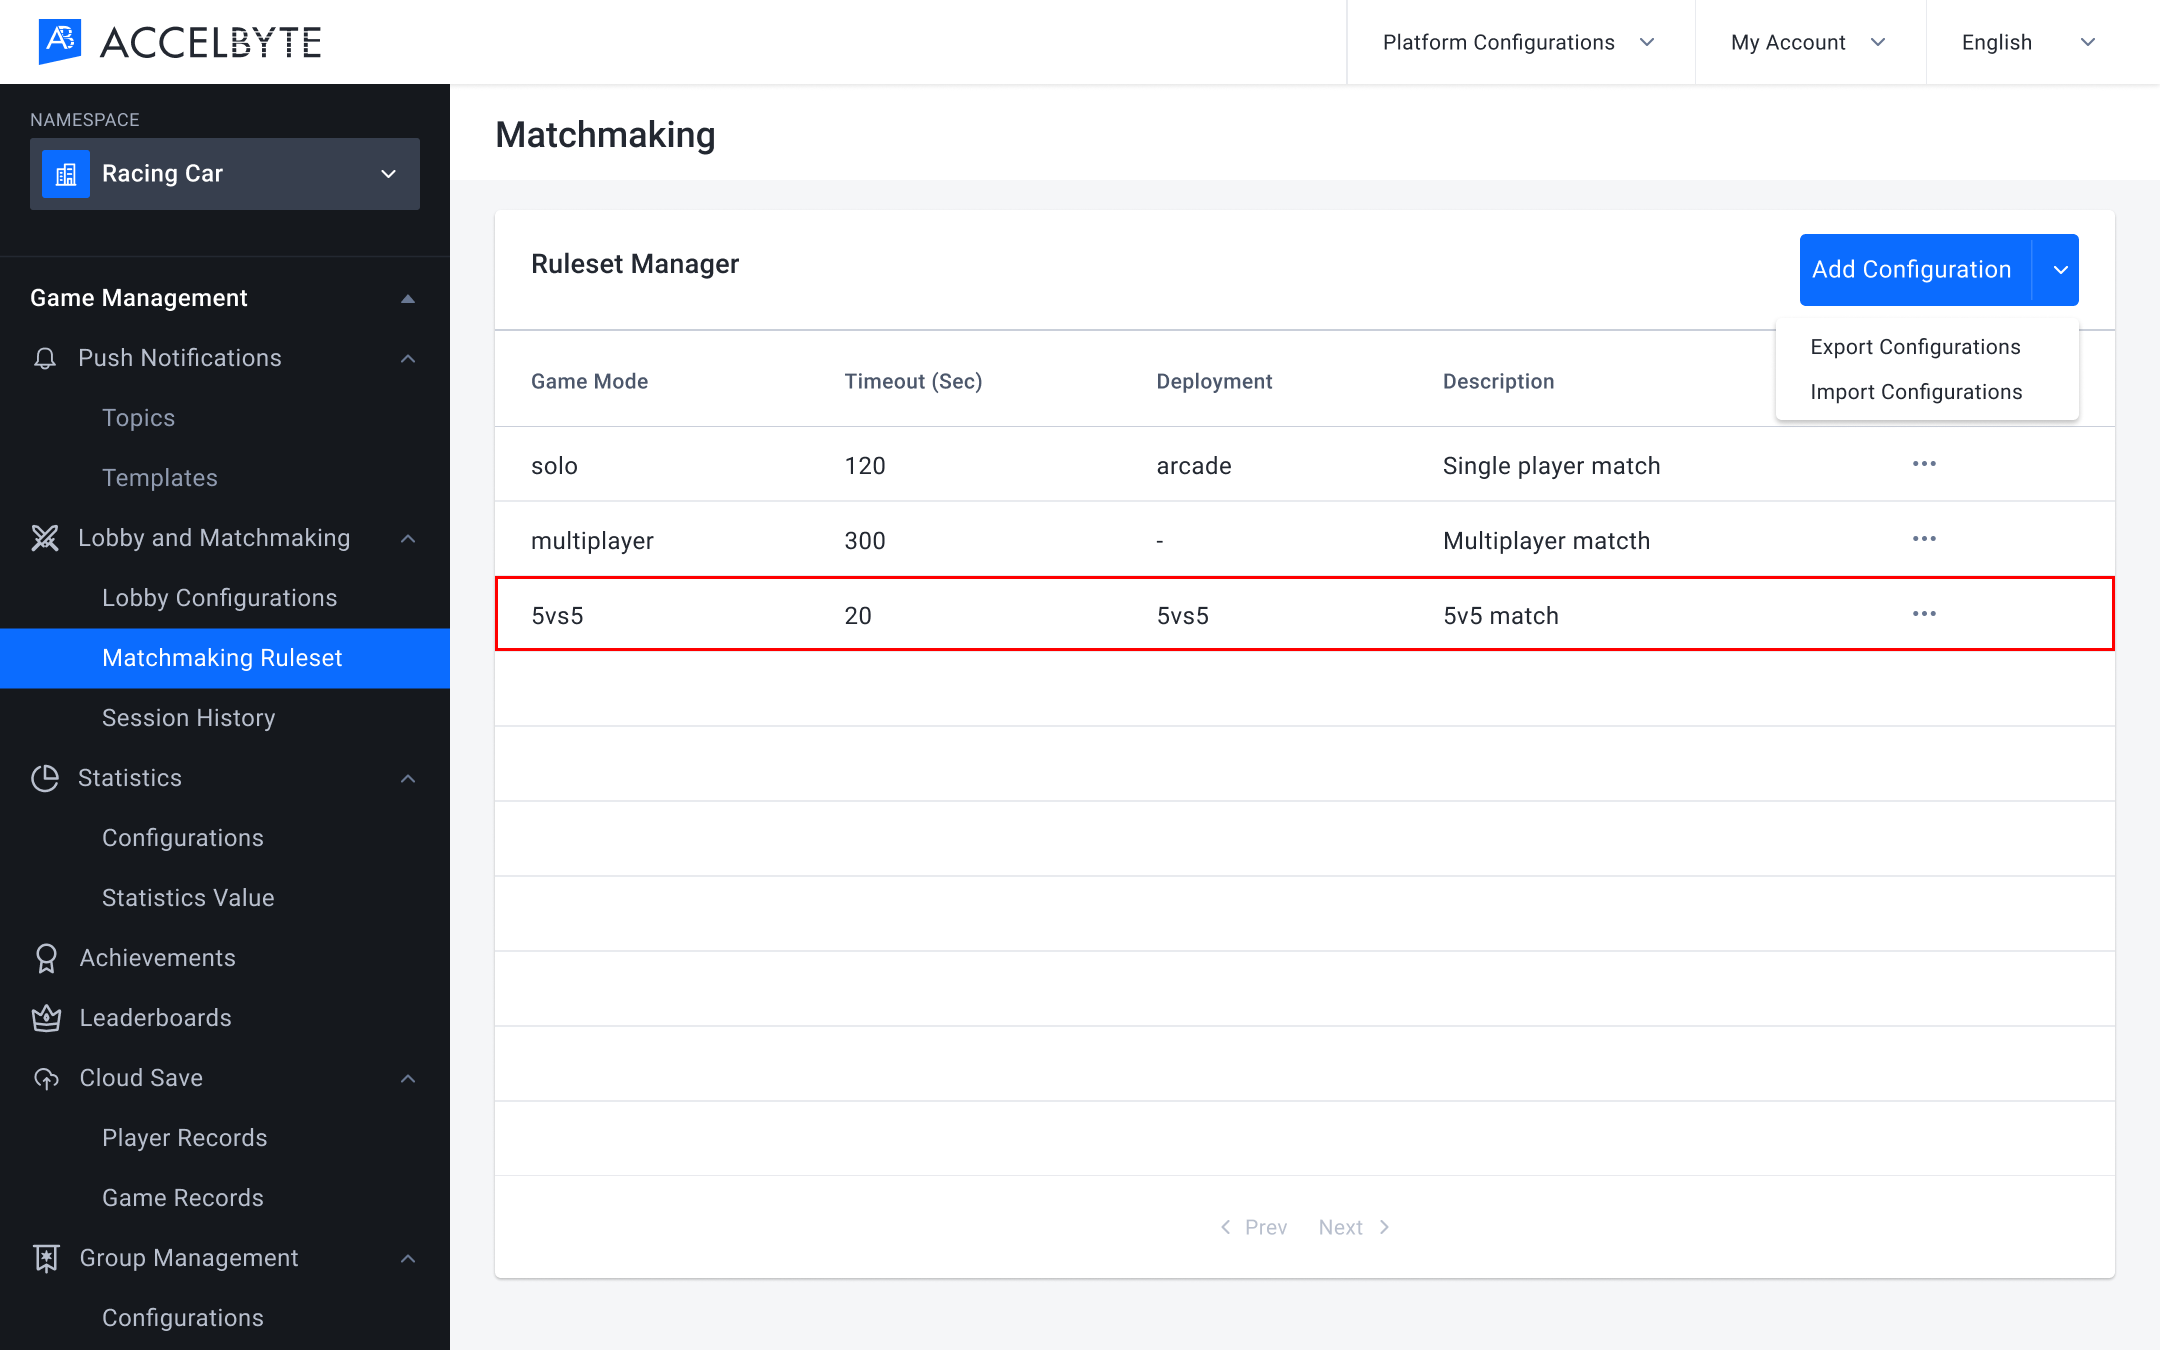
Follow the steps below to import a Matchmaking Configuration into a game namespace.
In the Admin Portal, go to the game namespace where you want to import the configuration. On the Matchmaking page, open the Add Configuration dropdown menu and select Import Configuration.
The Import Configuration form appears. Here, select the configuration file you want to import and choose the import method from the options below:
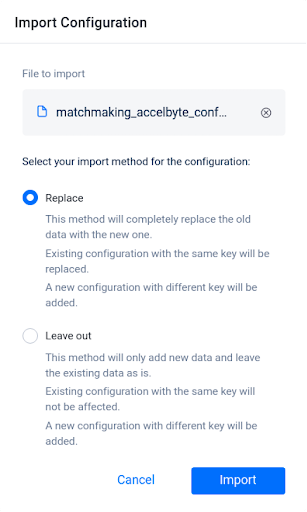
A confirmation window appears. To confirm your selection, type IMPORT in the text box, then click the Import button.
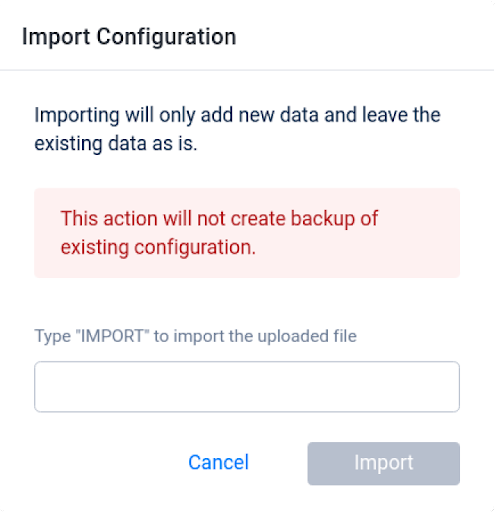
Here you can see the configuration has been added to the namespace.
IMPORTANT
If you use our Dedicated Server Manager Armada, don’t forget to also import your Dedicated Server Configuration. You will need both configurations in this namespace to use Armada.
The matchmaking can be started after the party leader invites another player to the party. The number of party members should match the configuration used when creating the matchmaking channel.
Once the matchmaking is finished, the matchmaking service will send a notification to the players to inform them that they've been matched. To implement this feature, use the function below.
The party leader can cancel matchmaking before a match is found. The players will also be notified that the matchmaking process is cancelled. To implement this feature, refer to the function below.
After the matchmaking process is completed, every player in each party needs to confirm their readiness to start the game. To implement this feature, refer to the function below.
If a player doesn’t confirm that they are ready to play after 20 seconds, they will receive a notification. To implement this feature, use the function below.
The following function is used to start matchmaking for a joinable session.
When a server is claimed, it will query the session details from the Matchmaking service. The game server will determine whether the session is joinable or not by calling the following function:
When receiving a joinable session, the game server will enqueue the session to the Matchmaking service as soon as it is ready to accept more players. To enqueue a session, use the following function:
After the game server enqueues a session, players who are already matched into the session can connect to the Lobby.
To ensure that the session in the queue is accurate, any time a player leaves during the Lobby phase, the server will update the session in the queue. To make this update, use the function below:
When the game is about to start, the game server will dequeue the session to prevent the Matchmaking service from matching a new player into it. To dequeue a session, use the following function:
You can use sub-game modes to allow players to choose from multiple game modes within your game. The following function is used to matchmake a player into a sub-game mode.
You can configure the matchmaking channel using our API. Follow the steps below to perform a request:
Use the Create a Channel: POST /matchmaking/namespaces/{namespace}/channels endpoint. Make sure you have the bearer access token for authorization.
Input the desired Namespace.
Fill out the Request Body.
Fill in the attributes for the team to define how many teams will be matched.
Fill in the attributes for the flexing rule. Flexing rules are used when the matchmaking service cannot find a match based on the matching rule. Flexing rules should be the same as matching rules, but with a higher reference point to allow for more possible matches.
Fill in the attributes of the matching rule.
Here is an example of a channel configuration for a 1 vs 1 match. Two players will be matched together with this configuration.
{
   "slug":"namspace:string",
   "ruleSet":{
      "alliance":{
         "minNumber":2,
         "maxNumber":2,
         "playerMinNumber":1,
         "playerMaxNumber":1
      },
      "matchingRules":[
         {
            "attribute":"string",
            "criteria":"distance",
            "reference":0
         }
      ],
      "flexingRules":[
         {
            "duration":0,
            "attribute":"string",
            "criteria":"distance",
            "reference":0
         }
      ],
      "match_options":{
         "options":null
      },
      "sub_game_modes":{

      }
   },
   "namespace":"namespace",
   "gameMode":"string",
   "description":"string",
   "findMatchTimeoutSeconds":0,
   "sessionQueueTimeoutSeconds":0,
   "joinable":true,
   "socialMatchmaking":false,
   "use_sub_gamemode":false,
   "deployment":"-",
   "max_delay_ms":0
}
This is a channel configuration for a 3v3v3 match where 9 individual players will be matched and play together.
{
   "slug":"namspace:string",
   "ruleSet":{
      "alliance":{
         "minNumber":3,
         "maxNumber":3,
         "playerMinNumber":3,
         "playerMaxNumber":1
      },
      "matchingRules":[
         {
            "attribute":"string",
            "criteria":"distance",
            "reference":0
         }
      ],
      "flexingRules":[
         {
            "duration":0,
            "attribute":"string",
            "criteria":"distance",
            "reference":0
         }
      ],
      "match_options":{
         "options":null
      },
      "sub_game_modes":{

      }
   },
   "namespace":"namespace",
   "gameMode":"string",
   "description":"string",
   "findMatchTimeoutSeconds":0,
   "sessionQueueTimeoutSeconds":0,
   "joinable":true,
   "socialMatchmaking":false,
   "use_sub_gamemode":false,
   "deployment":"-",
   "max_delay_ms":0
}
Before using the Matchmaking service from the SDK, you will need to initialize your server-side SDK to make you authorized and able to perform create, read, update, and delete actions.
Before using the Matchmaking service from the Golang SDK, you will need to initialize the SDK by following the steps below:
Once completed, you can use the Golang SDK to create, read, update, or delete the Matchmaking (opens new window) service from your serverless app.
Before using the Matchmaking service from the Python SDK, you will need to initialize the SDK by following the steps below:
Once completed, you can use the Python SDK to create, read, update, or delete the Matchmaking (opens new window) service from your serverless app.
Before using the Matchmaking service, you will need to set some permissions. Use the following .NET namespaces:
using AccelByte.Sdk.Api.Matchmaking.Model;
using AccelByte.Sdk.Api.Matchmaking.Operation;
using AccelByte.Sdk.Api.Matchmaking.Wrapper;
Before using the Matchmaking service, you will need to set some permissions. Initialize the Matchmaking wrapper from the Matchmaking service using the following code:
Matchmaking wMatchmaking = new Matchmaking(sdk);
Once completed, you can use the SDK to create, read, update, or delete matchmaking.
Use the following function to add a player to the session in a channel (opens new window):
Use the following function to remove a player from the session in a channel (opens new window):
Use the following function to create a matchmaking channel (opens new window):
Use the following function to retrieve a matchmaking channel (opens new window):
Use the following function to retrieve sessions in a matchmaking channel (opens new window):
Use the following function to update a matchmaking channel (opens new window):
Use the following function to delete a matchmaking channel (opens new window):
using AccelByte.Api;
using AccelByte.Core;
using AccelByte.Models;
AccelBytePlugin.GetLobby().MatchmakingCompleted += result => {};
AccelBytePlugin.GetLobby().ReadyForMatchConfirmed += result => {};
AccelBytePlugin.GetLobby().DSUpdated += result =>{};
AccelBytePlugin.GetLobby().RematchmakingNotif += result =>{};
string gameMode;

AccelBytePlugin.GetLobby().StartMatchmaking(gameMode, result =>
{
    //Check this is not an error
    if (!result.IsError)
    {
        Debug.Log("Started matchmaking is successful");
    }
});
string gameMode;

AccelBytePlugin.GetLobby().CancelMatchmaking(gameMode, result =>
{
    //Check this is not an error
    if (!result.IsError)
    {
        Debug.Log("Canceled matchmaking is successful");
    }
});
string matchId;

AccelBytePlugin.GetLobby().ConfirmReadyForMatch(matchId, result =>
{
    //Check this is not an error
    if (!result.IsError)
    {
        Debug.Log("Ready for match is successful");
    }
});
In this tutorial, you will learn how to use the Matchmaking services. This guide assumes that you already implemented the Lobby (opens new window), Friends (opens new window), and Party (opens new window) services.
Since Matchmaking implementation can vary for each game, you can familiarize yourself with other concepts and classes in the LobbyModels.cs file inside the plugin SDK.
We will start by adding simple matchmaking logic into the game.
using AccelByte.Api;
using AccelByte.Models;
using AccelByte.Core;
// Current selected game mode
private string gameMode = "1vs1";
private void FindMatch()
{
    AccelBytePlugin.GetLobby().StartMatchmaking(gameMode, result =>
    {
            // Check this is an error
            if (result.IsError)
            {
                Debug.Log($"Unable to start matchmaking: error code: {result.Error.Code} message: {result.Error.Message}");
            }
            else
            {
                Debug.Log("Started matchmaking is successful");
            }
    });

}
private void CancelMatchmaking()
{
    AccelBytePlugin.GetLobby().CancelMatchmaking(gameMode, result =>
    {
            //Check this is an error
            if (result.IsError)
            {
                Debug.Log($"Unable to cancel matchmaking: error code: {result.Error.Code} message: {result.Error.Message}");
            }
            else
            {
                Debug.Log("Canceled matchmaking is successful");
            }
    });
}
private void ReadyMatchmaking()
{
    AccelBytePlugin.GetLobby().ConfirmReadyForMatch(matchId, result =>
    {
            //Check this is an error
            if (result.IsError)
            {
                Debug.Log($"Unable to ready for match: error code: {result.Error.Code} message: {result.Error.Message}");
            }
            else
            {
                Debug.Log("Ready for match is successful");
            }
    });
}
This notification event occurs when the player finds a match, or the party leader starts or cancels matchmaking. You can differentiate these events by using the matchmaking status, such as in the following example:
_lobby.MatchmakingCompleted += result =>
{
    // Called when party leader start a match
    if (result.Value.status == "start")
    {
        Debug.Log($"Party leader start matchmaking.");
    }
    // Called when party leader cancel a match
    else if (result.Value.status == "cancel")
    {
        Debug.Log($"Party leader cancel matchmaking.");
    }
    // Called when found a match
    else if (result.Value.status == "done")
    {
        Debug.Log($"Found a match. Match id: {result.Value.matchId}");
    }
};
start: party members receive this notification event when the party leader starts matchmaking.
cancel: party members receive this notification event when the party leader cancels matchmaking.
done: party members receive this notification event when a match is found.
Ready for Match Confirmed
This notification event occurs when a player in the lobby declares they are ready to play the match. You can follow this to get the log when the player is ready to play.
`_lobby.ReadyForMatchConfirmed += result => { Debug.Log($"User {result.Value.userId} is ready!");};`
This notification event occurs when all players are ready to play in the current match, and this prompts an update from the Dedicated Server. To connect to the server, you must wait until the status from the DSUpdated notification event becomes ready or busy, such as in the following code:
_lobby.DSUpdated += result =>
{
    if (result.Value.status == "READY" || result.Value.status == "BUSY")
    {
        Debug.Log($"Game is started");
    }
};
You may also want to retry matchmaking if the first matchmaking attempt fails. Use this event below to do this.
_lobby.RematchmakingNotif += result => { Debug.Log($"Find another match");};
The result data only contains ban durations. Based on this, there are two rematchmaking behaviors:
Congratulations! You have learnt how to use the Matchmaking service!
Continue on for a step by step example of the UI and code implementation. Otherwise, you are now ready to move on to Armada (opens new window).


You can create an empty panel as this will be a temporary panel for now. You will change this to a real game scene later.

Now that you have some basic Matchmaking functionalities, you can implement these with your UI.
public enum GameMode
{
    None,
    versusOne,
    versusTwo
}
public static class GameModeHandler
{
    // This string is based on mode in Admin Portal
    private const string None = "None"; // This is default and not registered in AP
    private const string VersusOne = "1vs1";
    private const string VersusTwo = "2vs2";

    /// <summary>
    /// Parse Game Mode from enum to string
    /// </summary>
    /// <param name="mode"> Game Mode enum that will be parsed into string</param>
    /// <returns></returns>
    public static string GetString(this GameMode mode)
    {
        switch (mode)
        {
            case GameMode.versusOne:
                return VersusOne;
            case GameMode.versusTwo:
                return VersusTwo;

            case GameMode.None:
            default:
                return None;
        }
    }

    /// <summary>
    /// Parse Game Mode to return total players
    /// </summary>
    /// <param name="mode"> Game Mode enum that will be parsed into total players</param>
    /// <returns></returns>
    public static int GetTotalPlayers(this GameMode mode)
    {
        switch (mode)
        {
            case GameMode.versusOne:
                return 2;
            case GameMode.versusTwo:
                return 4;

            case GameMode.None:
            default:
                return 0;
        }
    }

    /// <summary>
    /// Parse Game Mode from string to GameMode
    /// </summary>
    /// <param name="mode"> Game Mode string that will be parsed into enum</param>
    /// <returns></returns>
    public static GameMode ToGameMode(this string mode)
    {
        switch (mode)
        {
            case VersusOne:
                return GameMode.versusOne;
            case VersusTwo:
                return GameMode.versusTwo;

            case None:
            default:
                return GameMode.None;
        }
    }
}
using System;

public static class ConnectionHandler
{
    // Get/ set ip in string
    public static string ip = "localhost";
    // Get/ set port in integer
    public static int port = 7777;

    // Get port in ushort format
    public static ushort uPort => Convert.ToUInt16(port);
}
public static bool GetLocalArgument()
{
    bool isLocal = false;

    // Get Local Argument from the system
    // You can run local by adding -local when executing the game/ server
    string[] args = System.Environment.GetCommandLineArgs();
    foreach (var arg in args)
    {
        if (arg.Contains("local"))
        {
            isLocal = true;
            break;
        }
    }

    return isLocal;
}
...
using UnityEngine.UI;

using UI = UnityEngine.UI;
// Current selected game mode
private GameMode gameMode;
private const string DefaultCountUp = "Time Elapsed: 00:00";
// This default count down time must be similar with the Lobby Config in the Admin Portal
private const string DefaultCountDown = "20";

// Current active match id
private string matchId;
#region UI
[SerializeField]
private GameObject matchmakingWindow;
[SerializeField]
private GameObject findMatchWindow;
[SerializeField]
private GameObject readyMatchWindow;
[SerializeField]
private GameObject gameWindow;

[SerializeField]
private Dropdown gameModeDropdown;

#region Button

[SerializeField]
private Button findMatchButton;
[SerializeField]
private Button readyButton;
[SerializeField]
private Button cancelButton;
[SerializeField]
private Button exitButton;
#endregion

[SerializeField]
private Text countUpText;
[SerializeField]
private Text countDownText;

[SerializeField]
private MatchmakingUsernamePanel[] usernameList;
#endregion
/// Clean up the username text and reset frame color
/// After that, populate current party members to the username text
private void CleanAndPopulateUsernameText()
{
    // Emptying username text in the matchmaking window
    foreach (var username in usernameList)
    {
        username.SetUsernameText("");
        username.SetUsernameFrameColor(Color.white);
    }

    // Populate party members
    int count = 0;
    foreach (var username in GetPartyHandler().partyMembers)
    {
        Debug.Log($"Populate party member with username: {username.Value}");

        usernameList[count].SetUsernameText(username.Value);
        count++;
    }
}

/// Reset the count down and count up into default value
private void ResetTimerText()
{
    countDownText.enabled = true;

    countDownText.text = DefaultCountDown;
    countUpText.text = DefaultCountUp;
}
private enum MatchmakingWindows
{
    Lobby,
    FindMatch,
    Matchmaking,
    Game
}
private MatchmakingWindows DisplayWindow
{
    get => DisplayWindow;
    set
    {
        switch (value)
        {
            case MatchmakingWindows.Lobby:
                matchmakingWindow.SetActive(false);
                findMatchWindow.SetActive(false);
                readyMatchWindow.SetActive(false);
                gameWindow.SetActive(false);
                break;

            case MatchmakingWindows.FindMatch:
                ResetTimerText();

                matchmakingWindow.SetActive(true);
                findMatchWindow.SetActive(true);
                readyMatchWindow.SetActive(false);
                gameWindow.SetActive(false);
                break;

            case MatchmakingWindows.Matchmaking:
                ResetTimerText();
                CleanAndPopulateUsernameText();

                matchmakingWindow.SetActive(true);
                findMatchWindow.SetActive(false);
                readyMatchWindow.SetActive(true);
                gameWindow.SetActive(false);
                break;

            case MatchmakingWindows.Game:
                matchmakingWindow.SetActive(true);
                findMatchWindow.SetActive(false);
                readyMatchWindow.SetActive(false);
                gameWindow.SetActive(true);
                break;

            default:
                break;
        }
    }
}
// Grab the current Party Handler
private PartyHandler GetPartyHandler()
{
    return LobbyHandler.Instance.partyHandler;
}
/// Validate empty party, game mode, and party members count based on game mode
private bool ValidateGameModeAndParty()
{
    // Set game mode based on game mode selector dropdown
    gameMode = gameModeDropdown.options[gameModeDropdown.value].text.ToGameMode();

    // Avoid to choose default game mode
    if (gameModeDropdown.value == 0)
    {
        LobbyHandler.Instance.WriteLogMessage("Choose the game mode", Color.red);
        return false;
    }
    // Check if user is not in the party
    if (GetPartyHandler().partyMembers == null || GetPartyHandler().partyMembers?.Count == 0)
    {
        LobbyHandler.Instance.WriteLogMessage("You are not in the party", Color.red);
        return false;
    }
    // Avoid party members exceed from the game mode
    if (gameMode == GameMode.versusOne && GetPartyHandler().partyMembers?.Count == 1 ||
        gameMode == GameMode.versusTwo && GetPartyHandler().partyMembers?.Count <= 2)
    {
        return true;
    }

    LobbyHandler.Instance.WriteLogMessage("Party members are exceeding from the selected game mode", Color.red);
    return false;
}
Check the game mode and party. After it passes, start matchmaking
private void FindMatch()
{
    // Check if the party is already created,
    // game mode is not empty, and
    // party /// members are not exceeding from the selected game mode
    if (!ValidateGameModeAndParty())
    {
            return;
    }
    AccelBytePlugin.GetLobby().StartMatchmaking(gameMode.GetString()
, result =>
    {
        if (result.IsError)
        ...
        else
        {
            ...
            DisplayWindow = MatchmakingWindows.FindMatch;
...

/// Cancel find match and back to the Lobby
private void CancelMatchmaking()
{
    AccelBytePlugin.GetLobby().CancelMatchmaking(gameMode.GetString(), result =>
    {
        //Check this is not an error
        if (result.IsError)
        ...
        else
        {
            ...
            DisplayWindow = MatchmakingWindows.Lobby;
...
/// Setup UI
public void SetupMatchmaking()
{
    // Setup button listener
    findMatchButton.onClick.AddListener(FindMatch);
    readyButton.onClick.AddListener(ReadyMatchmaking);
    cancelButton.onClick.AddListener(CancelMatchmaking);
    exitButton.onClick.AddListener(() => DisplayWindow = MatchmakingWindows.Lobby);
}
LobbyButton.onClick.AddListener(() =>
{
    GetComponent<MatchmakingHandler>().SetupMatchmaking();

    // Other actions
    ...
});
#region Notification
/// Called when party leader find a match, cancel match, or found a match
public void MatchmakingCompletedNotification(MatchmakingNotif result)
{
    // Handle if match id is empty
    if (string.IsNullOrEmpty(result.matchId))
    {
        // Called when party leader find a match
        if (result.status == "start")
        {
            DisplayWindow = MatchmakingWindows.FindMatch;
        }
        // Called when party leader cancel a match
        else if (result.status == "cancel")
        {
            DisplayWindow = MatchmakingWindows.Lobby;
        }

        return;
    }

    // Called when found a match
    matchId = result.matchId;
    Debug.Log($"Found a match. Match id: {matchId}");

    DisplayWindow = MatchmakingWindows.Matchmaking;
}

// Called when there is a player who set ready to play
public void ReadyForMatchConfirmedNotification(ReadyForMatchConfirmation result)
{
    // Display unknown player who ready in the current match into right panel
    if (!GetPartyHandler().partyMembers.ContainsKey(result.userId))
    {
        for (int i = GetPartyHandler().partyMembers.Count; i < usernameList.Length; i++)
        {
            if (string.IsNullOrEmpty(usernameList[i].GetUsernameText()))
            {
                AccelBytePlugin.GetUser().GetUserByUserId(result.userId, getUserResult =>
                {
                    usernameList[i].SetUsernameText(getUserResult.Value.displayName);
                });

                usernameList[i].SetUsernameFrameColor(Color.green);
                break;
            }
        }
    }
    // Display party member who ready in the current match into left panel
    else
    {
        for (int i = 0; i < GetPartyHandler().partyMembers.Count; i++)
        {
            if (usernameList[i].GetUsernameText() == GetPartyHandler().partyMembers[result.userId])
            {
                usernameList[i].SetUsernameFrameColor(Color.green);
                break;
            }
        }
    }
}

/// Called when all player in the current match is already ready to play
public void DSUpdatedNotification(DsNotif result)
{
    countDownText.enabled = false;
    ConnectionHandler.ip = result.ip;
    ConnectionHandler.port = result.port;

    if (result.status != "READY" && result.status != "BUSY") return;

    Debug.Log($"Game is started");

    DisplayWindow = MatchmakingWindows.Game;
}

/// Called when matchmaking is canceled when there are not enough players ready to play
public void RematchmakingNotif(RematchmakingNotification result)
{
    // Find another match if the ban duration is zero
    if (result.banDuration == 0)
    {
        Debug.Log($"Find another match");

        DisplayWindow = MatchmakingWindows.FindMatch;
        return;
    }

    // Display ban duration to party notification
    LobbyHandler.Instance.WriteLogMessage($"You must wait for {result.banDuration} s to start matchmaking", Color.red);

    DisplayWindow = MatchmakingWindows.Lobby;
}
#endregion
// Collection of friend notifications
#region Matchmaking
/// Called when matchmaking is found
/// <param name="result"> Contains data of status and match id</param>
public void OnMatchmakingCompleted(Result<MatchmakingNotif> result)
{
GetComponent<MatchmakingHandler>().MatchmakingCompletedNotification(result.Value);
}

/// <summary>
/// Called when user send ready for match confirmation
/// </summary>
/// <param name="result"> Contains data of user id and match id</param>
public void OnReadyForMatchConfirmed(Result<ReadyForMatchConfirmation> result)
{
GetComponent<MatchmakingHandler>().ReadyForMatchConfirmedNotification(result.Value);
}

/// <summary>
/// Called when all user is already confirmed the readiness
/// </summary>
/// <param name="result"> Contains data of ds notification</param>
public void OnDSUpdated(Result<DsNotif> result)
{
    GetComponent<MatchmakingHandler>().DSUpdatedNotification(result.Value);
}

/// <summary>
/// Called when there is user who not confirm the match
/// - The party that has a user who did not confirm the match will get banned and need to start matchmaking again
/// - The other party will start matchmaking automatically if ban duration is zero
/// </summary>
/// <param name="result"> Contains data of ban duration</param>
public void OnRematchmakingNotif(Result<RematchmakingNotification> result)
{
    GetComponent<MatchmakingHandler>().RematchmakingNotif(result.Value);
}
#endregion
public void ConnectToLobby()
{
    ...
    //Matchmaking
    _lobby.MatchmakingCompleted += notificationHandler.OnMatchmakingCompleted;
    _lobby.ReadyForMatchConfirmed += notificationHandler.OnReadyForMatchConfirmed;
    _lobby.RematchmakingNotif += notificationHandler.OnRematchmakingNotif;
    _lobby.DSUpdated += notificationHandler.OnDSUpdated;
}
...

public void RemoveLobbyListeners()
{
    ...

    //Matchmaking
    _lobby.MatchmakingCompleted -= notificationHandler.OnMatchmakingCompleted;
    _lobby.ReadyForMatchConfirmed -= notificationHandler.OnReadyForMatchConfirmed;
    _lobby.RematchmakingNotif -= notificationHandler.OnRematchmakingNotif;
    _lobby.DSUpdated -= notificationHandler.OnDSUpdated;
}
...

Expand the MatchmakingPanel and drag the objects to the remaining exposed variables:

In the **Script **component, expand the Username list and drag the objects to their corresponding variables:

using UnityEngine.UI;
[SerializeField]
private Image loadingImage;

[SerializeField]
private Text countUpText;

[SerializeField]
private Text countDownText;

private bool isWaiting;
private float deltaTime;
/// Animate the loading bar each 0.1 seconds
private IEnumerator StartLoadingAnimation()
{
    // Avoid the loading animation is being called when the Async is not finished yet
    isWaiting = true;

    // Animate the loading image
    loadingImage.transform.Rotate(0, 0, -45);

    // Wait 0.1 seconds before next animation is executed
    yield return new WaitForSeconds(0.1f);

    // Set boolean so it can be called again in the Update
    isWaiting = false;
}
/// Start count up timer to show time elapsed for waiting to find a match
private void StartCountup()
{
    if (!countUpText.isActiveAndEnabled) return;

    // Parse the time elapsed text into minutes and seconds (int)
    string time = countUpText.text.Substring(countUpText.text.IndexOf(':') + 2);
    int minutes = int.Parse(time.Substring(0, time.IndexOf(':')));
    int seconds = int.Parse(time.Substring(time.IndexOf(':') + 1));

    // Add 1 second increment
    int timer = minutes * 60 + seconds + 1;

    // Parse the time into text with format mm:ss
    countUpText.text = $"Time Elapsed: {string.Format("{0:00}", (timer / 60))}:{string.Format("{0:00}", (timer % 60))}";
}

/// Start the countdown timer to show time remaining to set ready to play
private void StartCountdown()
{
    // Do nothing if the count down text is not active
    if (!countDownText.isActiveAndEnabled) return;

    // Parse from text into time (int)
    int timer = int.Parse(countDownText.text);

    // Decrease 1 second and parse into text
    countDownText.text = Mathf.Round(timer - 1).ToString();
}
private void OnEnable()
{
    // Reset boolean when object changes into enable
    isWaiting = false;
}

private void Update()
{
    // Start loading animation
    if (!isWaiting)
    {
        StartCoroutine(StartLoadingAnimation());
    }

    // Start count down and count up timer
    if (countUpText.isActiveAndEnabled || countDownText.isActiveAndEnabled)
    {
        if (deltaTime >= 1)
        {
            deltaTime = 0;
            StartCountup();
            StartCountdown();
        }
        else
        {
            deltaTime += Time.deltaTime;
        }
    }
}

Add the following UI library to the top of the MatchmakingUsernamePanel.cs script:
using UnityEngine.UI;
[SerializeField]
private Text UsernameText;
[SerializeField]
private Image UsernameFrameImage;
public string GetUsernameText()
{
    return UsernameText.text;
}

public void SetUsernameText(string text)
{
    if (UsernameText == null) return;

    UsernameText.text = text;
}

public void SetUsernameFrameColor(Color color)
{
    UsernameFrameImage.color = color;
}

TIP: Save time by attaching the MatchmakingUsernamePanel.cs script to a prefab and then duplicating it for each gameObject.
Congratulations! You have now fully implemented the Matchmaking service.
Proceed to the next section to learn how to implement Armada (opens new window).
// Copyright (c) 2021 - 2022 AccelByte Inc. All Rights Reserved.
// This is licensed software from AccelByte Inc, for limitations
// and restrictions contact your company contract manager.

using AccelByte.Api;
using AccelByte.Models;
using AccelByte.Core;
using UnityEngine;
using UnityEngine.UI;

using UI = UnityEngine.UI;


public class MatchmakingHandler : MonoBehaviour
{
    private const string DefaultCountUp = "Time Elapsed: 00:00";
    // This default count down time must be similar with the Lobby Config in the Admin Portal
    private const string DefaultCountDown = "20";

    // Current selected game mode
    private GameMode gameMode;
    // Current active match id
    private string matchId;

    #region UI
    [SerializeField]
    private GameObject matchmakingWindow;
    [SerializeField]
    private GameObject findMatchWindow;
    [SerializeField]
    private GameObject readyMatchWindow;
    [SerializeField]
    private GameObject gameWindow;

    [SerializeField]
    private Dropdown gameModeDropdown;

    #region Button

    [SerializeField]
    private Button findMatchButton;
    [SerializeField]
    private Button readyButton;
    [SerializeField]
    private Button cancelButton;
    [SerializeField]
    private Button exitButton;
    #endregion

    [SerializeField]
    private Text countUpText;
    [SerializeField]
    private Text countDownText;

    [SerializeField]
    private UI.Image loadingImage;

    [SerializeField]
    private MatchmakingUsernamePanel[] usernameList;
    #endregion

    private enum MatchmakingWindows
    {
        Lobby,
        FindMatch,
        Matchmaking,
        Game
    }

    private MatchmakingWindows DisplayWindow
    {
        get => DisplayWindow;
        set
        {
            switch (value)
            {
                case MatchmakingWindows.Lobby:
                    matchmakingWindow.SetActive(false);
                    findMatchWindow.SetActive(false);
                    readyMatchWindow.SetActive(false);
                    gameWindow.SetActive(false);
                    break;

                case MatchmakingWindows.FindMatch:
                    ResetTimerText();

                    matchmakingWindow.SetActive(true);
                    findMatchWindow.SetActive(true);
                    readyMatchWindow.SetActive(false);
                    gameWindow.SetActive(false);
                    break;

                case MatchmakingWindows.Matchmaking:
                    ResetTimerText();
                    CleanAndPopulateUsernameText();

                    matchmakingWindow.SetActive(true);
                    findMatchWindow.SetActive(false);
                    readyMatchWindow.SetActive(true);
                    gameWindow.SetActive(false);
                    break;

                case MatchmakingWindows.Game:
                    matchmakingWindow.SetActive(true);
                    findMatchWindow.SetActive(false);
                    readyMatchWindow.SetActive(false);
                    gameWindow.SetActive(true);
                    break;

                default:
                    break;
            }
        }
    }

    /// <summary>
    /// Grab the current Party Handler
    /// </summary>
    private PartyHandler GetPartyHandler()
    {
        return LobbyHandler.Instance.partyHandler;
    }

    /// <summary>
    /// Setup UI
    /// </summary>
    public void SetupMatchmaking()
    {
        // Setup button listener
        findMatchButton.onClick.AddListener(FindMatch);
        readyButton.onClick.AddListener(ReadyMatchmaking);
        cancelButton.onClick.AddListener(CancelMatchmaking);
        exitButton.onClick.AddListener(() => DisplayWindow = MatchmakingWindows.Lobby);
    }

    /// <summary>
    /// Check the game mode and party. After it passes, start matchmaking
    /// </summary>
    private void FindMatch()
    {
        // Check if the party is already created,
        // game mode is not empty, and
        // party members are not exceeding from the selected game mode
        if (!ValidateGameModeAndParty())
        {
            return;
        }

        AccelBytePlugin.GetLobby().StartMatchmaking(gameMode, result =>
        {
            //Check this is not an error
            if (result.IsError)
            {
                Debug.Log($"Unable to start matchmaking: error code: {result.Error.Code} message: {result.Error.Message}");
            }
            else
            {
                Debug.Log("Started matchmaking is successful");

                DisplayWindow = MatchmakingWindows.FindMatch;
            }
        });
    }

    /// <summary>
    /// Cancel find match and back to the Lobby
    /// </summary>
    private void CancelMatchmaking()
    {
        AccelBytePlugin.GetLobby().CancelMatchmaking(gameMode, result =>
        {
            //Check this is not an error
            if (result.IsError)
            {
                Debug.Log($"Unable to cancel matchmaking: error code: {result.Error.Code} message: {result.Error.Message}");
            }
            else
            {
                Debug.Log("Canceled matchmaking is successful");

                DisplayWindow = MatchmakingWindows.Lobby;
            }
        });
    }

    /// <summary>
    /// Set ready to play when matchmaking
    /// </summary>
    private void ReadyMatchmaking()
    {
        AccelBytePlugin.GetLobby().ConfirmReadyForMatch(matchId, result =>
        {
            //Check this is not an error
            if (result.IsError)
            {
                    Debug.Log($"Unable to ready for match: error code: {result.Error.Code} message: {result.Error.Message}");
            }
            else
            {
                    Debug.Log("Ready for match is successful");
            }
        });
    }

    #region Notification
    /// <summary>
    /// Called when party leader find a match, cancel match, or found a match
    /// </summary>
    /// <param name="result"> Contains data of status and match id</param>
    public void MatchmakingCompletedNotification(MatchmakingNotif result)
    {
        // Handle if match id is empty
        if (string.IsNullOrEmpty(result.matchId))
        {
            // Called when party leader find a match
            if (result.status == "start")
            {
                    DisplayWindow = MatchmakingWindows.FindMatch;
            }
            // Called when party leader cancel a match
            else if (result.status == "cancel")
            {
                    DisplayWindow = MatchmakingWindows.Lobby;
            }

            return;
        }

        // Called when found a match
        matchId = result.matchId;
        Debug.Log($"Found a match. Match id: {matchId}");

        DisplayWindow = MatchmakingWindows.Matchmaking;
    }

    /// <summary>
    /// Called when there is a player who set ready to play
    /// </summary>
    /// <param name="result"> Contains data of match id and user id</param>
    public void ReadyForMatchConfirmedNotification(ReadyForMatchConfirmation result)
    {
        // Display unknown player who ready in the current match into right panel
        if (!GetPartyHandler().partyMembers.ContainsKey(result.userId))
        {
            for (int i = GetPartyHandler().partyMembers.Count; i < usernameList.Length; i++)
            {
                if (string.IsNullOrEmpty(usernameList[i].GetUsernameText()))
                {
                    AccelBytePlugin.GetUser().GetUserByUserId(result.userId, getUserResult =>
                    {
                        usernameList[i].SetUsernameText(getUserResult.Value.displayName);
                    });

                    usernameList[i].SetUsernameFrameColor(Color.green);
                    break;
                }
            }
        }
        // Display party member who ready in the current match into left panel
        else
        {
            for (int i = 0; i < GetPartyHandler().partyMembers.Count; i++)
            {
                if (usernameList[i].GetUsernameText() == GetPartyHandler().partyMembers[result.userId])
                {
                    usernameList[i].SetUsernameFrameColor(Color.green);
                    break;
                }
            }
        }
    }

    /// <summary>
    /// Called when all player in the current match is already ready to play
    /// </summary>
    /// <param name="result"> contains data of status, match id, ip, port, etc</param>
    public void DSUpdatedNotification(DsNotif result)
    {
        countDownText.enabled = false;

        Debug.Log($"Game is started");

        DisplayWindow = MatchmakingWindows.Game;
    }

    /// <summary>
    /// Called when matchmaking is canceled due to not enough players being ready to play
    /// </summary>
    /// <param name="result"> contains data of ban duration </param>
    public void RematchmakingNotif(RematchmakingNotification result)
    {
        // Find another match if the ban duration is zero
        if (result.banDuration == 0)
        {
            Debug.Log($"Find another match");

            DisplayWindow = MatchmakingWindows.FindMatch;
            return;
        }

        // Display ban duration to party notification
        GetPartyHandler().WritePartyMessage($"[Matchmaking] You must wait for {result.banDuration} s to start matchmaking", Color.red);

        DisplayWindow = MatchmakingWindows.Lobby;
    }
    #endregion

    /// <summary>
    /// Validate empty party, game mode, and party members count based on game mode
    /// </summary>
    /// <returns> Return true value if the validation is passed and vice versa</returns>
    private bool ValidateGameModeAndParty()
    {
        // Set game mode based on game mode selector dropdown
        gameMode = gameModeDropdown.options[gameModeDropdown.value].text.ToGameMode();

        // Avoid to choose default game mode
        if (gameModeDropdown.value == 0)
        {
            LobbyHandler.Instance.WriteLogMessage("Choose the game mode", Color.red);
            return false;
        }
        // Check if user is not in the party
        if (GetPartyHandler().partyMembers == null || GetPartyHandler().partyMembers?.Count == 0)
        {
            LobbyHandler.Instance.WriteLogMessage("You are not in the party", Color.red);
            return false;
        }
        // Avoid party members exceed from the game mode
        if (gameMode == GameMode.versusOne && GetPartyHandler().partyMembers?.Count == 1 ||
        gameMode == GameMode.versusTwo && GetPartyHandler().partyMembers?.Count <= 2)
        {
            return true;
        }

        LobbyHandler.Instance.WriteLogMessage("Party members are exceeding from the selected game mode", Color.red);
        return false;
    }

    /// <summary>
    /// Clean up the username text and reset frame color
    /// After that, populate current party members to the username text
    /// </summary>
    private void CleanAndPopulateUsernameText()
    {
        // Emptying username text in the matchmaking window
        foreach (var username in usernameList)
        {
            username.SetUsernameText("");
            username.SetUsernameFrameColor(Color.white);
        }

        // Populate party members
        int count = 0;
        foreach (var username in GetPartyHandler().partyMembers)
        {
            Debug.Log($"Populate party member with username: {username.Value}");

            usernameList[count].SetUsernameText(username.Value);
            count++;
        }
    }

    /// <summary>
    /// Reset the count down and count up into default value
    /// </summary>
    private void ResetTimerText()
    {
        countDownText.enabled = true;

        countDownText.text = DefaultCountDown;
        countUpText.text = DefaultCountUp;
    }
}
// Copyright (c) 2021 - 2022 AccelByte Inc. All Rights Reserved.
// This is licensed software from AccelByte Inc, for limitations
// and restrictions contact your company contract manager.

using System.Collections;
using UnityEngine;
using UnityEngine.UI;

public class MatchmakingManagementPanel : MonoBehaviour
{
    [SerializeField]
    private Image loadingImage;

    [SerializeField]
    private Text countUpText;

    [SerializeField]
    private Text countDownText;

    private bool isWaiting;
    private float deltaTime;

    private void OnEnable()
    {
        // Reset boolean when object changes into enable
        isWaiting = false;
    }

    private void Update()
    {
        // Start loading animation
        if (!isWaiting)
        {
            StartCoroutine(StartLoadingAnimation());
        }

        // Start count down and count up timer
        if (countUpText.isActiveAndEnabled || countDownText.isActiveAndEnabled)
        {
            if (deltaTime >= 1)
            {
                deltaTime = 0;
                StartCountup();
                StartCountdown();
            }
            else
            {
                deltaTime += Time.deltaTime;
            }
        }
    }

    /// <summary>
    /// Animate the loading bar each 0.1 seconds
    /// </summary>
    private IEnumerator StartLoadingAnimation()
    {
        // Avoid the loading animation is being called when the Async is not finished yet
        isWaiting = true;

        // Animate the loading image
        loadingImage.transform.Rotate(0, 0, -45);

        // Wait 0.1 seconds before next animation is executed
        yield return new WaitForSeconds(0.1f);

        // Set boolean so it can be called again in the Update
        isWaiting = false;
    }

    /// <summary>
    /// Start count up timer to show time elapsed for waiting to find a match
    /// </summary>
    private void StartCountup()
    {
        if (!countUpText.isActiveAndEnabled) return;

        // Parse the time elapsed text into minutes and seconds (int)
        string time = countUpText.text.Substring(countUpText.text.IndexOf(':') + 2);
        int minutes = int.Parse(time.Substring(0, time.IndexOf(':')));
        int seconds = int.Parse(time.Substring(time.IndexOf(':') + 1));

        // Add 1 second increment
        int timer = minutes * 60 + seconds + 1;

        // Parse the time into text with format mm:ss
        countUpText.text = $"Time Elapsed: {string.Format("{0:00}", (timer / 60))}:{string.Format("{0:00}", (timer % 60))}";
    }

    /// <summary>
    /// Start the count down timer to show time remaining to set ready to play
    /// </summary>
    private void StartCountdown()
    {
        // Do nothing if the count down text is not active
        if (!countDownText.isActiveAndEnabled) return;

        // Parse from text into time (int)
        int timer = int.Parse(countDownText.text);

        // Decrease 1 second and parse into text
        countDownText.text = Mathf.Round(timer - 1).ToString();
    }
}
// Copyright (c) 2021 - 2022 AccelByte Inc. All Rights Reserved.
// This is licensed software from AccelByte Inc, for limitations
// and restrictions contact your company contract manager.

using UnityEngine;
using UnityEngine.UI;

public class MatchmakingUsernamePanel : MonoBehaviour
{
    [SerializeField]
    private Text UsernameText;
    [SerializeField]
    private Image UsernameFrameImage;

    public string GetUsernameText()
    {
        return UsernameText.text;
    }

    public void SetUsernameText(string text)
    {
        UsernameText.text = text;
    }

    public void SetUsernameFrameColor(Color color)
    {
        UsernameFrameImage.color = color;
    }
}
// Copyright (c) 2021 - 2022 AccelByte Inc. All Rights Reserved.
// This is licensed software from AccelByte Inc, for limitations
// and restrictions contact your company contract manager.

using UnityEngine;
using AccelByte.Api;

public class LobbyHandler : MonoBehaviour
{
    /// <summary>
    /// Private Instance
    /// </summary>
    static LobbyHandler _instance;

    /// <summary>
    /// The Instance Getter
    /// </summary>
    public static LobbyHandler Instance => _instance;

    /// <summary>
    /// The Instance Getter
    /// </summary>
    private Lobby _lobby;

    public GameObject LobbyWindow;

    #region Notification Box
    [Header("Notification Box")]
    [SerializeField]
    private Transform notificationBoxContentView;
    [SerializeField]
    private GameObject logMessagePrefab;
    #endregion

    [HideInInspector]
    public NotificationHandler notificationHandler;


    private void Awake()
    {
        // Check if another Instance is already created, and if so delete this one, otherwise destroy the object
        if (_instance != null && _instance != this)
        {
            Destroy(this);
            return;
        }
        else
        {
            _instance = this;
        }

        // Get the the object handler
        notificationHandler = gameObject.GetComponent<NotificationHandler>();
    }

    /// <summary>
    /// Connect to the <see cref="Lobby"/> and setup CallBacks
    /// </summary>
    public void ConnectToLobby()
    {
        //Get a reference to the instance of the Lobby
        _lobby = AccelBytePlugin.GetLobby();

        //Init menu handler
        GetComponent<MenuHandler>().Create();
        GetComponent<MenuHandler>().Menu.gameObject.SetActive(true);

        //Connection
        _lobby.Connected += notificationHandler.OnConnected;
        _lobby.Disconnecting += notificationHandler.OnDisconnecting;
        _lobby.Disconnected += notificationHandler.OnDisconnected;

        //Friends
        _lobby.FriendsStatusChanged += notificationHandler.OnFriendsStatusChanged;
        _lobby.FriendRequestAccepted += notificationHandler.OnFriendRequestAccepted;
        _lobby.OnIncomingFriendRequest += notificationHandler.OnIncomingFriendRequest;
        _lobby.FriendRequestCanceled += notificationHandler.OnFriendRequestCanceled;
        _lobby.FriendRequestRejected += notificationHandler.OnFriendRequestRejected;
        _lobby.OnUnfriend += notificationHandler.OnUnfriend;

        //Party
        _lobby.InvitedToParty += notificationHandler.OnInvitedToParty;
        _lobby.JoinedParty += notificationHandler.OnJoinedParty;
        _lobby.KickedFromParty += notificationHandler.OnKickedFromParty;
        _lobby.LeaveFromParty += notificationHandler.OnLeaveFromParty;
        _lobby.RejectedPartyInvitation += notificationHandler.OnRejectedPartyInvitation;
        _lobby.PartyDataUpdateNotif += notificationHandler.OnPartyDataUpdateNotif;

        //Matchmaking
        _lobby.MatchmakingCompleted += notificationHandler.OnMatchmakingCompleted;
        _lobby.ReadyForMatchConfirmed += notificationHandler.OnReadyForMatchConfirmed;
        _lobby.RematchmakingNotif += notificationHandler.OnRematchmakingNotif;
        _lobby.DSUpdated += notificationHandler.OnDSUpdated;

        //Connect to the Lobby
        if (!_lobby.IsConnected)
        {
            _lobby.Connect();
        }
    }

    public void RemoveLobbyListeners()
    {
        //Remove delegate from Lobby
        //Connection
        _lobby.Connected -= notificationHandler.OnConnected;
        _lobby.Disconnecting -= notificationHandler.OnDisconnecting;
        _lobby.Disconnected -= notificationHandler.OnDisconnected;

        //Friends
        _lobby.FriendsStatusChanged -= notificationHandler.OnFriendsStatusChanged;
        _lobby.FriendRequestAccepted -= notificationHandler.OnFriendRequestAccepted;
        _lobby.OnIncomingFriendRequest -= notificationHandler.OnIncomingFriendRequest;
        _lobby.FriendRequestCanceled -= notificationHandler.OnFriendRequestCanceled;
        _lobby.FriendRequestRejected -= notificationHandler.OnFriendRequestRejected;
        _lobby.OnUnfriend -= notificationHandler.OnUnfriend;

        //Party
        _lobby.InvitedToParty -= notificationHandler.OnInvitedToParty;
        _lobby.JoinedParty -= notificationHandler.OnJoinedParty;
        _lobby.KickedFromParty -= notificationHandler.OnKickedFromParty;
        _lobby.LeaveFromParty -= notificationHandler.OnLeaveFromParty;
        _lobby.RejectedPartyInvitation -= notificationHandler.OnRejectedPartyInvitation;
        _lobby.PartyDataUpdateNotif -= notificationHandler.OnPartyDataUpdateNotif;

        //Matchmaking
        _lobby.MatchmakingCompleted -= notificationHandler.OnMatchmakingCompleted;
        _lobby.ReadyForMatchConfirmed -= notificationHandler.OnReadyForMatchConfirmed;
        _lobby.RematchmakingNotif -= notificationHandler.OnRematchmakingNotif;
        _lobby.DSUpdated -= notificationHandler.OnDSUpdated;
    }

    public void DisconnectFromLobby()
    {
        if (AccelBytePlugin.GetLobby().IsConnected)
        {
            AccelBytePlugin.GetLobby().Disconnect();
        }
    }

    private void OnApplicationQuit()
    {
        // Attempt to Disconnect from the Lobby when the Game Quits
        DisconnectFromLobby();
    }

    /// <summary>
    /// Write the log message on the notification box
    /// </summary>
    /// <param name="text"> text that will be shown in the party notification</param>
    public void WriteLogMessage(string text, Color color)
    {
        LogMessagePanel logPanel = Instantiate(logMessagePrefab, notificationBoxContentView).GetComponent<LogMessagePanel>();
        logPanel.UpdateNotificationUI(text, color);
    }
}
// Copyright (c) 2021 - 2022 AccelByte Inc. All Rights Reserved.
// This is licensed software from AccelByte Inc, for limitations
// and restrictions contact your company contract manager.

using System.Collections;
using System.Collections.Generic;
using UnityEngine;
using UnityEngine.UI;

public class MenuHandler : MonoBehaviour
{
    public Transform Menu;

    public Button LobbyButton;
    public Button FriendsButton;

    private bool isInitialized = false;

    public void Create()
    {
        if (isInitialized) return;

        isInitialized = true;

        LobbyButton.onClick.AddListener(() =>
        {
            GetComponent<PartyHandler>().SetupParty();
            GetComponent<MatchmakingHandler>().SetupMatchmaking();

            Menu.gameObject.SetActive(false);
            GetComponent<LobbyHandler>().LobbyWindow.SetActive(true);
        });

        FriendsButton.onClick.AddListener(() =>
        {
            GetComponent<FriendsManagementHandler>().Setup(FriendsManagementHandler.ExitMode.Menu);
            Menu.gameObject.SetActive(false);
            GetComponent<FriendsManagementHandler>().FriendsManagementWindow.SetActive(true);
        });
    }
}
// Copyright (c) 2021 - 2022 AccelByte Inc. All Rights Reserved.
// This is licensed software from AccelByte Inc, for limitations
// and restrictions contact your company contract manager.

using UnityEngine;
using AccelByte.Models;
using AccelByte.Core;

public class NotificationHandler : MonoBehaviour
{
    #region Notifications

    // Collection of connection notifications
    #region Connections
    /// <summary>
    /// Called when lobby is connected
    /// </summary>
    public void OnConnected()
    {
        Debug.Log("Lobby Connected");
    }

    /// <summary>
    /// Called when connection is disconnecting
    /// </summary>
    /// <param name="result"> Contains data of message</param>
    public void OnDisconnecting(Result<DisconnectNotif> result)
    {
        Debug.Log($"Lobby Disconnecting {result.Value.message}");
    }

    /// <summary>
    /// Called when connection is being disconnected
    /// </summary>
    /// <param name="result"> Contains data of websocket close code</param>
    public void OnDisconnected(WsCloseCode result)
    {
        Debug.Log($"Lobby Disconnected: {result}");
    }
    #endregion

    // Collection of friend notifications
    #region Friends
    /// <summary>
    /// Called when friend status is changed
    /// </summary>
    /// <param name="result"> Contains data of user id, availability, status, etc</param>
    public void OnFriendsStatusChanged(Result<FriendsStatusNotif> result)
    {
        GetComponent<FriendsManagementHandler>().UpdateFriends(result.Value);
    }

    /// <summary>
    /// Called when friend request is accepted
    /// </summary>
    /// <param name="result"> Contains data of friend's user id</param>
    public void OnFriendRequestAccepted(Result<Friend> result)
    {
        Debug.Log($"Accepted a Friend Request from user {result.Value.friendId}");
    }

    /// <summary>
    /// Called when there is incoming friend request
    /// </summary>
    /// <param name="result"> Contains data of friend's user id</param>
    public void OnIncomingFriendRequest(Result<Friend> result)
    {
        Debug.Log($"Received a Friend Request from user {result.Value.friendId}");
    }

    /// <summary>
    /// Called when friend is unfriend
    /// </summary>
    /// <param name="result"> Contains data of friend's user id</param>
    public void OnUnfriend(Result<Friend> result)
    {
        Debug.Log($"Unfriended User {result.Value.friendId}");
    }

    /// <summary>
    /// Called when friend request is canceled
    /// </summary>
    /// <param name="result"> Contains data of sender user id</param>
    public void OnFriendRequestCanceled(Result<Acquaintance> result)
    {
        Debug.Log($"Cancelled a Friend Request from user {result.Value.userId}");
    }

    /// <summary>
    /// Called when friend request is rejected
    /// </summary>
    /// <param name="result"> Contains data of rejector user id</param>
    public void OnFriendRequestRejected(Result<Acquaintance> result)
    {
        Debug.Log($"Rejected a Friend Request from user {result.Value.userId}");
    }
    #endregion

    // Collection of party notifications
    #region Party
    /// <summary>
    /// Called when user gets party invitation
    /// </summary>
    /// <param name="result"> Contains data of inviter, party id, and invitation token</param>
    public void OnInvitedToParty(Result<PartyInvitation> result)
    {
        GetComponent<PartyHandler>().InvitePartyNotification(result.Value);
    }

    /// <summary>
    /// Called when user joins to the party
    /// </summary>
    /// <param name="result"> Contains data of joined user id</param>
    public void OnJoinedParty(Result<JoinNotification> result)
    {
        GetComponent<PartyHandler>().JoinedPartyNotification(result.Value);
    }

    /// <summary>
    /// Called when user is kicked by party leader
    /// </summary>
    /// <param name="result"> Contains data of party leader's user id, party id, and kicked user id</param>
    public void OnKickedFromParty(Result<KickNotification> result)
    {
        GetComponent<PartyHandler>().KickPartyNotification();
    }

    /// <summary>
    /// Called when user leaves from the party
    /// </summary>
    /// <param name="result"> Contains data of party leader's user id and leaver user id</param>
    public void OnLeaveFromParty(Result<LeaveNotification> result)
    {
        GetComponent<PartyHandler>().LeavePartyNotification(result.Value);
    }

    /// <summary>
    /// Called when user rejects party invitation
    /// </summary>
    /// <param name="result"> Contains data of party id, party leader's user id, and rejector user id</param>
    public void OnRejectedPartyInvitation(Result<PartyRejectNotif> result)
    {
        Debug.Log("[Party-Notification] Invitee rejected a party invitation");
    }

    /// <summary>
    /// Called when party data is updated
    /// </summary>
    /// <param name="result"> Contains data of updated party</param>
    public void OnPartyDataUpdateNotif(Result<PartyDataUpdateNotif> result)
    {
        GetComponent<PartyHandler>().DisplayPartyData(result);
    }
    #endregion

    // Collection of friend notifications
    #region Matchmaking
    /// <summary>
    /// Called when matchmaking is found
    /// </summary>
    /// <param name="result"> Contains data of status and match id</param>
    public void OnMatchmakingCompleted(Result<MatchmakingNotif> result)
    {
        GetComponent<MatchmakingHandler>().MatchmakingCompletedNotification(result.Value);
    }

    /// <summary>
    /// Called when user send ready for match confirmation
    /// </summary>
    /// <param name="result"> Contains data of user id and match id</param>
    public void OnReadyForMatchConfirmed(Result<ReadyForMatchConfirmation> result)
    {
        GetComponent<MatchmakingHandler>().ReadyForMatchConfirmedNotification(result.Value);
    }

    /// <summary>
    /// Called when all user is already confirmed the readiness
    /// </summary>
    /// <param name="result"> Contains data of ds notification</param>
    public void OnDSUpdated(Result<DsNotif> result)
    {
        GetComponent<MatchmakingHandler>().DSUpdatedNotification(result.Value);
    }

    /// <summary>
    /// Called when there is user who not confirm the match
    /// - The party that has a user who did not confirm the match will get banned and need to start matchmaking again
    /// - The other party will start matchmaking automatically if ban duration is zero
    /// </summary>
    /// <param name="result"> Contains data of ban duration</param>
    public void OnRematchmakingNotif(Result<RematchmakingNotification> result)
    {
        GetComponent<MatchmakingHandler>().RematchmakingNotif(result.Value);
    }
    #endregion

    #endregion
}
