
Access
Connect cross-platform accounts & identity management
Get a 360 view on game health by combining crash reporting, performance analytics, build quality and binary distributtion into one toolbox
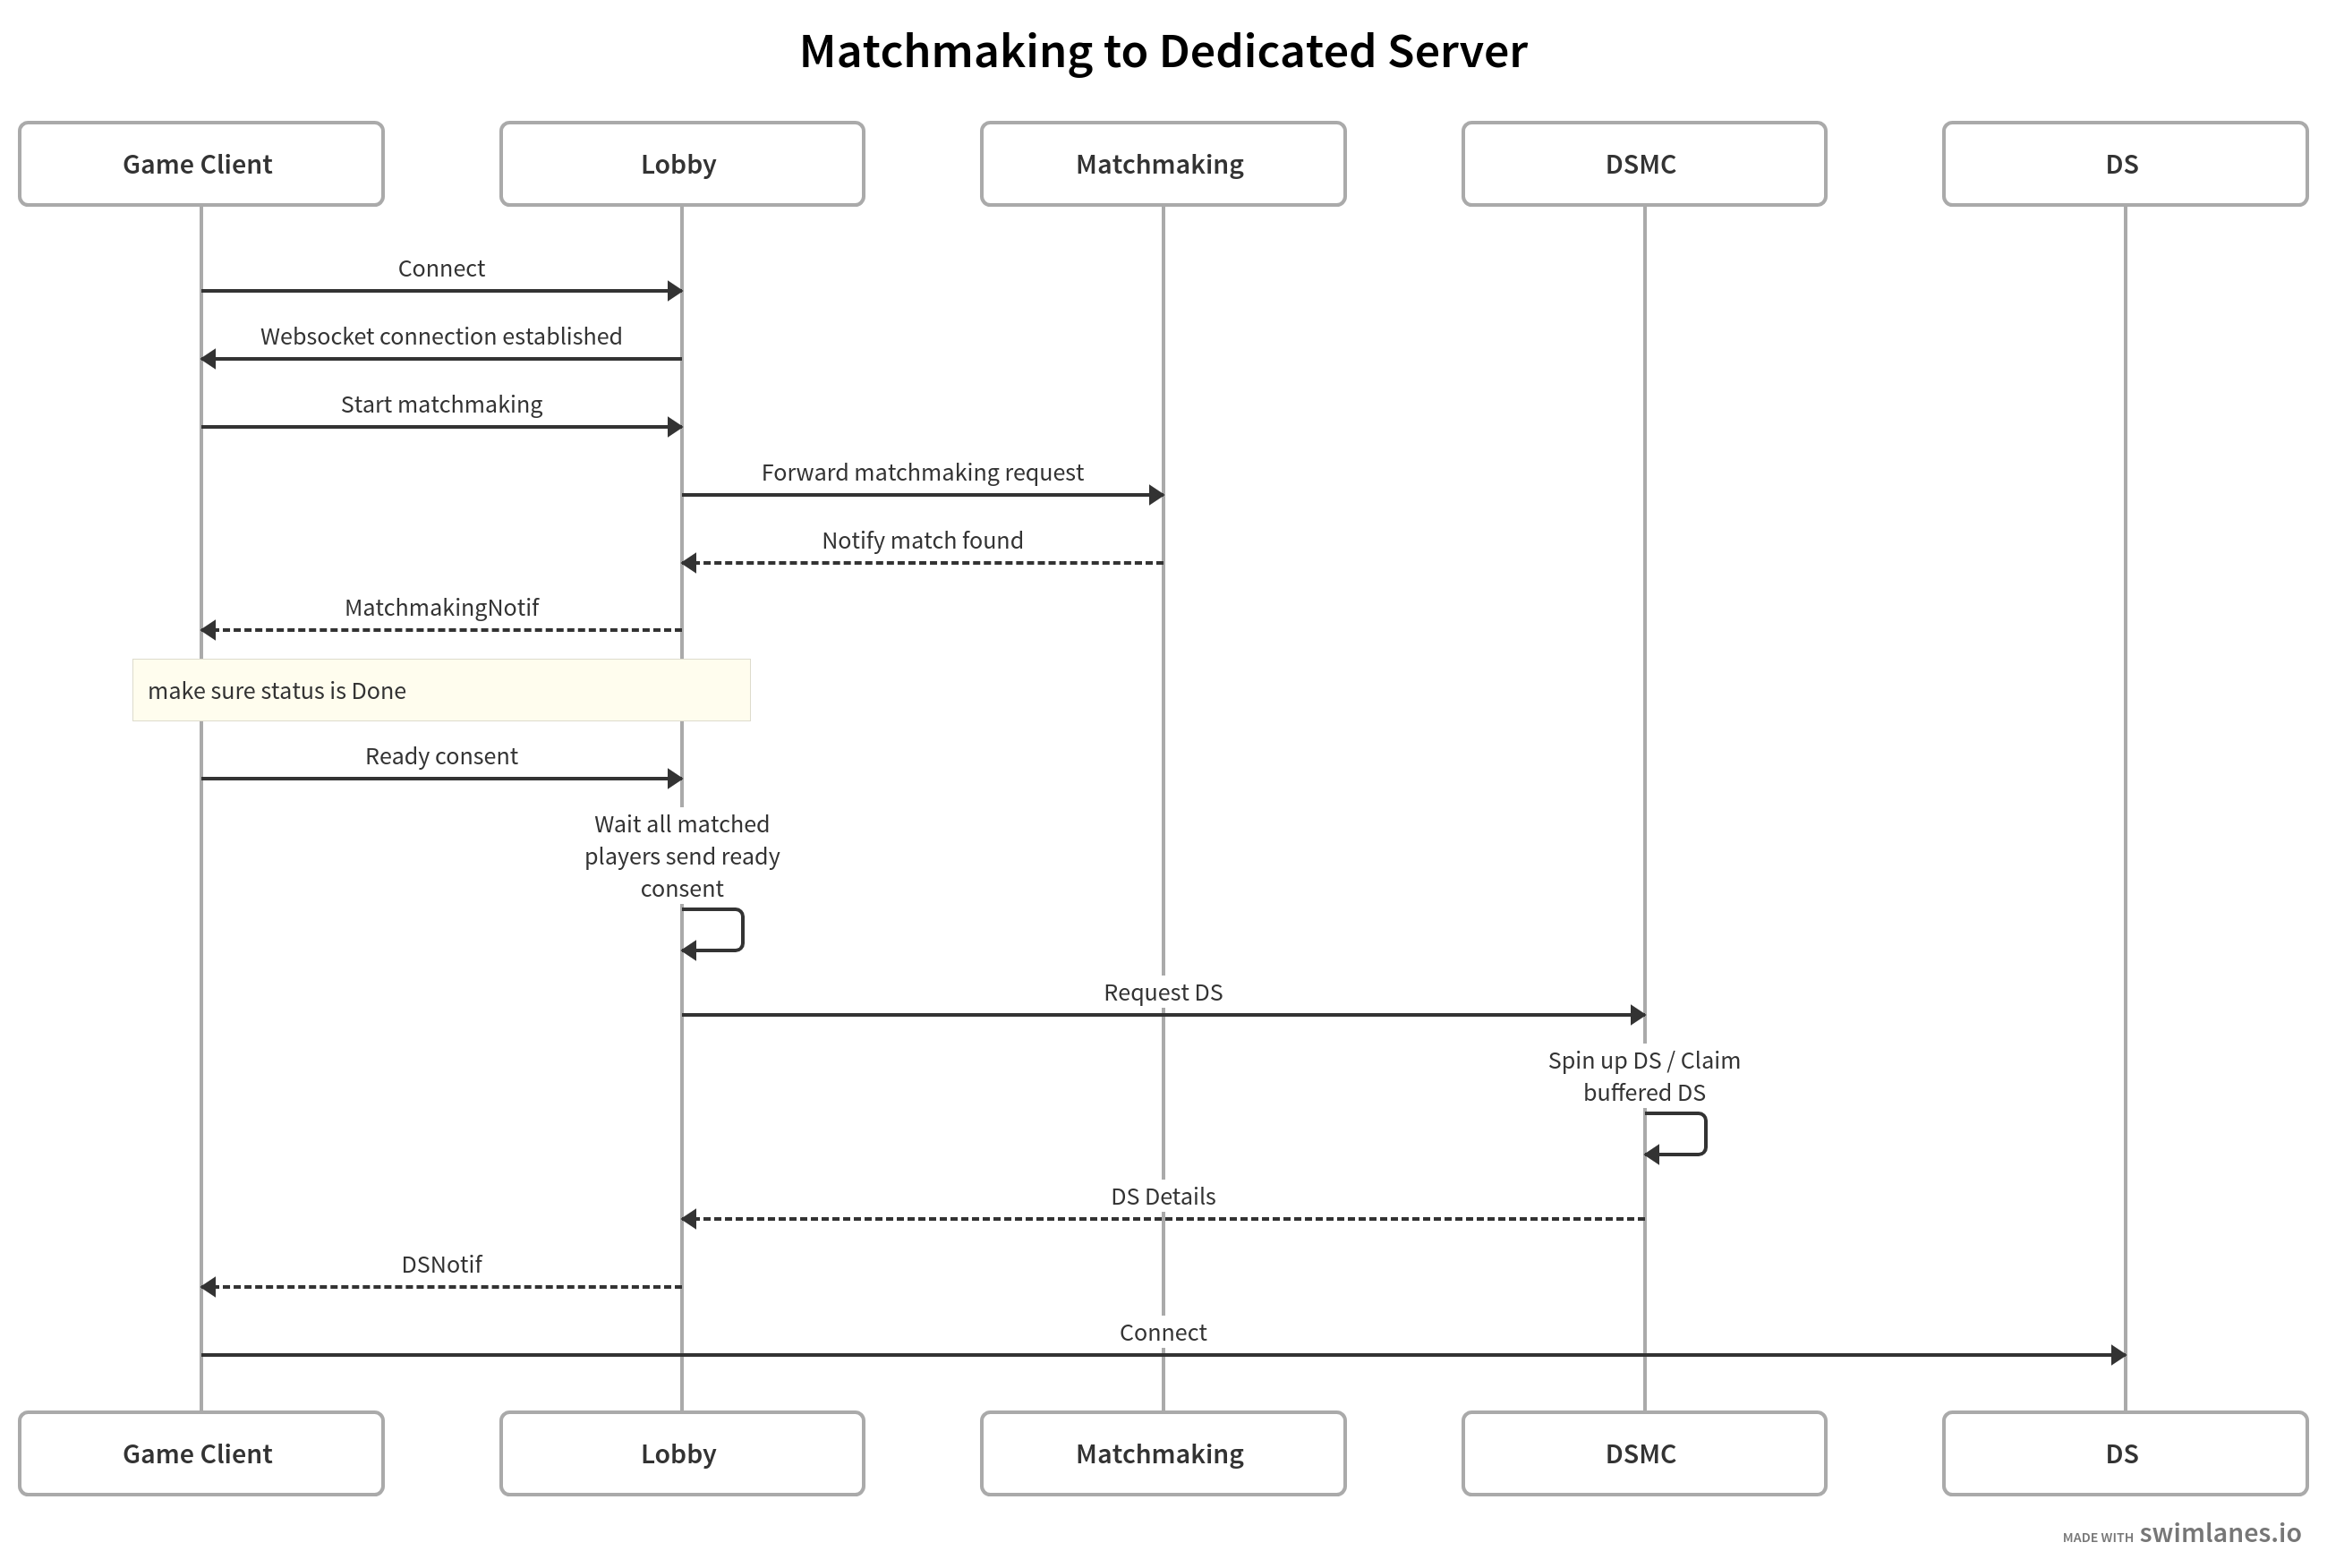
The Matchmaking service works along with our Dedicated Server Manager to ensure your players have a smooth multiplayer experience. Dedicated servers will handle every event that occurs in the game, hosting the players’ matchmaking session, and keep track of their scores.
There are two types of dedicated servers: local and managed. See the explanation below to know how matchmaking is handled by each dedicated server.
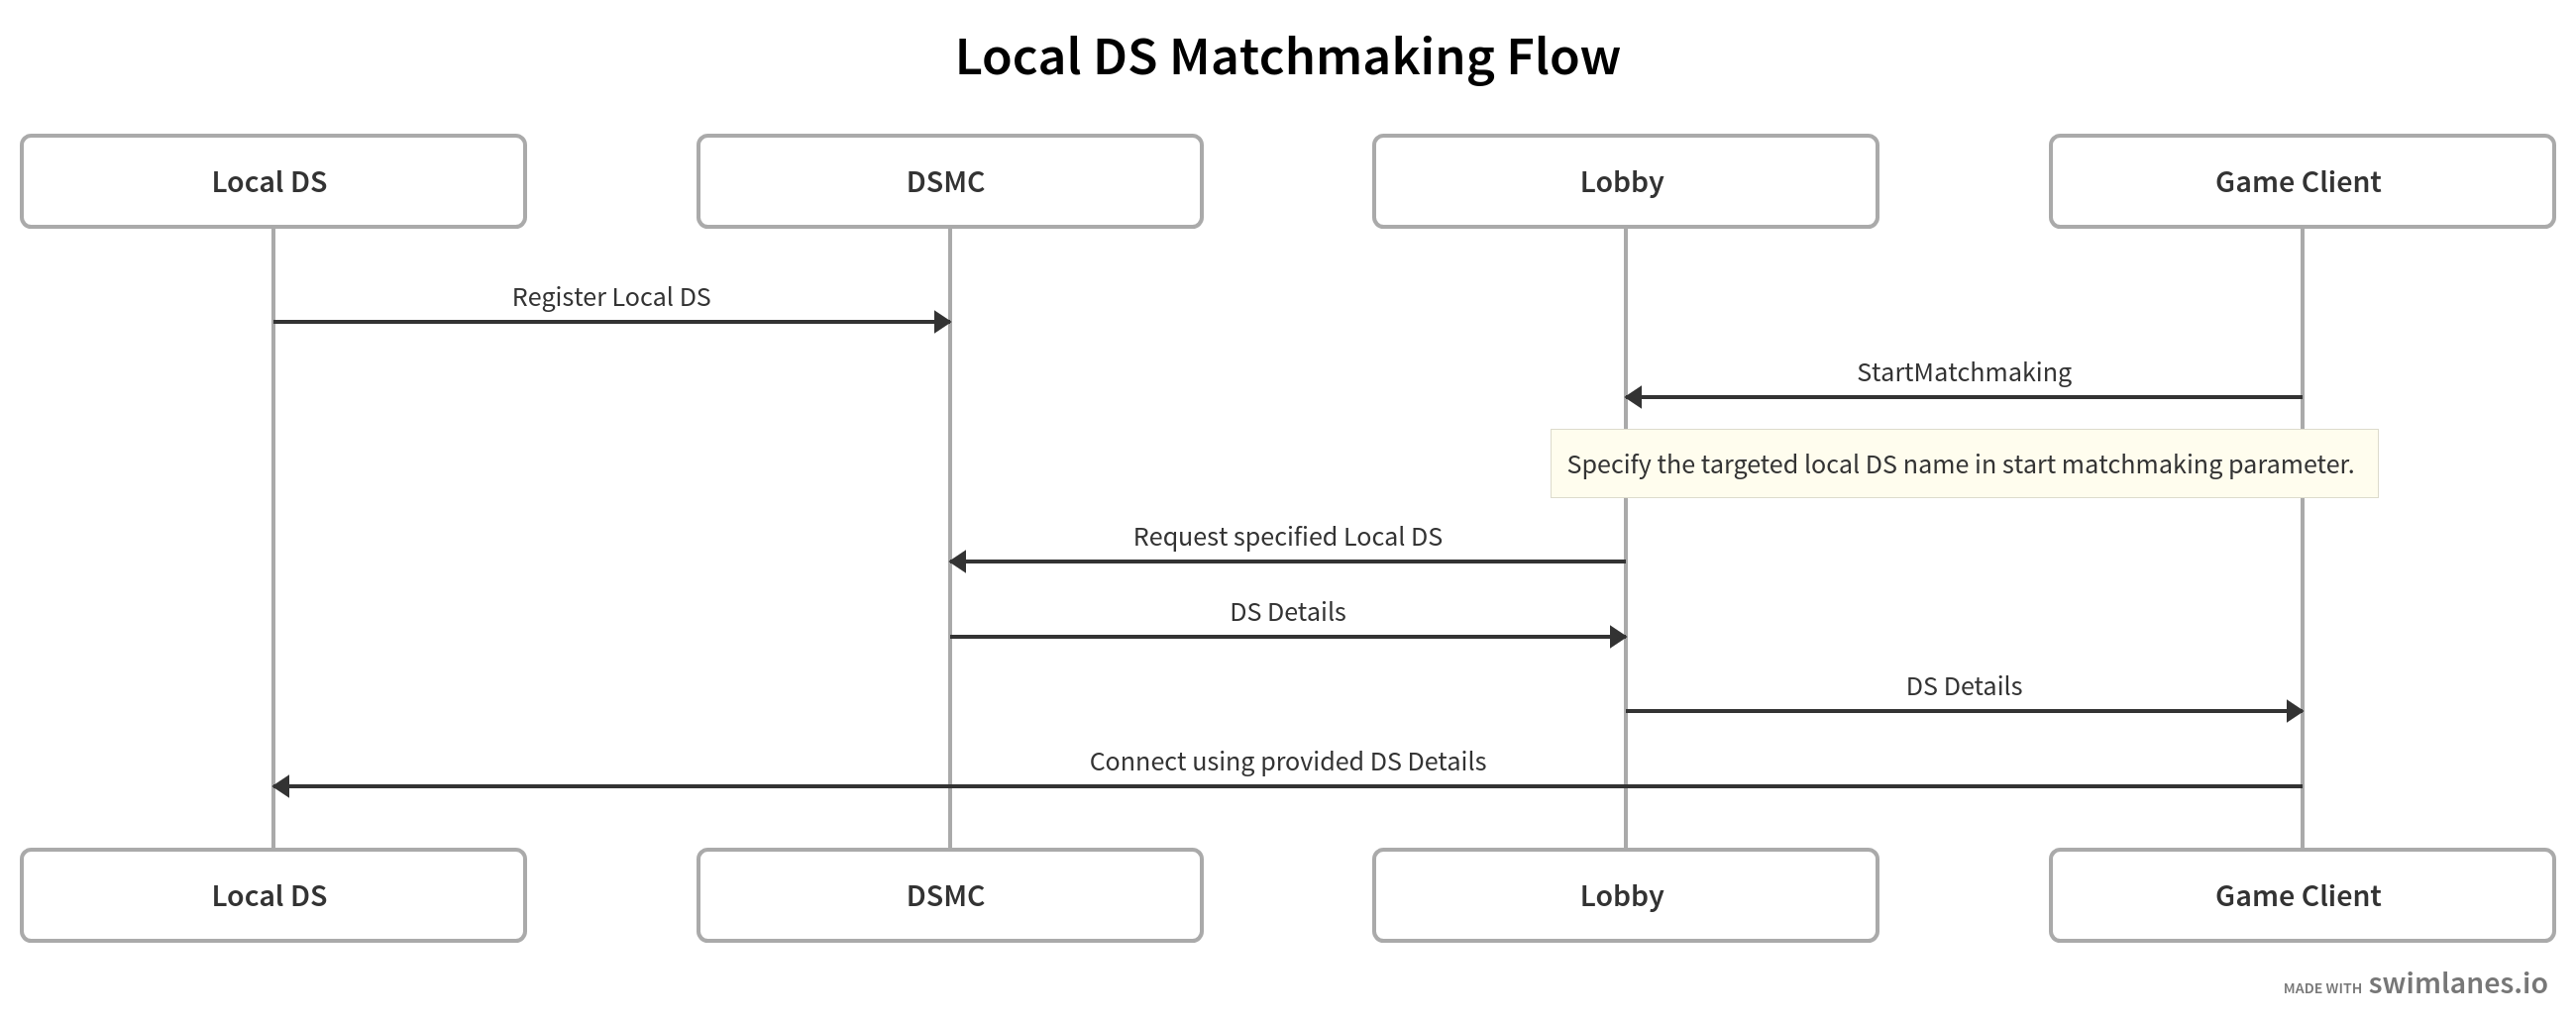
A Local Dedicated Server is a type of dedicated server that runs on your local computer. This type of dedicated server is used to perform testing before a game is published.
Here are the requirements to be able to use a Local Dedicated Server:
A Managed Dedicated Server is managed by AccelByte to ensure smooth player experience and maximize your game’s performance, especially during multiplayer sessions with many players playing the game at once.
Here are the requirements to be able to use a Managed Dedicated Server.
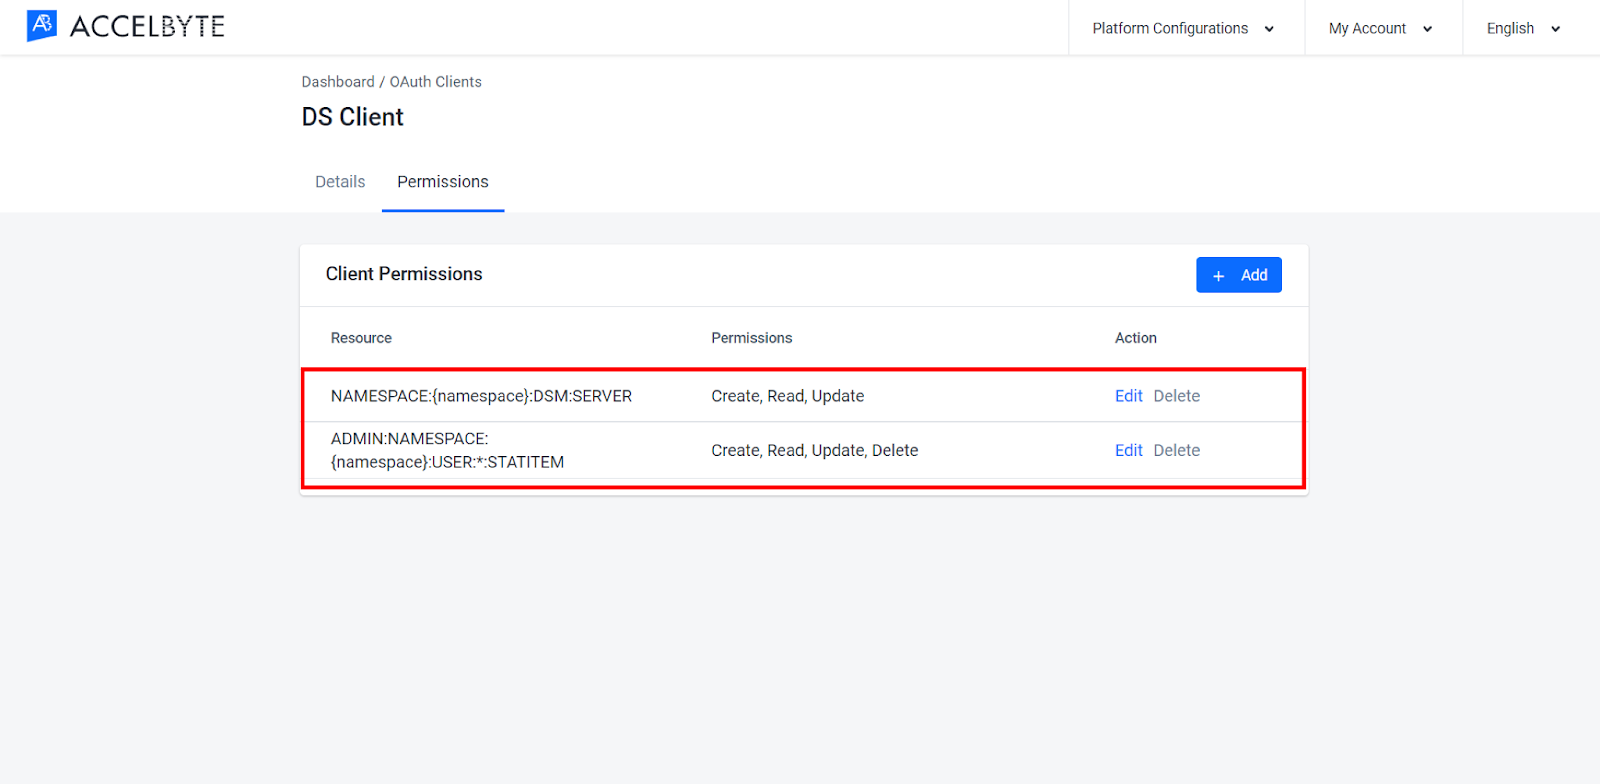
Create a DS Client Credentials. Create a DS Client with Confidential as the client type. Here are the permissions you must add to the DS Client so that it can call the DSM.
Create DS Uploader Client Credentials. Create the client credentials for DS Uploader with Confidential as the client type. Here is the permission you must add to the DS Uploader client credentials.
| Usage | Permission | Action |
|---|---|---|
| Create an STS Configuration | NAMESPACE:{namespace}:DSUS:CONFIG | Create |
| Create an Image | NAMESPACE:{namespace}:DSUS:IMAGE | Create |
| Check DS Status | NAMESPACE:{namespace}:DSUS:IMAGE | Read |
| Patch existing image version | NAMESPACE:{namespace}:DSM:SERVER | Create, Update |
| Check Image Version Availability on Armada | NAMESPACE:(namespace):DSM:CONFIG | Read |
To set up a Dedicated Server Manager, the first thing you have to do is upload your dedicated server. To do so, make sure you have fulfilled the following requirements:
You can upload a new server using our DS Uploader. Before uploading a server for the first time, you’ll have to create an IAM client for DS Uploader with the following permissions:
NOTE
You only need to create an IAM Client for DS Uploader the first time you use it to upload a server.
To upload a DS uploader, follow the steps below:
In the Admin Portal, open the desired game namespace, then go to the Dedicated Server Management section and open the Configurations menu.

On the Configurations page, click the Upload Instructions button in the Image Server and Deployment panel.

Download the version of the dedicated server uploader that matches your operating system. Once completed, click Next.

On the Generate Command page, fill in the fields below with the data from the game server you’re uploading:
Fill the Version field with the version of the game server.
Fill the Command field with the game server’s executable command. This can be found inside the game server directory.
Fill the Local Path field with the game server’s local path. You can use either a relative or absolute path.
Fill the Artifact Directory field with the directory path where artifact files will be stored.
TIP
The directory path starts from your current directory server path.
Fill the S3 Directory field with the directory of your S3 bucket.
Fill the Deployment field with the deployment that will be used for this image server.
Select the Add Persistent Flag option if you don’t want this server to be deleted when the maximum number of servers is reached.
Select the Enable Debugging option if you want to install a package for debugging into the dedicated server image.
Select the Show Upload Progress option if you want the DS image upload progress to appear in your CLI.
Once completed, click Next.

A command that you can use to upload your game server will be automatically generated for you. Before you use this command, make sure you replace the client_id and client_secret with the Client ID and Client Secret of the IAM Client for your DS Uploader. Open the CLI in the folder that contains the DS Uploader and the game server, and run the command.

The command will contain multiple flags denoting the information you entered earlier. The flags and their meanings are listed below for reference:
| Flag | Shortcut | Description |
|---|---|---|
| --artifact string | -a | The directory path where artifact files will be stored. |
| --bucket string | -b | The name of your S3 bucket. |
| --command string | -c | The server’s executable command. |
| --s3dirname string | -d | The directory path of your S3 bucket. |
| --debug-enabled | Use this flag to install a debugging package into the server. | |
| --default-image | Use this flag to make this server the default server image. | |
| --deployment string | Deployment that will be used for this image server | |
| --hostname string | -H | The hostname path of the platform. |
| --id string | -i | The IAM Client ID of your DS Uploader. |
| --namespace string | -n | The namespace of your game. |
| --path string | -p | The local path of the game server. |
| --persistent | Use this flag to make the server persistent. Persistent servers aren’t deleted when the server limit is reached. | |
| --secret string | -s | The IAM Client Secret of your DS Uploader. |
| --show-progress | Use this flag to make the server image upload appear in your CLI during the upload. | |
| --version string | -v | The game server version. |
You can also view this information in your CLI by using the “<ds-uploader>.exe --help” command.
Follow the steps below to upload the file from your local computer to the Docker registry.
Execute this command to upload the file from your local computer to the Docker registry.
Command
call windows-amd64.exe syncFolder --hostname=%HOSTNAME% --namespace=%NAMESPACE% --id=%CLIENT_ID% --version=%VERSION% --command=%DS_STARTUP_COMMANDFILE% --path=%SERVER_PATH% --bucket=%S3_BUCKETNAME% --s3dirname=%S3_DIRECTORY%
Example
call windows-amd64.exe syncFolder --hostname=https://demo.accelbyte.io --namespace=myawesomegame --id=87bc17a36a62482aa46c14412922aa2c --version=0.0.1 --command=myawesomegame_server.x86_64 --path=D:\Project\Games\GameServer --bucket=justice-ds-upload-service-demo --s3dirname=myawesomegame_0.0.1
NOTE
If you have a space on your argument, you need to add quotes to your argument.
If you want to use a command with a flag, follow this execution command.
call windows-amd64.exe syncFolder --hostname=https://demo.accelbyte.io --namespace=myawesomegame --id=87bc17a36a62482aa46c14412922aa2c --version=0.0.1 --command=myawesomegame_server.x86_64 --path=D:\Project\Games\GameServer --bucket=justice-ds-upload-service-demo --s3dirname=myawesomegame_0.0.1
If you want to use the command using the shortcut, follow this execution command.
call windows-amd64.exe syncFolder -H "https://demo.accelbyte.io" -n "myawesomegame" -i "87bc17a36a62482aa46c14412922aa2c" -v "0.0.1" -c "myawesomegame_server.x86_64" -p "D:\Project\Games\GameServer" -b "justice-ds-upload-service-demo" -s "myawesomegame_0.0.1"
When the upload is finished, the console will return an output containing parameters that you need to input to configure your Dedicated Server in the Admin Portal.
Use the function below to enable DS login with client credentials.
Make sure you set up all this function when on the dedicated server scene or level. And the function is only called by the server, not the client.
Register your Local Dedicated Server to the DSM.
After that, if any match request is received, the Dedicated Server will accept the connections from game clients and will be able to start the match.
After the match finished. You need to make sure the Dedicated Server is no longer registered in the Dedicated Server Management, call this function to deregister the Dedicated Server.
Make sure when you call this function, you are already on the server side functionality not client side.
Register your Managed Dedicated Server to the DSM.
Wait until the DS gets a session. The DS should wait for a player to try to connect to the DS.
This function can be used to let the DS retrieve the session ID. If the session ID is empty, this indicates that the DS doesn’t have a session yet.
Your managed dedicated server can be shut down automatically using this function.
Make sure the player is logged in.
Call this function to request the Lobby service to start matchmaking. We provide a unique DS name to make sure that the player will connect to the local DS. An empty server name means the DSM will create an instance of a managed DS.
Wait for the Lobby service to send a notification that a match has been found. After you successfully found a match we suggest you save the match id to a variable that then you can use again if needed.
The Lobby service will notify the game client that the player is ready to join the match using this function.
Wait for the DS to get the match details from the Lobby service. Then, connect to the DS using those details.
Make sure the player is logged in.
Use the GetServerLatencies function to get the latencies from each region. This will return an array of pairs of regions and latency in ms.
Use the array of latencies when you call the StartMatchmaking function.
Wait for the Lobby service to send a notification that a match has been found.
Notify the game client that the player is ready to join the match using this function.
Wait for the DS to get the match details from the Lobby service. Then, connect to the DS using those details.
You can call the below function to send more information related to your party attributes. The client will send the party information and the server will retrieve all information when all party or player success opens the server. to send more information about the party to the server and client will send all that information.
You will see here how the client will call start matchmaking by sending the party attributes, so then the server will get all that information about the party attributes later for your custom logic on the server if needed.
Make sure the player is logged into the game.
Connect to the Lobby service and request matchmaking with the Party attributes parameter.
After that, you can follow the same steps as you would making other matchmaking requests.
You will get more information about the status of the party matchmaking by using the below function. You will need all this information to set up your custom statistic when the game is starting.
Make sure the DS is authenticated and registered in the DSM.
You need to call this query function to get the status and all information about the matchmaking.
The Dedicated Server will automatically shut down after a period of time when it has been claimed but contains no active players. You can also set a delegate when the auto shutdown is called using the SetOnAutoShutdownResponse(). If the auto shutdown fails, the error will be sent to SetOnAutoShutdownErrorDelegate(), as shown below.
Before using the DS Log Manager service from the SDK, you will need to initialize your server-side SDK to make you authorized and able to perform create, read, update, and delete actions.
Before using the DS Log Manager service from the Golang SDK, you will need to initialize the SDK by following the steps below:
Once completed, you can use the Golang SDK to access DS Log Manager (opens new window) services from your serverless app.
Before using the DS Log Manager service from the Python SDK, you will need to initialize the SDK by following the steps below:
Once completed, you can use the Golang SDK to access DS Log Manager (opens new window) services from your serverless app.
Before using the DS Log Manager service, you will need to set some permissions. Use the following .NET namespaces:
    using AccelByte.Sdk.Api.Dslogmanager.Model;
    using AccelByte.Sdk.Api.Dslogmanager.Operation;
    using AccelByte.Sdk.Api.Dslogmanager.Wrapper;
Before using the DS Log Manager service, you will need to set some permissions. Initialize the TerminatedServers wrapper from the DS Log Manager service using the following code:
TerminatedServers wTerminatedServers = new TerminatedServers(sdk);
Once completed, you can use the SDK to create, read, update, or delete logs.
To check dedicated server logs (opens new window), use the following function.
To retrieve all terminated server (opens new window), use the following function.
To download dedicated server logs (opens new window), use the following function.
Before using the DSM Controller service from the SDK, you will need to initialize your server-side SDK to make you authorized and able to perform create, read, update, and delete actions.
Before using the DSM Controller service from the Golang SDK, you will need to initialize the SDK by following the steps below:
Once completed, you can use the Golang SDK to access DSM Controller (opens new window) services from your serverless app.
Before using the DSM Controller service from the Python SDK, you will need to initialize the SDK by following the steps below:
Once completed, you can use the Golang SDK to access DSM Controller (opens new window) services from your serverless app.
Before using the DSMC service, you will need to set some permissions. Use the following .NET namespaces:
using AccelByte.Sdk.Api.Dsmc.Model;
using AccelByte.Sdk.Api.Dsmc.Operation;
using AccelByte.Sdk.Api.Dsmc.Wrapper;
Before using the DSMC service, you will need to set some permissions. Initialize the Session wrapper from the DSMC service using the following code:
net.accelbyte.sdk.api.dsmc.wrappers.Session wSession = new net.accelbyte.sdk.api.dsmc.wrappers.Session(sdk);
Once completed, you can use the SDK to create, read, update, or delete DSMCs.
Use the following function to create a game session (opens new window):
Use the following function to claim a dedicated server (opens new window):
Use the following function to retrieve a session (opens new window):
← Matchmaking Armada →
